Expert Quarter Glass Replacement for Land Rover LR3 (Discovery 3) 2005-2009
The Land Rover LR3, globally recognized as the Discovery 3 and produced between 2005 and 2009, is celebrated for its rugged off-road capabilities paired with a luxurious, incredibly airy interior cabin. A defining feature of this iconic British SUV is its stadium seating, stepped roofline, and expansive greenhouse design, which relies heavily on the large, distinctively shaped rear quarter glass. When this specific piece of auto glass is shattered—whether from an errant rock kicked up on a remote trail or an unfortunate urban break-in—it immediately compromises the vehicle's security, climate control, and structural integrity. Unlike a standard sedan, the LR3's rear quarter glass is a complex, encapsulated panel that forms a major part of the vehicle's rear architecture. Replacing it is not a simple DIY project; it demands the exacting precision of a Master Technician.
Because the quarter glass on the 2005-2009 Land Rover LR3 is constructed from tempered safety glass, an impact does not just cause a crack; it causes the entire panel to shatter into thousands of small, granular chunks. As a senior auto glass technician, I have seen firsthand how these shards can infiltrate the deep crevices of the LR3's cargo area, folding seats, and interior trim panels. Addressing this requires more than just pasting in a new piece of glass; it requires a meticulous, multi-stage restoration process to bring your premium SUV back to factory standards.
Our Master Technician A-to-Z Replacement Process
Replacing the quarter glass on a Land Rover Discovery 3 is a highly technical procedure. At AlexWindshield, we follow a strict, factory-approved protocol to ensure the utmost safety, perfect fitment, and a guaranteed watertight seal. Here is our detailed, step-by-step methodology:
Step 1: Thorough Damage Assessment and Interior Protection
Before any tools are lifted, we begin by protecting your vehicle. The Land Rover LR3 features premium interior materials that must be safeguarded. We lay down heavy-duty protective drop cloths over the cargo area, the rear stadium seats, and the exterior paintwork surrounding the quarter panel. We tape off the surrounding exterior edges with specialized automotive masking tape to ensure our cutting tools never make contact with your vehicle's clear coat.
Step 2: Rigorous Vacuuming of Shattered Glass Shards
Because tempered quarter glass shatters entirely upon impact, the first major technical hurdle is containment and cleanup. We utilize high-powered industrial vacuums to extract all broken glass shards from the vehicle's interior. We meticulously vacuum the rear cargo carpet, the tracks of the third-row seating, and the seatback folds. Leaving even a single piece of glass behind can cause rattles, damage the interior trim, or pose a safety hazard to your passengers.
Step 3: Removal of Rear Cargo Trim and Paneling
To properly access the mounting points and the pinch weld of the LR3's quarter glass, we must carefully remove the interior cargo trim panels and the D-pillar moldings. Using specialized nylon pry tools, we unclip the robust Land Rover interior panels without scratching the plastics or breaking the fragile retention clips. This step is crucial because shattered glass often falls deep behind these interior panels. Once the panels are removed, we perform a secondary vacuuming deep within the vehicle's body cavity to ensure absolutely all debris is eliminated.
Step 4: Precision Extraction of the Old Glass and Urethane Bead
Even though the center of the glass may be shattered, the encapsulated edges and the original factory polyurethane bead remain firmly bonded to the vehicle's frame. Utilizing advanced wire-cutting systems and cold knives, we carefully slice through the incredibly tough factory urethane. This is a delicate process; the LR3 has complex curves near the rear tailgate and the Alpine roofline. Once the remaining glass frame is removed, we use sharp urethane paring tools to trim the old adhesive bead down to a uniform 1 to 2 millimeters, creating the perfect foundation for the new adhesive to bond to.
Step 5: Surface Cleaning and Pinch Weld Preparation
A flawless installation relies entirely on preparation. We clean the trimmed urethane bead and the surrounding exposed metal pinch weld using a specialized, alcohol-based glass cleaner and lint-free wipes. All dirt, moisture, and fine glass dust must be completely eradicated. If our tools exposed any bare metal on the pinch weld during the removal process, we meticulously treat those specific areas to prevent any future oxidation. Rust prevention is a mandatory step in our auto glass replacement process.
Step 6: Application of Advanced Glass Primer
We apply a high-quality, scientifically formulated black glass primer to the newly cleaned pinch weld and to the encapsulated bonding edge of the new Land Rover LR3 quarter glass. This primer serves a dual purpose: it acts as a bonding agent that activates the urethane adhesive, and it acts as a UV barrier, preventing the sun's rays from degrading the adhesive over time. The primer must be allowed to flash off and dry completely, a process we monitor under strict timing.
Step 7: Applying the High-Quality Urethane Adhesive
With the surfaces primed and prepped, we load our specialized electric caulking guns with premium, OEM-grade, fast-curing urethane adhesive. We apply a continuous, V-shaped bead of urethane around the entire perimeter of the LR3's pinch weld. The height and width of this bead must be perfectly consistent to ensure the heavy, encapsulated quarter glass sits at the exact factory depth, aligning flush with the surrounding body panels and the adjacent rear door.
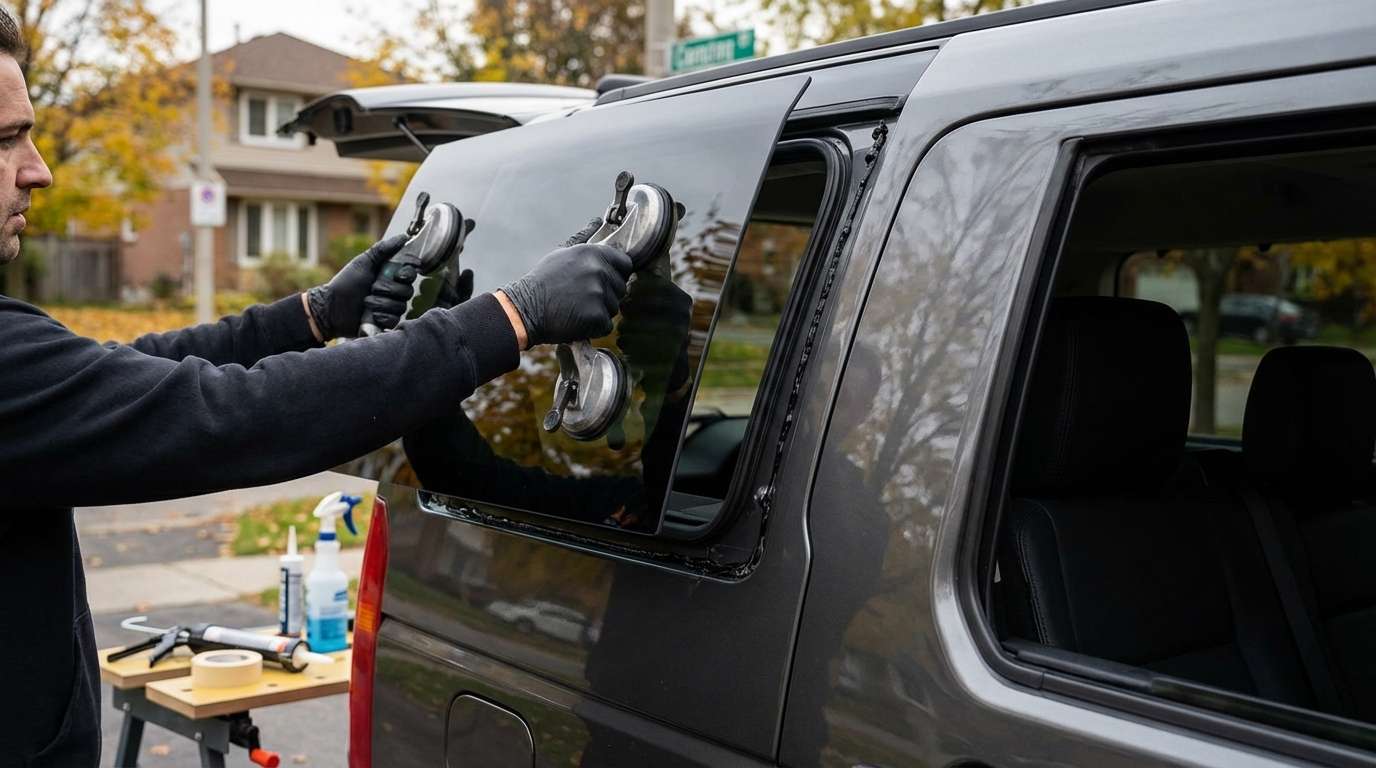
Step 8: Installation and Setting of the New Quarter Glass
Using heavy-duty suction cups and an expert touch, we carefully lift the new LR3 quarter glass into position. This is where experience truly matters. The glass must be aligned perfectly on the first attempt to avoid smearing the urethane bead. We gently press the glass into the adhesive, ensuring a uniform, watertight seal around the entire perimeter. We then use specialized retention tape to hold the heavy glass panel securely in place while the urethane begins its initial chemical curing process.
Step 9: Reassembly, Final Polish, and Curing Time
While the adhesive cures, we begin the reassembly process. We carefully reinstall the D-pillar trim and the interior cargo paneling, securing all clips to factory specifications. We perform a final interior vacuum to ensure absolute cleanliness, followed by a thorough cleaning of the newly installed quarter glass using streak-free automotive glass cleaner. Finally, we advise the vehicle owner on the Safe Drive-Away Time (SDAT), ensuring the urethane has cured sufficiently to meet strict federal safety standards before the vehicle returns to the road.
Premium Mobile Auto Glass Services Across the Greater Toronto Area (GTA)
Driving a premium vehicle like the Land Rover LR3 means you shouldn't have to compromise your schedule to get a premium repair. At AlexWindshield, we bring the auto glass shop directly to your driveway, office, or workplace. We understand that driving with a shattered quarter glass is dangerous and exposes your interior to the unpredictable Canadian weather.
That is why we offer comprehensive mobile auto glass replacement services across the Greater Toronto Area (GTA). Whether you are navigating the busy commercial districts of Vaughan, parked at a suburban residence in Richmond Hill, or working out of an office complex in Markham, our fully equipped mobile service vans will come to you. We carry all the specialized tools, heavy-duty vacuums, and premium materials required to perform a factory-quality replacement right on the spot. Our Master Technicians are intimately familiar with the unique climate challenges of the GTA, utilizing temperature-adaptive urethane adhesives that cure safely and efficiently, whether it is a humid summer afternoon in Markham or a crisp autumn morning in Richmond Hill.
Why Trust AlexWindshield for Your Land Rover LR3 Glass Needs?
When it comes to specialized British SUVs like the Land Rover Discovery 3, generic auto glass solutions simply do not cut it. The vehicle's rugged capability and high-end acoustic insulation rely heavily on perfectly installed auto glass. Here is why AlexWindshield stands out as the premier choice in the GTA:
- Unmatched Technical Expertise: As Master Technicians, we understand the specific nuances of the 2005-2009 LR3 architecture, from the encapsulated moldings to the intricate interior trim panels.
- OEM-Quality Materials: We use only industry-leading glass, primers, and rapid-cure urethanes to ensure your vehicle is structurally sound and absolutely leak-proof.
- Comprehensive Debris Removal: We don't just replace the glass; we meticulously vacuum every broken glass shard from your vehicle's interior and body panels, ensuring the safety of your passengers.
- Unbeatable Convenience: Our mobile units deliver expert service directly to your location in Vaughan, Richmond Hill, Markham, and throughout the GTA, saving you time and towing fees.
- Lifetime Warranty: We stand confidently behind our craftsmanship. Every replacement we perform is backed by an industry-leading Lifetime Warranty against leaks, wind noise, and manufacturer defects.
Do not let a shattered quarter glass compromise the safety, security, and aesthetic appeal of your Land Rover LR3. Trust the seasoned experts who understand the anatomy of your vehicle inside and out. Contact AlexWindshield today to schedule your mobile auto glass replacement, and experience the ultimate standard of precision, convenience, and peace of mind in the Greater Toronto Area.


