Restoring the Iconic Split Tailgate: Expert Back Glass Replacement for Your Land Rover LR3 (Discovery 3)
The Land Rover LR3, globally revered as the Discovery 3, revolutionized the luxury off-roading landscape between 2005 and 2009. With its legendary Terrain Response system, stadium seating, and distinctive asymmetric split tailgate, this vehicle was engineered to conquer both rugged mountain trails and sophisticated urban environments. However, the LR3's iconic rear profile is heavily reliant on its expansive upper tailgate glass. When this specialized back glass shatters—whether due to a stray rock on a remote trail, extreme temperature fluctuations, or an unfortunate break-in—your premium SUV is instantly compromised. The elements, security risks, and lack of visibility demand immediate, professional intervention.
At AlexWindshield, we understand that a premium British SUV requires a premium, uncompromising repair process. Replacing the rear window on a 2005-2009 Land Rover LR3 is not a generic job; it requires deep technical knowledge of Land Rover's unique upper tailgate mechanics, specialized tools, and a meticulous approach to safety. As Master Technicians, we don't just replace glass—we restore the structural integrity and aesthetic perfection of your Discovery 3.
Local Auto Glass Excellence Across the Greater Toronto Area
Driving a Land Rover means you appreciate quality, and when it comes to auto glass repair, you shouldn't have to settle for less. AlexWindshield is proud to be the premier provider of mobile auto glass services across the Greater Toronto Area (GTA). We know that a shattered rear window disrupts your daily schedule, which is why we bring our state-of-the-art mobile service directly to your driveway, office, or dealership.
Our dedicated mobile units are fully equipped to perform complex back glass replacements in specific local hubs, including:
- Vaughan: Providing rapid, on-site glass restoration for suburban commuters and off-road enthusiasts alike.
- Richmond Hill: Delivering precision installations with OEM-quality glass to match the high standards of local luxury vehicle owners.
- Markham: Ensuring secure, weather-tight seals and meticulous glass cleanup for families relying on their LR3 for daily transport.
No matter where you are situated in the GTA, our Master Technicians arrive with the right glass, the best adhesives, and the technical expertise required to service your exact 2005-2009 Land Rover LR3.
The Technical Complexity of the 2005-2009 Land Rover LR3 Rear Glass
The upper tailgate of the LR3 presents specific challenges that elevate it above a standard back glass replacement. This particular model year features a heavy-duty, curved tempered glass pane that houses an integrated defroster grid and accommodates the rear wiper assembly. Because the glass is tempered, a significant impact will cause it to explode into thousands of granular pieces rather than cracking in a spider-web pattern. These shards infiltrate the cargo area, the split tailgate mechanism, and the interior door panels, making rigorous cleanup just as critical as the installation itself.
Step-by-Step Back Glass Replacement Process for the Land Rover LR3
At AlexWindshield, we adhere to a strict, A-to-Z replacement protocol that guarantees safety, longevity, and a factory-finish appearance. Here is the detailed technical process our Master Technicians execute for your Land Rover LR3 back glass replacement:
Phase 1: Comprehensive Damage Assessment and Interior Protection
The moment our mobile unit arrives, the technician evaluates the extent of the damage. Since tempered glass shatters violently, the first priority is protecting your vehicle's luxurious interior.
- We apply heavy-duty protective crash wrap over the damaged window area to prevent loose shards from falling during the initial assessment.
- Thick, industrial-grade drop cloths are draped over the rear cargo area, the folded third-row seats, and the exterior rear bumper to protect the LR3's premium leather and paintwork from scratches and debris.
- Technicians don specialized cut-resistant gloves and safety glasses to handle the hazardous materials safely.
Phase 2: Upper Tailgate Disassembly and Component Removal
Before any glass is removed or installed, the hardware attached to the back window must be carefully dismantled. The Discovery 3 has specific wiring and mechanical components integrated into the upper tailgate.
- Wiper Assembly Removal: The exterior rear wiper arm is unbolted, and the internal wiper motor mechanism is carefully detached from its mounting points.
- Interior Trim Removal: Using non-marring specialized pry tools, the technician carefully removes the plastic interior trim panels of the upper tailgate. This exposes the wiring harness and the inner structural frame.
- Electrical Disconnection: The wiring connectors for the rear defroster grid and the high-mount third brake light are delicately unplugged to prevent any electrical shorts or damage to the vehicle's harness.
Phase 3: Meticulous Glass Extraction and Shard Cleanup
This phase separates standard glass shops from Master Technicians. When a back glass shatters, thousands of tiny, razor-sharp pieces of tempered glass fall into the tailgate cavity and cargo hold.
- The remaining jagged pieces of glass still attached to the window frame are carefully extracted using specialized pliers and locking tools.
- Deep Vacuuming Protocol: We utilize an industrial-strength HEPA vacuum to meticulously extract every broken glass shard from the vehicle's interior. We vacuum the cargo carpet, the seat crevices, and most importantly, deep inside the internal cavity of the tailgate door panels. Leaving glass inside the door panel will cause a persistent, irritating rattling noise whenever you drive your LR3.
- The old urethane bead holding the original glass is then expertly sliced away using a specialized cold knife or wire cutting system, ensuring the underlying pinch weld metal is never scratched.
Phase 4: Pinch Weld Preparation and Priming
The structural integrity of your new back glass relies entirely on the quality of the chemical bond between the glass, the urethane, and the vehicle's frame. Proper preparation is non-negotiable.
- The old urethane track is trimmed down to a precise, uniform base of 1-2 millimeters. This acts as a foundation for the new adhesive.
- The entire pinch weld (the metal frame where the glass sits) is rigorously cleaned with an alcohol-based, lint-free chemical prep solution to remove dirt, grease, and microscopic debris.
- Primer Application: A high-performance, anti-corrosive black primer is applied to any exposed bare metal on the pinch weld to prevent future rust. Simultaneously, the frit band (the black painted edge) of the new OEM-quality back glass is treated with a glass activator and primer to ensure maximum adhesion.
Phase 5: Urethane Adhesive Application and Glass Installation
With the LR3 and the new glass perfectly prepped, we move to the critical bonding phase.
- We apply a continuous, V-shaped bead of premium, high-viscosity, fast-curing automotive urethane around the entire perimeter of the pinch weld. This specialized urethane meets or exceeds all federal motor vehicle safety standards (FMVSS).
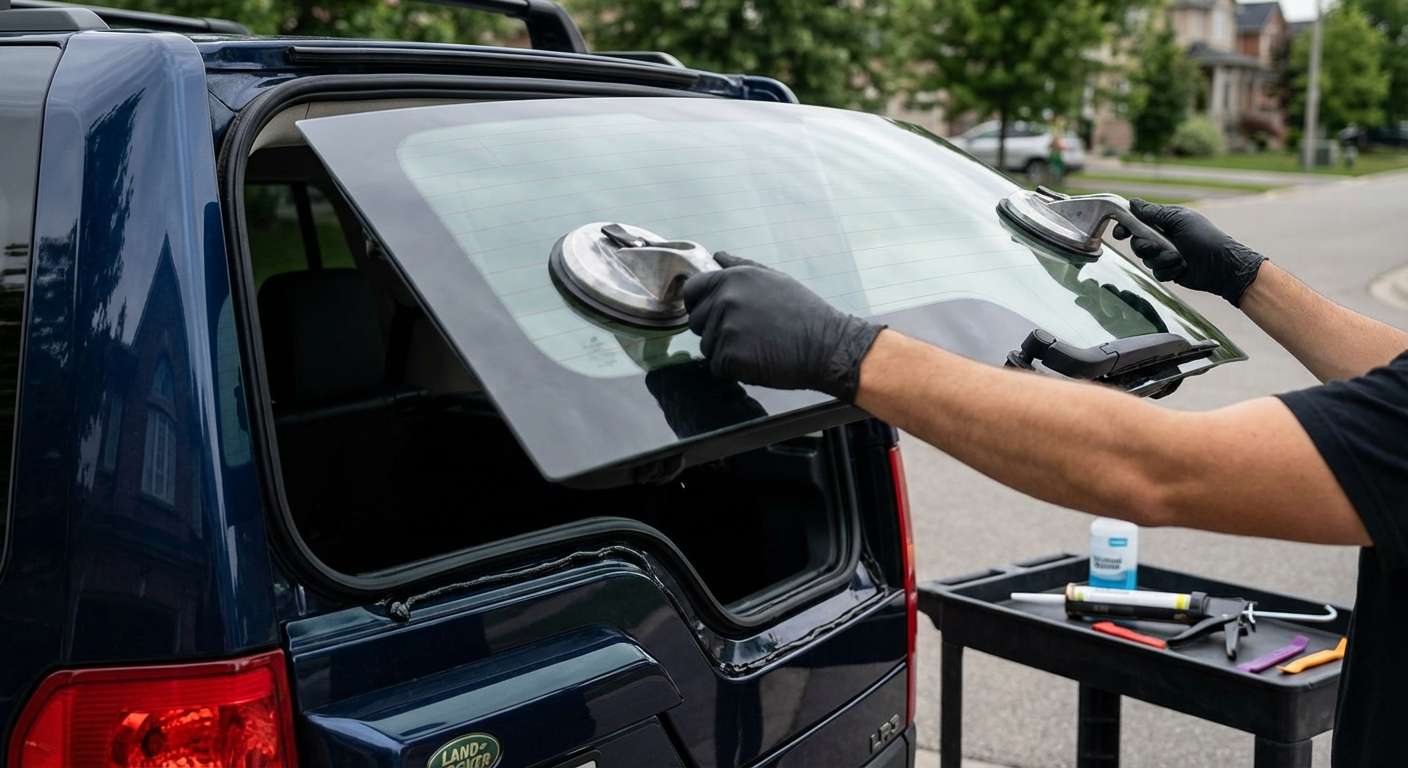
- Using heavy-duty suction cups, two Master Technicians carefully lift the new, curved Land Rover back glass and precisely align it with the tailgate frame.
- The glass is gently pressed into the wet urethane, ensuring a uniform, weather-tight, and airtight seal that matches the original factory specifications. Retention tape is temporarily applied to hold the glass perfectly in place while the chemical curing process begins.
Phase 6: Reassembly, Testing, and Final Cleanup
The final phase ensures your Discovery 3 is fully functional and looks exactly as it did before the damage occurred.
- The electrical connections for the rear defroster are securely reattached to the new glass terminals.
- The rear wiper motor and the exterior wiper arm are reinstalled and calibrated to ensure perfect sweeping motion without striking the edges of the window frame.
- The interior tailgate trim panels are snapped firmly back into place.
- We conduct a comprehensive systems test: checking the defroster circuit, the wiper function, and the third brake light.
- A final, obsessive interior vacuum is performed, followed by a streak-free cleaning of the new back glass using premium automotive glass cleaner.
Trust AlexWindshield: The GTA's Premier Mobile Auto Glass Experts
Replacing the back glass on a sophisticated vehicle like the 2005-2009 Land Rover LR3 demands precision, patience, and professional expertise. Do not trust your luxury SUV to cut-rate shops that skip crucial steps like interior panel shard vacuuming or anti-corrosion priming.
At AlexWindshield, we pride ourselves on delivering unparalleled craftsmanship directly to your door. Whether you are navigating the busy streets of Vaughan, parked at a corporate office in Markham, or relaxing at home in Richmond Hill, our mobile auto glass replacement service ensures your vehicle is repaired safely and efficiently.
We stand confidently behind our Master Technicians, which is why every back glass replacement we perform is backed by our comprehensive Lifetime Warranty against leaks, wind noise, and workmanship defects. When you choose AlexWindshield, you are choosing enduring safety, crystal-clear visibility, and the ultimate peace of mind for your Land Rover LR3. Contact us today to schedule your mobile auto glass replacement and get back on the road—or the trail—with total confidence.


