The Land Rover Discovery 5 Back Glass: Precision Replacement for an Iconic Design
The Land Rover Discovery 5 (2017-2027) is instantly recognizable by its distinctive, asymmetrical rear license plate housing—a bold design choice that wraps seamlessly around an expansive, technologically advanced back glass. When you pilot a luxury SUV engineered for both rugged off-road trails and the sophisticated streets of the city, a shattered or heavily damaged rear windshield is much more than a cosmetic eyesore. It compromises your vehicle's structural integrity, exposes your luxurious interior to the elements, and disables crucial integrated defroster systems. As a senior Master Technician at AlexWindshield, I have seen firsthand how the unique tailgate structure of the Discovery 5 requires specialized automotive glazing expertise. Standard, rushed replacements simply will not suffice for a vehicle of this caliber.
Unlike laminated front windshields that crack upon impact, the rear glass of your Land Rover Discovery 5 is made of tempered glass. When compromised, it is designed to shatter into thousands of granular pieces to prevent deep lacerations. While this is an essential safety feature, it creates an absolute mess inside your premium cargo area and deep within the intricate mechanisms of your tailgate. Choosing the right experts for your Land Rover Discovery 5 back glass replacement ensures not only a flawless visual finish but also the restoration of your vehicle's quiet, secure, and climate-controlled cabin.
Why the Discovery 5 Requires Specialized Rear Glass Replacement
Replacing the back glass on a modern Land Rover is a highly technical procedure. The rear glass serves as a mounting point for the rear wiper assembly, houses complex thermal heating grids for defrosting, and integrates seamlessly with the vehicle's aerodynamic spoiler and third brake light assembly. At AlexWindshield, our Master Technicians approach this sophisticated system with unparalleled precision. We utilize only OEM-equivalent high-quality auto glass that matches the exact curvature, tint, and electrical specifications of your original factory glass.
A-to-Z Technical Process: How We Replace Your Discovery 5 Back Glass
We pride ourselves on transparency and technical excellence. Below is the strict, step-by-step standard operating procedure our certified technicians follow to restore your Land Rover Discovery 5 to factory condition.
Step 1: Pre-Installation Inspection and Interior Protection
Before any tools are lifted, we conduct a comprehensive assessment of the damage. Because tempered glass shatters explosively, shards typically scatter across the rear cargo area, into the rear seats, and all over the exterior bumper. We begin by meticulously applying protective drop cloths and specialized taping mechanisms over your Land Rover's premium leather seating, carpets, and painted bumper surfaces. This crucial first step ensures that our tools, adhesives, and the remaining glass shards do not cause secondary damage to your luxury SUV.
Step 2: Tailgate Panel Removal and Exhaustive Vacuuming
This is arguably the most critical step in a back glass replacement, particularly for a luxury vehicle where cabin acoustics are paramount. We carefully unclip and remove the interior plastic tailgate panels, trim pieces, and the rear wiper motor assembly. Once the inner mechanics of the liftgate are exposed, we deploy industrial HEPA-filter vacuums. We meticulously vacuum all broken glass shards from the vehicle's interior, including deep within the tailgate cavity, the cargo tracks, and the weather seals. Failing to remove every hidden piece of glass will result in maddening rattling noises every time you close the tailgate or drive over a bump. Our intensive cleanup process guarantees a silent, rattle-free ride.
Step 3: Precision Removal of the Old Urethane Seal
With the shattered glass fully cleared and the electronic harnesses safely disconnected, we turn our attention to the vehicle's pinch weld (the metal frame that holds the glass). Using specialized cold knives and advanced wire-cutting extraction tools, we carefully slice through the remaining original factory urethane. We trim the old adhesive bead down to a uniform 1-2 millimeters. This thin base layer of original urethane provides the optimal bonding surface for the new adhesive, while ensuring we never scratch the painted metal frame beneath it.
Step 4: Surface Cleaning and Anti-Corrosion Primer Application
Contamination is the enemy of a safe auto glass installation. We treat the entire perimeter of the pinch weld with highly specialized, alcohol-based chemical cleaners to remove all dirt, grease, and microscopic debris. If any bare metal is exposed during the cutting process, we immediately treat it with a high-performance auto glass primer. This black primer serves a dual purpose: it acts as a powerful anti-rust agent to prevent galvanic corrosion on your Land Rover's tailgate, and it promotes a molecular bond between the vehicle frame and the new urethane.
Step 5: Applying High-Quality Urethane Adhesive
With the surface prepped and primed, we prepare the new back glass. We clean the glass perimeter with a specialized glass activator to ensure maximum adhesion. Next, we utilize a premium, fast-curing, high-modulus urethane adhesive. Using an electric caulking gun, we apply a precise, continuous "V-bead" of urethane around the perimeter of the glass or pinch weld. This shape is engineered to compress perfectly, preventing any air pockets or weak spots that could lead to devastating water leaks or wind noise at highway speeds.
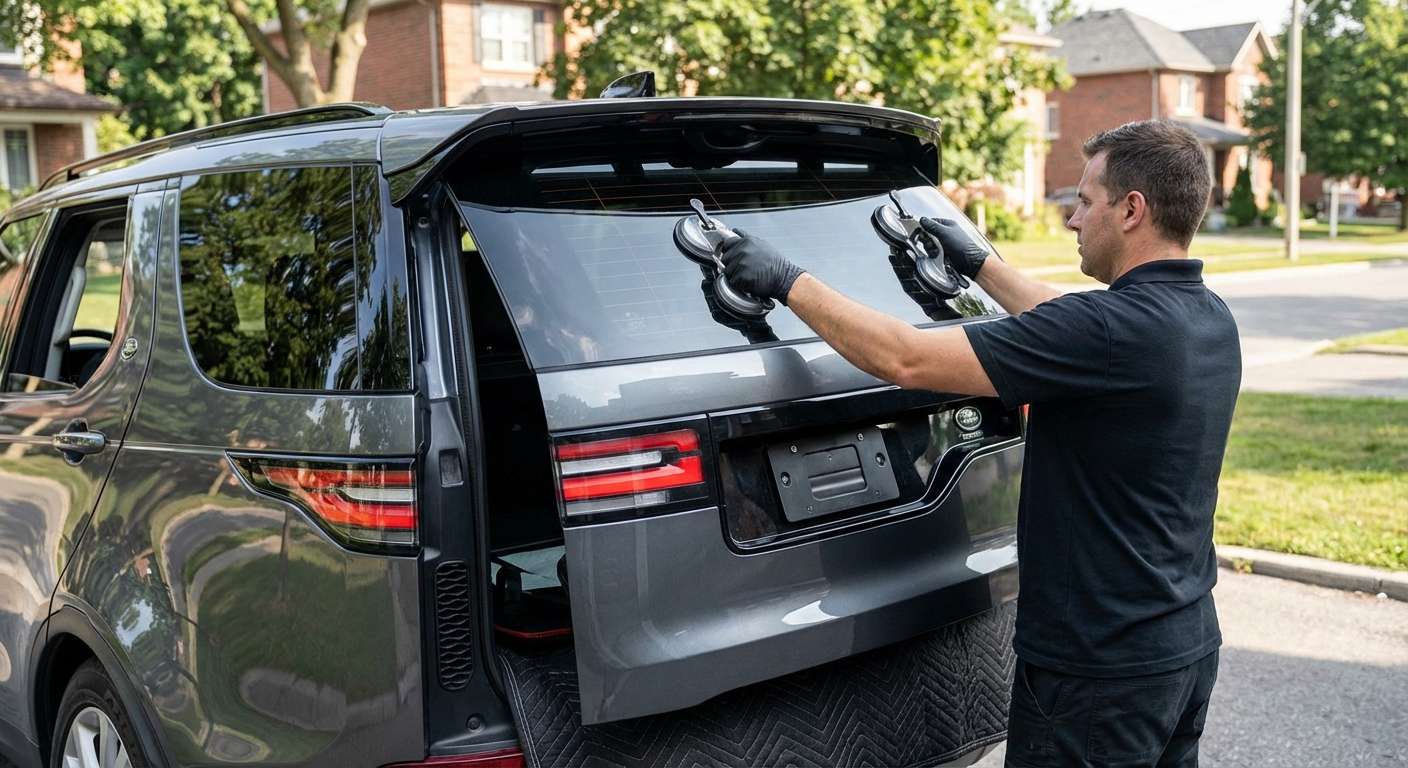
Step 6: Setting the Glass and Reconnecting Electronics
Timing and precision are critical in this phase. The new rear glass is carefully lifted and set into place. Because the Discovery 5 has a large and uniquely shaped back glass, we utilize heavy-duty suction cups and precise alignment markers to ensure the glass is perfectly centered before the urethane begins to cross-link and cure. Once the glass is set, we apply gentle, even pressure to bond the glass to the urethane bead. Immediately after setting, we meticulously reconnect the defroster terminals and reinstall the rear wiper motor, ensuring all electrical components communicate seamlessly with your Land Rover's computer system.
Step 7: Final Assembly and Secondary Cleanup
Once the glass is locked into place, we begin the reassembly process. All interior tailgate panels, plastic trims, and retaining clips are carefully reinstalled to factory specifications. We then perform a secondary, intensive vacuuming of the entire cargo area to catch any microscopic glass dust that may have settled during the installation. Finally, we clean the new rear glass with ammonia-free foaming glass cleaner, leaving you with a crystal-clear, factory-fresh finish. We then inform you of the Safe Drive Away Time (SDAT), ensuring the urethane has sufficiently cured before you hit the road.
Premium Mobile Auto Glass Services Across the Greater Toronto Area (GTA)
We understand that a shattered back window completely disrupts your daily schedule. Driving a vehicle with a missing rear glass in the unpredictable weather of the Greater Toronto Area (GTA) is not only highly uncomfortable but strictly unsafe. That is why AlexWindshield brings the repair shop directly to you with our fully equipped mobile service fleet.
- Vaughan: Whether you are running errands at Vaughan Mills or parked at a corporate office, our mobile technicians will arrive promptly to secure and replace your Discovery 5 back glass, saving you the hassle of a dangerous commute.
- Richmond Hill: If you wake up to a shattered tailgate window in your driveway, our Richmond Hill mobile response team will handle the full A-to-Z replacement right at your home, complete with our exhaustive glass cleanup protocol.
- Markham: From residential neighborhoods to busy tech parks in Markham, we provide on-site luxury auto glass replacement, allowing you to continue your workday uninterrupted while we restore your Land Rover.
Our mobile units are outfitted with the same advanced tools, climate-controlled urethane, and industrial vacuums found in our physical facilities, ensuring no compromises are made on quality, regardless of where the installation takes place.
The AlexWindshield Guarantee: Trust the Master Technicians
Your Land Rover Discovery 5 is an investment in unparalleled luxury and rugged capability. Do not entrust its structural integrity to just anyone. As a senior Master Technician at AlexWindshield, I stand behind every piece of glass we install. We are recognized as the premier experts for mobile auto glass services in the GTA, combining technical mastery with an unyielding commitment to customer convenience.
Because we use only top-tier materials and adhere to the strictest safety standards in the automotive glazing industry, every back glass replacement we perform is backed by our comprehensive Lifetime Warranty. This warranty guarantees that your new rear windshield will be completely free from water leaks, air whistles, and manufacturer defects for as long as you own the vehicle. When disaster strikes your back glass, trust the specialists who know your Land Rover inside and out. Contact AlexWindshield today for swift, professional, and flawless auto glass replacement.


