Restoring an Off-Road Legend: Land Rover Discovery 2 Back Glass Replacement
The 1999-2004 Land Rover Discovery 2 is an undeniable off-road icon, instantly recognizable by its stepped roofline, distinctive alpine windows, and the classic side-hinged rear Safari door. However, when the back glass of your Discovery 2 shatters—whether from a rogue branch on a secluded overland trail, shifting cargo inside the cabin, or unexpected vandalism—the rugged capability and interior security of your classic 4x4 are immediately compromised. As a Master Technician and Senior SEO Specialist at AlexWindshield, I understand that replacing the rear window on a Series II Discovery is far from a generic procedure. It requires an intimate understanding of British automotive engineering, dealing with the rear-mounted spare tire obstruction, and meticulously handling the complex defrosting matrix integrated into the glass.
Driving with a broken rear window exposes your vehicle's luxurious yet rugged interior to the unpredictable Canadian elements, significantly reducing the structural integrity of your Safari door. Moreover, because back glass is made of tempered safety glass, an impact causes it to instantly shatter into thousands of granular pieces. These tiny shards embed themselves deep into your cargo area, carpets, and the internal cavity of the rear door. That is why a professional, meticulous replacement process is mandatory to restore your Land Rover to its original factory condition.
The Importance of Professional Back Glass Replacement for Your Discovery 2
For the 1999-2004 Land Rover Discovery 2, the back glass is more than just a transparent barrier; it is a highly functional component of the vehicle's ecosystem. Here is why immediate, professional replacement is critical:
- Weather Intrusion and Rust Prevention: The rear aperture of a Discovery 2 is highly susceptible to water pooling if not properly sealed. A broken window allows moisture to seep into the tailgate electronics and interior floorboards, leading to devastating corrosion and electrical faults.
- Integrated Defroster Systems: The original rear glass features a highly sensitive electro-thermal grid designed to clear condensation and ice. A premium replacement ensures these connections are properly re-established for optimal winter visibility.
- Cabin Security and Climate Control: A shattered back glass renders your vehicle's HVAC system useless and leaves your valuable gear vulnerable to theft.
- Safety Hazard Mitigation: Tempered glass shards are sharp and notoriously difficult to clean. Without professional extraction, these shards can cause injury to passengers and pets, or jam the mechanical components of your rear door latch.
Our Master Technician Step-by-Step Replacement Process
At AlexWindshield, we do not cut corners. Our comprehensive back glass replacement process guarantees a factory-tight seal, flawless aesthetic restoration, and a completely hazard-free interior. Here is the detailed A-to-Z protocol we follow for every Land Rover Discovery 2 that comes into our care.
Step 1: Comprehensive Damage Assessment and Interior Protection
Before any physical work begins, we conduct a thorough inspection of the vehicle's rear end. The Discovery 2 features a unique side-opening Safari door, often carrying a heavy spare tire. If necessary, we temporarily unmount the spare tire to gain unimpeded access to the window frame. Next, we prioritize the protection of your vehicle's interior. We lay down heavy-duty protective drop cloths over the rear cargo area, fold-down jump seats, and exterior paintwork. Protective masking tape is applied around the window's pinch weld to ensure no scratch occurs on your classic Land Rover's exterior finish during the extraction process.
Step 2: Deep Interior Vacuuming and Safari Door Panel Removal
Because rear windows are constructed from tempered glass, a break results in thousands of small glass nuggets. Simply vacuuming the cargo floor is never enough. We systematically dismantle and remove the interior trim panels of the Safari door. By exposing the inner door cavity, we gain access to the hidden crevices where broken glass inevitably falls. Using high-powered, industrial-grade shop vacuums equipped with specialized micro-crevice tools, we extract every single shard of broken glass from the interior door cavity, the latch mechanisms, the cargo carpeting, and the rear wiper motor housing. This meticulous step prevents future rattling noises and ensures no hidden glass causes injury or mechanical binding down the line.
Step 3: Removing the Damaged Back Glass and Old Adhesive
With the interior completely safe and clear of debris, we turn our attention to the glass aperture. Using specialized cold knife tools and precision wire-cutting systems, we carefully slice through the original factory polyurethane bead that holds the remaining glass perimeter in place. We ensure that the rear wiper assembly and high-mounted brake light are safely bypassed or temporarily detached. Once the broken glass frame is removed, we utilize a razor scraper to pare down the old urethane adhesive, leaving a highly uniform, thin base layer (approximately 1-2 millimeters thick) on the pinch weld. This precise trimming provides the optimal bonding foundation for the new adhesive.
Step 4: Precision Surface Cleaning and Primer Application
A flawless seal requires an immaculately clean surface. We scrub the exposed pinch weld and surrounding frame using an alcohol-based, lint-free glass cleaner to remove dust, dirt, moisture, and residual oils. If any bare metal was exposed during the removal process—a common issue in older vehicles like the 1999-2004 Discovery 2—we immediately treat it with a high-performance, anti-corrosive metal primer. We then apply a specialized glass prep and urethane primer to the black ceramic frit band on the edge of the new replacement back glass. This chemical activator is absolutely crucial; it acts as a bonding agent that permanently marries the glass to the structural adhesive.
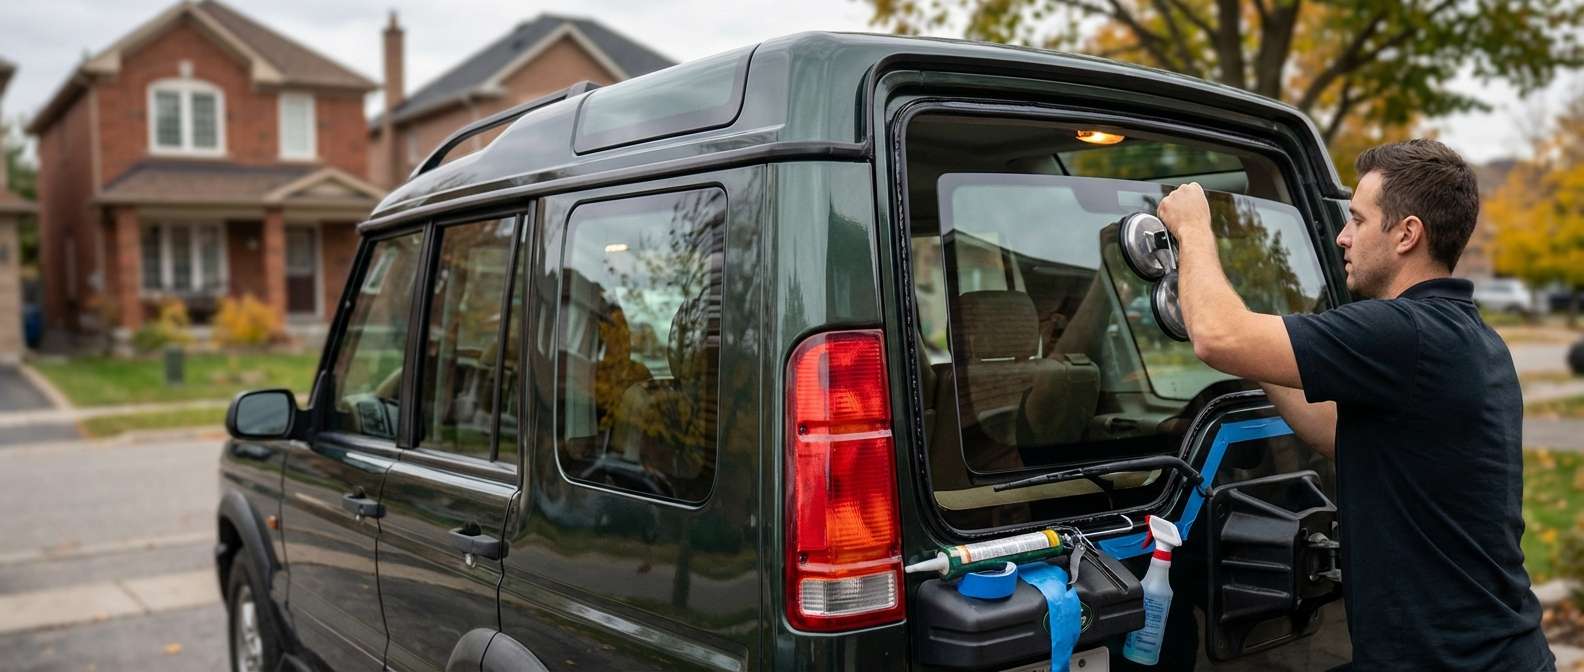
Step 5: High-Quality Adhesive Extrusion and Glass Installation
Once the primers have flashed and cured, we prepare our premium, OEM-grade polyurethane adhesive. Using an electric caulking gun, we apply a structurally engineered "V-bead" of urethane continuously around the vehicle's pinch weld. The V-bead ensures a tall, uniform ridge of adhesive that will compress perfectly without air bubbles or gaps. With the adhesive laid down, two technicians carefully lift the new Land Rover Discovery 2 back glass, aligning it perfectly with the Safari door's asymmetrical frame. We gently press the glass into the urethane, ensuring the depth and gaps are flush with the factory body lines. We then reconnect the rear defroster grid wiring harness and re-install the rear wiper motor assembly, testing all electrical connections to guarantee perfect functionality.
Step 6: Reassembly, Final Cleanup, and Quality Assurance
With the new glass firmly locked into place, we begin the reassembly phase. The interior Safari door panels are meticulously snapped and screwed back into their original factory positions. We conduct a secondary sweep with our vacuums to guarantee the cargo area is pristine. Finally, we clean the newly installed back glass with a streak-free, foaming glass cleaner. The vehicle then undergoes a strict Safe Drive-Away Time (SDAT) curing period, allowing the urethane adhesive to cross-link and harden, ensuring the structural integrity of the cabin is completely restored.
Premium Mobile Auto Glass Services Across the Greater Toronto Area (GTA)
Driving a classic Land Rover Discovery 2 in Ontario means dealing with extreme temperature fluctuations, from freezing winter snowstorms to blazing summer heat. These conditions demand that your auto glass is installed flawlessly to prevent thermal stress fractures and leaks. At AlexWindshield, we eliminate the hassle of bringing your vehicle to a shop by offering elite, fully equipped mobile auto glass services across the Greater Toronto Area (GTA).
We proudly deploy our master technicians directly to your driveway, office, or private garage. Our mobile fleet provides rapid, on-site back glass replacement services specifically targeted to key regions, including Vaughan, Richmond Hill, and Markham. Whether you are parked near the busy commercial hubs of Vaughan, residing in the quiet residential neighborhoods of Richmond Hill, or working in the high-tech sectors of Markham, our mobile units arrive fully stocked with the premium glass, heavy-duty vacuums, and climate-specific adhesives required to perform a factory-perfect installation right where you are.
Our Commitment to Quality: The AlexWindshield Lifetime Warranty
Your 1999-2004 Land Rover Discovery 2 deserves nothing but the absolute best in automotive care. Choosing the right technician is the difference between a leaky, noisy cabin and a perfectly sealed, quiet ride. At AlexWindshield, we don't just replace auto glass; we engineer a long-lasting, structural repair that respects the pedigree of your vehicle.
We stand firmly behind our craftsmanship. Every back glass replacement we perform comes backed by the comprehensive AlexWindshield Lifetime Warranty. This industry-leading guarantee covers you against any leaks, wind noise, or workmanship defects for as long as you own your vehicle. When you choose us, you are investing in absolute peace of mind, premium materials, and the unmatched expertise of dedicated auto glass professionals.
Do not let a shattered rear window keep your legendary off-roader off the streets. Trust the mobile experts at AlexWindshield to restore the safety, security, and iconic look of your Land Rover Discovery 2. Contact us today to schedule your mobile back glass replacement anywhere in the GTA!


