Restoring the Rugged Elegance of Your Land Rover Defender L663
The Land Rover Defender L663, spanning the 2020 to 2027 model years across the agile 90, the versatile 110, and the expansive 130 variants, represents the absolute pinnacle of modern off-road architecture. Masterfully blending go-anywhere capability with premium British luxury, one of the most striking visual elements of this resurrected icon is its unmistakable greenhouse design. The flush-mounted quarter glass—often integrated with the distinctive floating pillar or "signature graphic"—is not merely a window. It is a highly engineered structural and aesthetic cornerstone of the vehicle's unibody design. When this specialized glass sustains damage from a rogue trail rock, highway debris, or an unfortunate break-in, you cannot rely on a standard, rushed patch job. It requires a master technician's surgical touch to restore the factory-level integrity, acoustic dampening, and flawless waterproof seal of your Defender.
The Structural Complexity of Defender 90/110/130 Quarter Glass Replacement
Unlike vintage off-roaders that utilized simple rubber push-in gaskets, the modern L663 Land Rover Defender utilizes a highly advanced, urethane-bonded glazing system. The quarter glass on these luxury SUVs is precisely engineered to fit seamlessly into the complex aluminum monocoque framework. Depending on your specific model configuration, the quarter glass dimensions, integrated antennas, and hidden mounting points vary significantly. Furthermore, because automotive side and quarter windows are manufactured from tempered safety glass, an impact usually causes the entire pane to shatter into thousands of minuscule fragments. These sharp shards inevitably cascade into the cargo area, the intricate interior side panels, and deep into sub-floor compartments. A premium, SEO-optimized auto glass replacement service must address not only the precise structural bonding of the new glass but also the exhaustive, meticulous remediation of the vehicle's interior.
Our Master Technician Step-by-Step Quarter Glass Replacement Process
At AlexWindshield, we do not believe in shortcuts or temporary fixes. Replacing the quarter glass on a premium, highly engineered vehicle like the Land Rover Defender L663 demands a rigorous, highly technical approach. As senior auto glass specialists, we follow a strict A-to-Z protocol to ensure your vehicle is returned to its pristine, factory condition.
Step 1: Comprehensive Damage Assessment and Interior Protection
Before a single tool is lifted, our master technicians perform a thorough, multi-point inspection of the damaged area. We carefully assess the aluminum body panels and the signature floating pillar surrounding the quarter glass to ensure there are no hidden dents or deep paint scratches that could compromise the seating of the new glass. Because luxury vehicle interiors are highly susceptible to scuffs and damage during major repairs, we meticulously protect your Defender's cabin. We drape the premium leather seating, the rear cargo floor, and adjacent interior panels with heavy-duty, scratch-resistant protective blankets. Additionally, high-tack automotive masking tape is applied to the exterior paintwork surrounding the quarter glass aperture to prevent any accidental marring during the extraction process.
Step 2: Interior Trim Removal and Complete Glass Shard Extraction
When a quarter glass shatters, the resulting debris rarely stays confined to the window frame. The Defender’s interior features complex, tightly fitted C-pillar and D-pillar plastic trims, as well as carpeted cargo area side panels. Using specialized, non-marring trim removal pry tools, we carefully unclip and detach these interior panels to gain full, unhindered access to the inner structure of the window frame and the urethane bed. Once the panels are safely unfastened and stored, we employ high-powered, industrial-grade HEPA vacuums equipped with micro-crevice attachments to extract every single shard of broken glass. We methodically vacuum inside the deep interior body cavities, between the rear seat rails, and within the hidden trim channels. Ensuring absolutely zero glass remnants are left behind is a mandatory step; it prevents frustrating future interior rattles and protects passengers and pets from hidden safety hazards.
Step 3: Precision Removal of the Damaged Glass and Old Adhesive
With the interior safely exposed and completely cleaned, we commence the delicate removal of the remaining shattered quarter glass frame and the original factory adhesive. Because the Land Rover L663 features an advanced aluminum frame, extreme care must be taken to never gouge or scratch the underlying pinch weld. We utilize advanced wire-cutting induction tools and specialized auto glass cold knives to carefully slice through the dense factory polyurethane bead. This low-impact method allows us to detach the frame without applying any undue mechanical stress to the vehicle's body. Once the glass remnants are fully removed, we use a sharpened technician's paring chisel to level down the old urethane. We leave a perfectly even, 1-to-2 millimeter base layer of the original adhesive. This critical "trimming" step is vital because fresh, high-quality polyurethane bonds most effectively to a clean, tightly adhered layer of existing urethane.
Step 4: Pinch Weld Preparation and Surface Cleaning
A flawless, leak-proof installation relies entirely on the immaculate cleanliness of the mating surfaces. We treat the vehicle's aluminum pinch weld and the surrounding framework with an industry-grade, residue-free glass cleaner and a specialized surface prep solvent. This rigorous cleaning eliminates any accumulated dust, off-road mud, organic debris, or hand oils that could inhibit the chemical bonding process. If there are any microscopic abrasions or bare metal spots on the painted pinch weld exposed during the paring process, they are documented and immediately treated with an anti-corrosion primer to prevent any risk of future galvanic corrosion on the aluminum body.
Step 5: Advanced Primer Application
To guarantee an impenetrable, waterproof seal that meets and exceeds Land Rover's stringent factory specifications, we apply a high-performance, rapid-drying glass primer. The primer is applied via a specialized dauber directly to any bare spots on the pinch weld, as well as to the ceramic fret (the black painted band) on the interior perimeter of the new, OEM-equivalent quarter glass. This primer is not optional; it acts as a critical chemical bridge, actively promoting molecular adhesion between the glass surface, the aluminum frame, and the polyurethane adhesive. We allow the primer to flash and cure precisely according to the manufacturer's specific humidity and temperature guidelines.
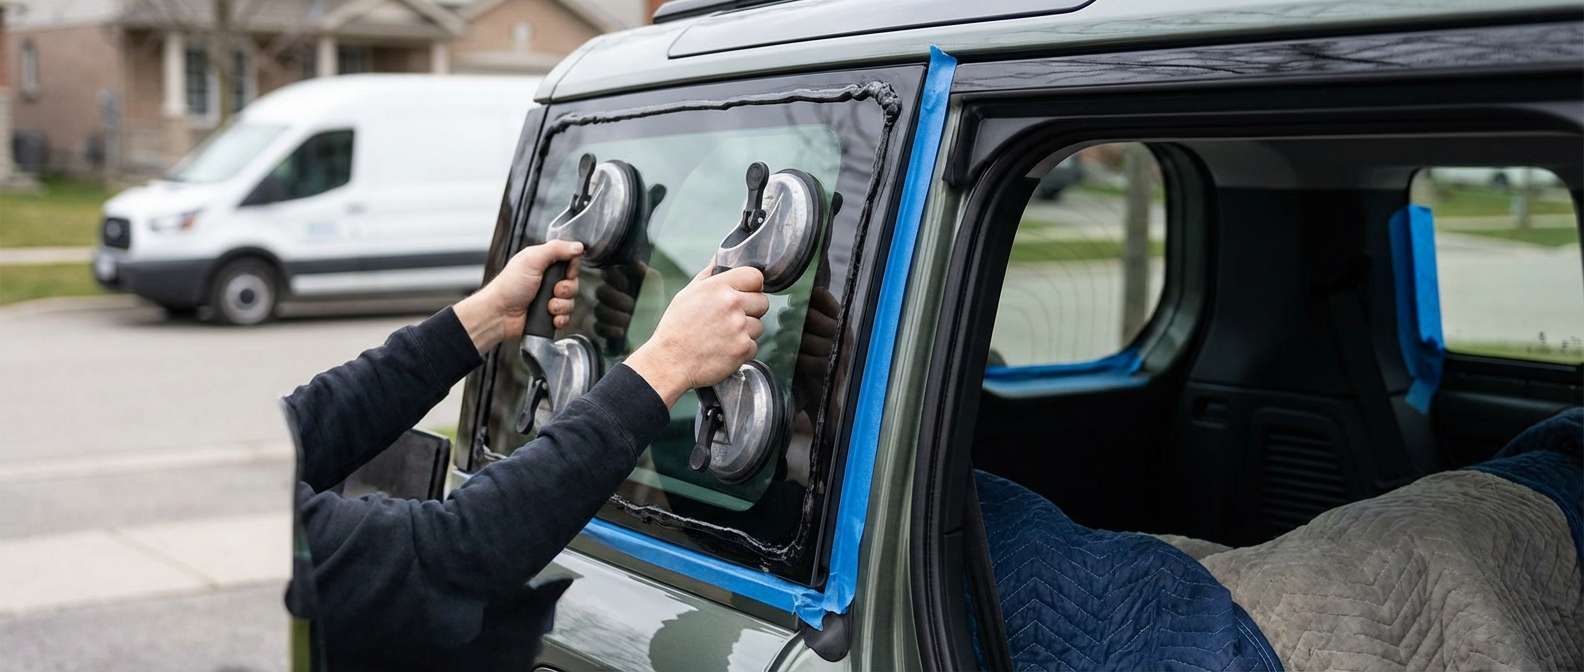
Step 6: Urethane Extrusion and Precision Glass Installation
The core structural integrity of the replacement lies in the application of the adhesive. We load our heavy-duty electric caulking guns with a premium, rapid-cure, OEM-certified polyurethane adhesive. Our master technicians extrude a flawless, uniform V-shaped bead of urethane perfectly aligned over the prepped pinch weld. The V-bead shape is scientifically designed to ensure optimal compression and a completely void-free seal. Utilizing heavy-duty, pump-action suction cups, two technicians carefully lift the new Land Rover Defender quarter glass. With synchronized precision, the glass is guided into the exact factory position. We apply firm, even pressure around the entire perimeter to compress the urethane, ensuring the quarter glass sits perfectly flush with the adjacent body panels, the roofline, and the signature graphic pillar.
Step 7: Reassembly, Curing Time, and Final Quality Inspection
While the high-quality adhesive begins its rapid chemical cross-linking and curing process, we begin the meticulous reassembly of your vehicle's interior. The interior C-pillar, D-pillar, and cargo side trims are carefully snapped back into their exact factory positions, ensuring all retaining clips are fully and securely seated. We perform one final, exhaustive interior vacuum to guarantee absolute cleanliness. The exterior and interior of the newly installed quarter glass are polished to a brilliant, streak-free shine. Finally, we advise the vehicle owner on the Safe Drive-Away Time (SDAT). This ensures the urethane has cured sufficiently to meet federal roof-crush safety standards and structural integrity requirements before the Defender hits the road or the trail.
Premium Mobile Auto Glass Services Across the Greater Toronto Area (GTA)
Your time is incredibly valuable, and driving a luxury off-road vehicle with a shattered side window is both a severe inconvenience and a major security risk. That is exactly why AlexWindshield brings our master technician expertise directly to your location—whether that is your residential driveway, your office parking lot, or a local dealership. We proudly offer comprehensive, elite mobile auto glass replacement services across the Greater Toronto Area (GTA).
Whether you are located in the bustling residential neighborhoods of Vaughan, require workplace service in the fast-paced corporate hubs of Markham, or need an emergency glass replacement at your home in Richmond Hill, our fully equipped mobile service vans are ready to deploy. We carry all the specialized tools, OEM-quality auto glass, and premium automotive adhesives required to perform a flawless Land Rover Defender L663 quarter glass replacement on-site, regardless of where your journey has taken you in the GTA.
Why Choose AlexWindshield for Your Land Rover Defender?
Trusting your highly sophisticated 2020-2027 Defender 90, 110, or 130 to just any generic discount glass shop can result in permanent interior damage, severe water leaks, and frustrating highway wind noise. Here is why discerning Land Rover owners consistently choose AlexWindshield:
- Master Technician Expertise: Our senior technicians undergo rigorous, ongoing training specifically focused on modern luxury SUVs and advanced unibody off-road vehicles. We intimately understand the complex architectural nuances of the Land Rover L663 platform.
- OEM-Quality Materials: We source only premium, original equipment manufacturer equivalent quarter glass. This guarantees a perfect match for your factory tint, acoustic dampening properties, and the precise structural requirements of your Defender.
- Advanced Polyurethane Systems: We exclusively utilize industry-leading, rapid-cure adhesives that fully restore your vehicle's structural integrity, allowing for a faster, safer return to the road.
- Meticulous Interior Care: From heavy-duty protective draping to exhaustive, microscopic glass shard vacuuming, we treat your luxury cabin with the utmost respect and care it deserves.
- Unmatched Mobile Convenience: We save you the immense hassle of arranging a tow truck or sitting in a dreary repair shop waiting room. We bring the highest standard of auto glass service directly to you in Vaughan, Richmond Hill, Markham, and the broader GTA.
Schedule Your Defender Quarter Glass Replacement Today
Do not let a shattered quarter glass compromise the high-end security, striking aesthetics, or off-road readiness of your modern Land Rover. When you require a meticulous, structurally sound replacement, trust the senior specialists who understand your luxury vehicle inside and out. AlexWindshield is your premier, trusted destination for expert mobile auto glass services in the GTA. We passionately stand behind the elite quality of our craftsmanship and our premium materials, which is why every single installation we perform is backed by our comprehensive Lifetime Warranty against water leaks, wind noise, and manufacturer defects. Contact AlexWindshield today to schedule your Land Rover Defender 90, 110, or 130 quarter glass replacement and experience the absolute pinnacle of automotive glass care.


