Reviving a Modern Icon: Land Rover Defender 90/110/130 (L663) Back Glass Replacement
The modern Land Rover Defender (L663), encompassing the agile 90, the versatile 110, and the cavernous 130 from model years 2020 to 2027, represents the ultimate fusion of 21st-century off-road supremacy and refined British luxury. Whether you are traversing the rugged, unpredictable trails of the Canadian wilderness or navigating the fast-paced highways of the Greater Toronto Area (GTA), your Defender is engineered to conquer the elements. However, its rugged nature cannot always protect it from sudden impacts. A rogue branch on a trail, a high-speed stone kicked up by a commercial truck, or even an unfortunate act of vandalism can instantly shatter your back glass.
Unlike laminated windshields that crack and stay intact, the rear glass of your Land Rover Defender is constructed from tempered safety glass. Upon impact, it is designed to explode into thousands of tiny, pebble-like shards to prevent catastrophic lacerations. While this is a brilliant safety feature, it leaves your premium cabin entirely exposed to rain, snow, and severe security risks. Furthermore, these glass shards instantly infiltrate the cargo area, the rear seating, and the inner cavity of the Defender’s signature side-hinged tailgate. Restoring your vehicle requires much more than just slapping on a new piece of glass; it demands the surgical precision, deep technical knowledge, and meticulous cleanup that only a Master Technician can provide.
Why the Defender L663 Rear Glass Requires Expert Attention
Replacing the back glass on the 2020-2027 Land Rover Defender is a highly complex procedure. The L663 chassis features an intricate tailgate system that houses multiple electronic components. The rear glass itself is often integrated with a complex defroster grid, an embedded radio antenna, and acts as the mounting point or passthrough for the heavy-duty rear wiper motor assembly. Additionally, depending on your trim level, the tailgate area interacts with advanced sensors and the ClearSight interior rear-view mirror camera systems.
As a senior SEO specialist and Master Technician, I have engineered our replacement protocol to ensure that every single technological integration is preserved, every shard of glass is eradicated, and the structural integrity of your Defender is flawlessly restored using OEM-equivalent materials.
The Complete A to Z Back Glass Replacement Process
At AlexWindshield, we do not cut corners. We follow a strict, multi-point technical procedure to ensure a factory-perfect seal and absolute safety. Here is the detailed, step-by-step master class on how we replace the back glass on your Land Rover Defender.
Step 1: Thorough Inspection and Ultimate Interior Protection
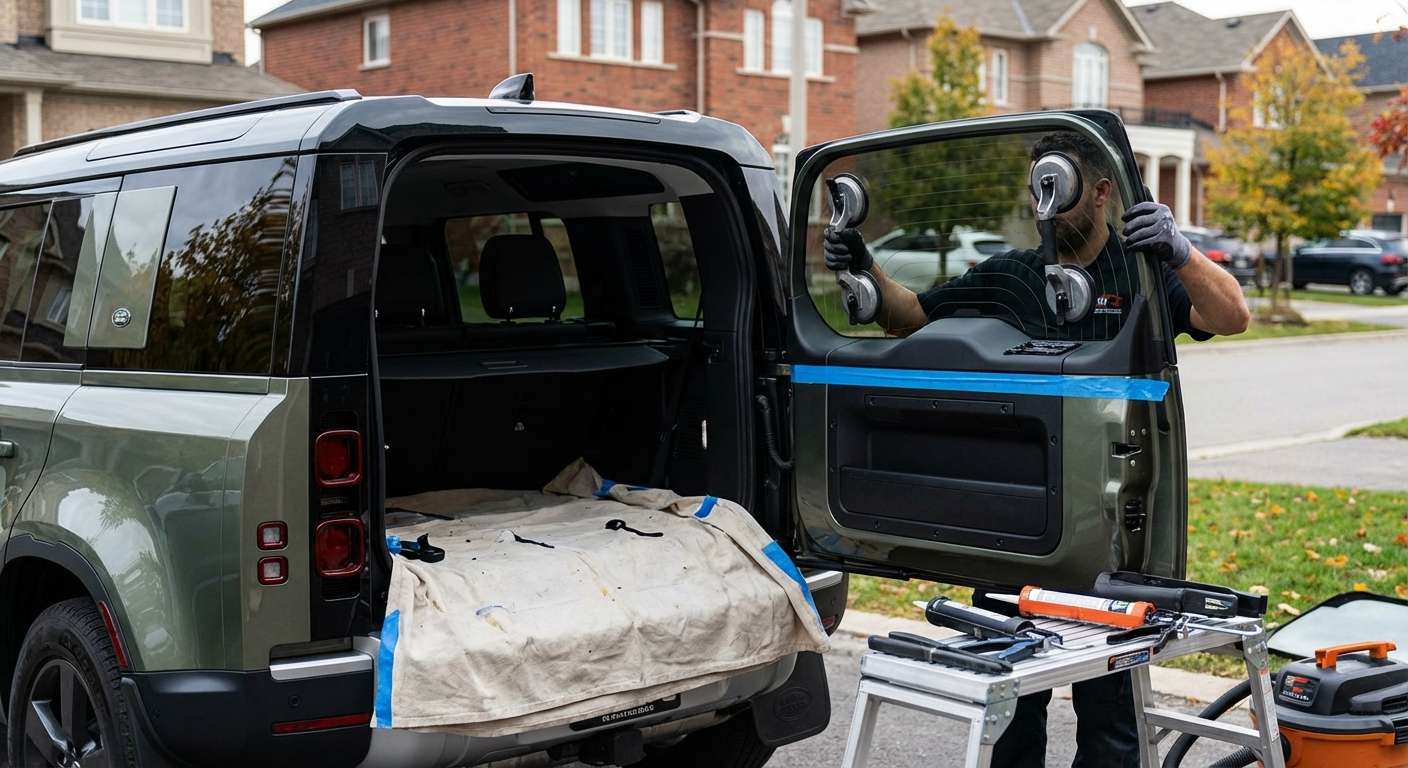
Before any tools are deployed, we conduct a comprehensive pre-inspection of the tailgate, the exterior paintwork, and the interior cargo bay. Because tempered glass shatters violently, shards end up everywhere. We begin by applying high-tack automotive masking tape around the exterior edges of the tailgate to protect your Defender’s premium paint from accidental tool strikes. Inside the cabin, we lay down heavy-duty protective drop cloths over the cargo floor, the rear seating of your 90, 110, or 130, and the interior trim panels. Protecting your luxury interior from urethane drips and sharp debris is our immediate priority.
Step 2: Tailgate Panel Removal and Comprehensive Glass Extraction
This is where standard technicians fail and Master Technicians excel. The thousands of tempered glass pieces do not just sit on the floor; they fall directly into the internal cavity of the side-hinged tailgate. If left inside, they will rattle aggressively every time you hit a bump or close the rear door, and they can severely damage the internal wiring, latch mechanisms, and wiper motor gears.
- Panel Disassembly: We carefully use non-marring trim removal tools to unclip and extract the interior tailgate panels, sound deadening materials, and access ports.
- Industrial Vacuuming: Armed with high-powered industrial shop vacuums and flexible crevice attachments, we meticulously vacuum all broken glass shards from the vehicle's interior cargo bay, the rear seats, and the hidden depths of the tailgate door cavity.
- Mechanism Check: We inspect the tailgate latch and the rear wiper motor assembly to ensure no microscopic glass dust is interfering with the mechanical grease.
Step 3: Disconnecting Electrical and Mechanical Components
The Defender's back glass is an active component of the vehicle's electronics. We carefully disconnect the wiring harnesses for the rear defroster grid and the integrated antenna. We then unbolt and safely remove the rear wiper arm, the wiper motor assembly (if integrated through the glass), and the rear washer fluid nozzle system. Every wiring loom is secured out of the way to prevent accidental damage during the cutting process.
Step 4: Precision Removal of the Old Urethane Bead
Even though the glass is shattered, the tough polyurethane adhesive bead that held it in place remains bonded to the vehicle’s metal pinch weld. Using advanced cold knife tools and specialized wire cut-out systems, we carefully slice through this original factory adhesive. We trim the old urethane down to a perfectly flat, uniform base layer of approximately 1 to 2 millimeters. This "close cut" method provides the optimal bonding foundation for the new adhesive, ensuring the structural integrity of the new installation.
Step 5: Meticulous Surface Cleaning and Primer Application
A perfect seal requires a surgically clean bonding surface. Any contamination can lead to leaks, wind noise, or catastrophic adhesive failure in the event of an accident.
- Cleaning: We clean the entire pinch weld and the surrounding tailgate frame using a specialized, ammonia-free automotive glass cleaner and lint-free wipes. We remove all traces of dirt, moisture, and residual glass dust.
- Metal Treatment: If our cutting tools exposed any bare aluminum or steel on your Defender's tailgate, we immediately treat those microscopic scratches with an anti-corrosion bare metal primer.
- Glass Preparation: The fritted edge (the black painted band) of the new, premium OEM-equivalent back glass is scrubbed and prepped with a specialized chemical activator.
- Urethane Primer: We apply a high-grade, fast-flashing urethane primer to both the vehicle's pinch weld and the bonding edge of the new glass. This primer acts as a chemical bridge, ensuring the urethane bites into both surfaces permanently.
Step 6: Applying High-Quality Polyurethane Adhesive
Using a battery-operated, heavy-duty caulking gun, we apply a continuous, precision V-bead of premium, fast-curing automotive polyurethane adhesive. The V-shape is mathematically critical; as the glass is pressed into place, the peak of the "V" collapses, spreading the adhesive evenly without air pockets or gaps. We use only top-tier adhesives that meet or exceed Land Rover's stringent factory crash-test specifications.
Step 7: Precision Installation of the New Back Glass
Handling the large, heavy back glass of a Defender 110 or 130 requires absolute precision. Using industrial-grade suction cups, our technicians align the new glass perfectly with the tailgate frame. The glass is gently pressed into the wet urethane bead, ensuring uniform compression. We utilize specialized holding tape to keep the glass exactly in its factory-designated position while the urethane begins its cross-linking curing process.
Step 8: Reassembly, Reconnection, and Final Quality Control
With the new glass firmly installed, we reverse the disassembly process. We reinstall the rear wiper motor, securely bolt down the wiper arm, and carefully reconnect the defroster and antenna wiring harnesses. We power on the vehicle to test the rear wiper functionality and verify continuity in the defroster grid. Finally, we reinstall the interior tailgate panels with precision, ensuring all clips seat perfectly. A final, exhaustive vacuuming is performed to guarantee your Defender is pristine, followed by a streak-free cleaning of the new back glass.
Mobile Auto Glass Excellence Across the Greater Toronto Area (GTA)
We understand that a shattered back glass is an emergency. Driving a Land Rover Defender with an open rear cabin exposes you to the harsh Canadian weather and loud highway winds. That is why AlexWindshield brings our Master Technician expertise directly to your driveway, workplace, or emergency location.
We are proud to offer our premium mobile auto glass replacement services across the entirety of the Greater Toronto Area (GTA). Whether you are at a corporate office in the bustling tech hubs of Markham, parked at a shopping center in Vaughan, or relaxing at your residential home in Richmond Hill, our fully equipped mobile service vans arrive with all the specialized tools, heavy-duty vacuums, and premium adhesives required to perform a factory-quality replacement on-site. You do not need to deal with the hassle of towing your Defender or sitting for hours in a waiting room; we bring the auto glass shop directly to you.
Crucial Post-Installation Care Guidelines
To ensure your new Defender back glass cures perfectly and provides decades of secure service, we advise our clients to follow these strict post-installation rules:
- Safe Drive-Away Time: Depending on the specific premium urethane we utilize and the current ambient humidity in the GTA, you must let the vehicle sit stationary for 1 to 2 hours. This allows the adhesive to achieve optimal structural rigidity.
- Leave the Tape: If retention tape was applied to the exterior roofline and glass, leave it perfectly intact for at least 24 hours.
- Avoid Car Washes: Do not take your Land Rover Defender through any high-pressure automated car washes for a minimum of 48 hours. The immense water pressure can rupture the urethane seal before it has fully chemically cured.
- Door Closing Protocol: For the first 24 hours, leave a side window cracked about an inch when closing the heavy Defender doors. This prevents abrupt spikes in cabin air pressure from pushing outward against the newly installed, curing rear glass.
Trust AlexWindshield for Your Land Rover Defender
Your Land Rover Defender L663 is an uncompromising machine built for extreme conditions and absolute luxury. When its structural integrity is compromised by shattered rear glass, you cannot trust the repair to standard, run-of-the-mill technicians who leave hidden glass shards in your tailgate and use inferior glues. You require a Master Technician who respects the engineering of the vehicle.
AlexWindshield is your trusted, premier expert for mobile auto glass services in the GTA, Vaughan, Richmond Hill, and Markham. We combine unparalleled technical precision with ultimate convenience, ensuring your Defender is restored to its exact factory specifications. Because we stand behind the flawless quality of our parts and our craftsmanship, every back glass replacement we perform is backed by our comprehensive Lifetime Warranty against leaks, air noises, and manufacturer defects. Do not let broken glass slow down your next adventure. Contact AlexWindshield today, and let our Master Technicians restore the security, comfort, and rugged beauty of your Land Rover Defender.


