The BMW X1 (E84) Legacy: Preserving the Pioneer of Compact Luxury
The BMW X1 2012-2015 (E84) was not just another crossover; it was a market pioneer that introduced the driving dynamics of the legendary 3-series Touring into a robust, SAV (Sports Activity Vehicle) format. As an owner of this specific chassis, you understand that the E84 relies on rigid structural integrity to deliver that signature BMW handling. The windshield in your X1 is not merely a shield against the wind; it provides up to 40% of the vehicle's structural strength in a rollover and is integral to the proper deployment of the passenger airbag.
At AlexWindshield, we approach BMW X1 windshield replacement with the precision of a dealership master technician but with the convenience and competitive pricing of a specialized local expert. Whether you are dealing with a spiderweb crack from highway debris or a stress fracture from temperature changes, replacing the glass on a German luxury vehicle requires specific protocols that general auto glass shops often overlook. Below, we detail our uncompromising process for restoring your BMW to factory specifications.
Technical Specifications: More Than Just Glass
Before a tool ever touches your vehicle, understanding the glazing specifications of the 2012-2015 BMW X1 is critical. This model year range often comes equipped with sophisticated technology embedded directly onto the glass surface. Using incorrect aftermarket glass results in malfunctioning systems and decreased resale value.
- Rain and Light Sensors: Most E84 models feature a combined rain/light sensor located behind the rearview mirror. This sensor dictates automatic wiper speed and automatic headlight activation. The replacement windshield must have the precise optical clarity and bracketry to house this sensor.
- Condensation Sensors: Located near the rain sensor, this detects humidity levels inside the cabin to automatically adjust the climate control and defogger.
- High-Beam Assist Cameras (KAFAS): While less common than on newer models, some high-spec E84s are equipped with cameras for speed limit information and high-beam assistance. These require specific glass with camera heaters and brackets.
- Acoustic Interlayer: BMW utilizes "SoundScreen" technology in many OEM windshields to dampen road noise. We prioritize installing OEM-equivalent acoustic glass to maintain the quiet luxury cabin experience you are accustomed to.
Step-by-Step Replacement Process: The AlexWindshield Standard
As Master Technicians, we do not believe in shortcuts. A proper windshield replacement for a BMW X1 is a surgical procedure. Here is the exact A-to-Z process we utilize when servicing your vehicle in the Greater Toronto Area (GTA).
Phase 1: Pre-Inspection and Interior Protection
The difference between a technician and a professional is preparation. Before we begin, we perform a pre-scan of your vehicle's electronics to check for any existing fault codes related to the wipers or sensors. We then deploy protective gear:
- Protective Fender Covers: Magnetic covers are placed on your hood and fenders to prevent belt buckle scratches or tool damage to your paint.
- Interior Shielding: We cover your dashboard, steering wheel, and front seats with heavy-duty covers. This ensures that no debris, old urethane, or glass shards contaminate your leather or upholstery.
- Tape-Off: The roof line and A-pillars are taped off with low-tack automotive tape to protect the paint during the glass removal process.
Phase 2: Disassembly and Removal
Removal on the BMW X1 (E84) requires removing exterior trim that is tightly fitted. Force is the enemy here; finesse is required.
- Wiper Arm Removal: We remove the cosmetic caps and nuts, then use a specialized puller tool to lift the wiper arms off the splines. Wiggling them off by hand can strip the delicate wiper transmission linkage.
- Cowl Panel Extraction: The plastic cowling (the cover at the base of the windshield) is removed to expose the bottom edge of the glass. On the 2012-2015 models, this plastic becomes brittle with age; we handle it delicately to prevent cracking.
- Side Molding Removal: The E84 utilizes side moldings that cover the gap between the glass and the A-pillar. These are carefully unclipped. If the clips are brittle, we replace them with new OEM clips to ensure the trim sits flush after installation.
- Cutting the Adhesive: We utilize a "Cold Knife" or a high-tensile fiber cutting line (specifically the WRD Spider system) to slice through the old urethane. The fiber line method is preferred for BMWs as it eliminates the risk of scratching the metal pinchweld, which causes rust.
Phase 3: Surface Preparation and Pinchweld Treatment
This is the most critical step for the longevity of the installation and the safety of the vehicle. If the surface isn't prepped correctly, the bond will fail.
- Trimming the Old Bead: We trim the existing urethane down to a thin layer, approximately 1-2mm thick. This "old" urethane acts as the best bonding surface for the new adhesive.
- Rust Inspection: We inspect the metal frame (pinchweld) for any scratches or rust. If minor scratches occurred during removal or previous improper installs, we sand them down and treat them immediately.
- Primer Application: We apply a high-quality black primer to the pinchweld and the frit band (the black ceramic border) of the new glass. This primer serves three functions: it blocks UV light from degrading the adhesive, it promotes chemical bonding, and it acts as a rust inhibitor.
Phase 4: Installation and Bonding
We use only premium, high-modulus, non-conductive urethane adhesives (such as Sika or DuPont) that match BMW factory specifications.
- The V-Bead Method: Unlike the amateur "round bead" method, we apply a high-profile triangular "V-bead" of urethane. This shape ensures that when the glass is pressed down, the glue spreads outward evenly, eliminating air pockets and potential water leaks.
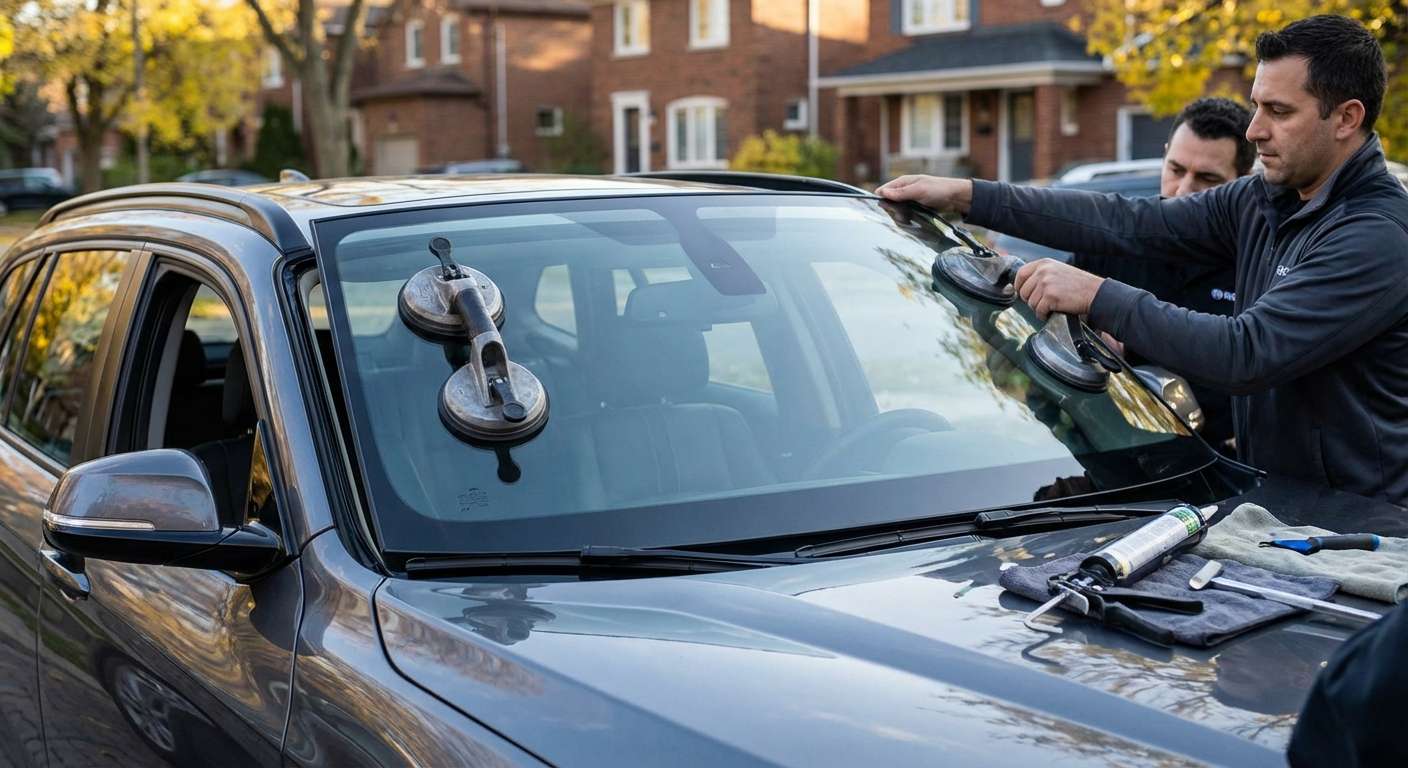
- Setting the Glass: Using heavy-duty suction cups (or a setting tool like the Lil' Buddy for solo technicians), the new windshield is lowered onto the frame with millimeter precision. We align the VIN window and the top roofline gap perfectly.
- Decking: We gently press the glass to "deck" it into the urethane, ensuring instant grab and verifying that the depth is flush with the roofline to prevent wind noise.
Phase 5: Mandatory ADAS and Sensor Calibration
For the BMW X1 2012-2015, simply plugging the sensors back in is insufficient. AlexWindshield emphasizes the necessity of calibration for safety systems.
- Sensor Gel Replacement: The rain/light sensor relies on a clear silicone gel pad to bond the sensor to the glass optically. We never reuse old pads. A fresh, bubble-free gel pad is installed to ensure your automatic wipers react accurately to rainfall.
- Camera Calibration (ADAS): If your X1 is equipped with the KAFAS camera system (Lane Departure Warning/High Beam Assist), a dynamic or static calibration is mandatory. Even a 1-degree change in the angle of the new glass can confuse the safety systems, causing them to misjudge distances. We utilize advanced diagnostic tools to recalibrate the camera to the new windshield's position, ensuring all safety features function as intended by BMW.
Service Availability: Expert Auto Glass in the GTA
We understand that a damaged windshield is an inconvenience. That is why AlexWindshield brings the shop to you. We offer our premium mobile service throughout the Greater Toronto Area (GTA), ensuring you don't have to drive a compromised vehicle to a shop.
Serving Vaughan, Richmond Hill, and Markham
Our mobile units are daily fixtures in the northern GTA. Whether you are parked at your office in Vaughan, your driveway in Richmond Hill, or a commercial lot in Markham, our technicians arrive fully equipped. We carry on-board power supplies, weather protection canopies, and all necessary calibration tools. This allows us to perform a dealership-level installation at your location, saving you time and money.
Why Choose AlexWindshield for Your BMW?
Your BMW X1 is a precision machine, and it requires a technician who understands German engineering. Generic "quick-fix" auto glass shops often use low-grade glass that distorts your view and cheap adhesives that require 24 hours to cure.
At AlexWindshield, we offer:
- One-Hour Safe Drive-Away Time: We use rapid-cure urethane that allows you to safely drive your vehicle just 60 minutes after installation.
- Master Technicians: Our staff is certified and trained specifically on luxury European vehicles.
- Lifetime Warranty: We stand behind our workmanship. We offer a comprehensive Lifetime Warranty covering water leaks, air noises, and manufacturer defects for as long as you own the vehicle.
Don't compromise the safety and comfort of your BMW X1 (E84) with subpar glass or inexperienced labor. Trust the experts who treat your car with the respect it deserves.
Contact AlexWindshield today to schedule your mobile replacement and restore your view of the road.


