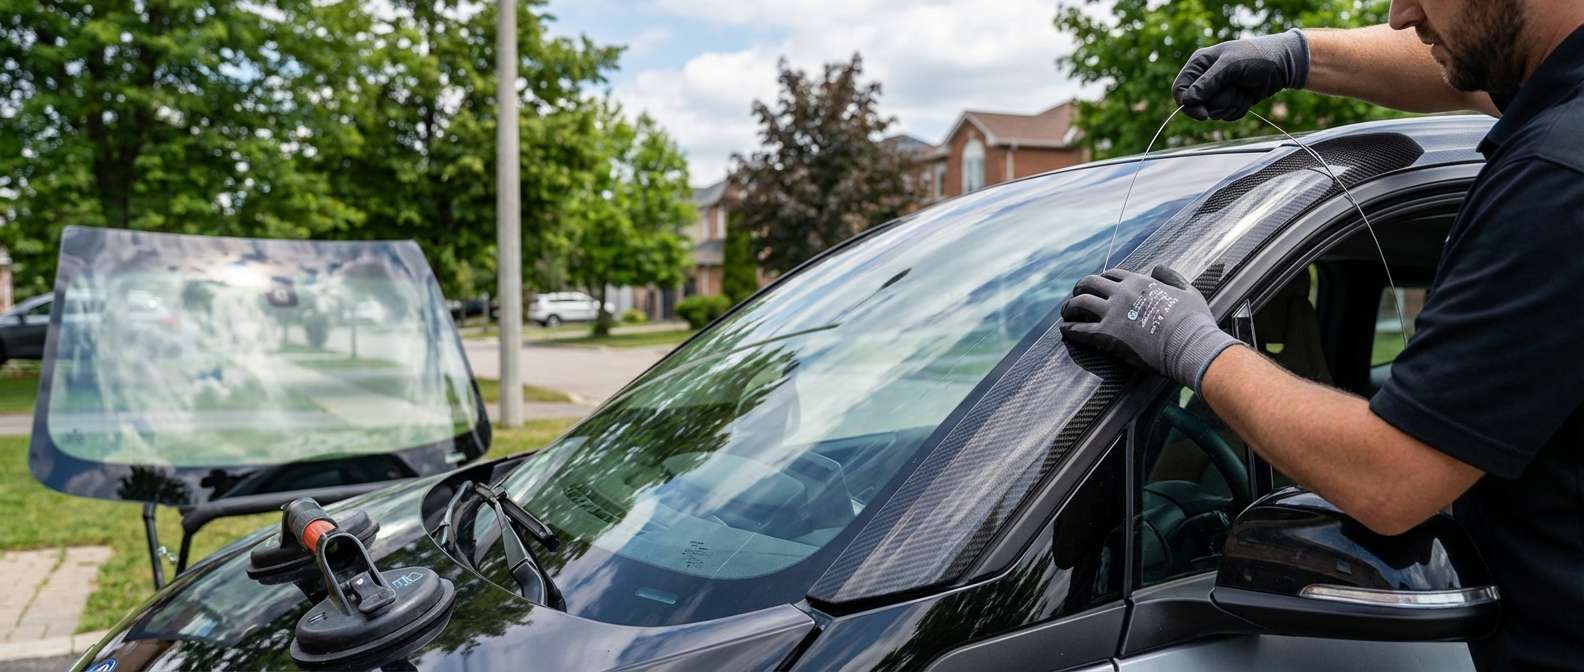
The BMW i3 (I01): A Carbon Fiber Masterpiece Requires Specialized Glass Care
The BMW i3 (I01), produced from 2014 to 2021, is not your standard vehicle, and treating it like one during a windshield replacement is a recipe for disaster. Unlike 99% of cars on the road that utilize a steel unibody, the i3 is constructed using BMW’s revolutionary LifeDrive architecture, featuring a Carbon Fiber Reinforced Plastic (CFRP) passenger cell. This distinction is critical. A technician cannot simply take a standard cold knife to the frame of an i3 without risking irreparable damage to the carbon fiber structure. As a Master Technician at AlexWindshield, I understand that the i3 requires a delicate, surgical approach that respects the unique engineering of this electric pioneer.
When you drive a vehicle designed with sustainability and advanced composites in mind, you need a glass service that matches that level of sophistication. Whether you are commuting through Vaughan, charging up in Richmond Hill, or navigating the streets of Markham, your BMW i3 windshield serves as a structural component of the CFRP "Life Module." Compromising the integrity of this glass or its bond affects the vehicle's roof crush strength and the performance of the passenger airbag. Below, I detail the exact, uncompromising process we use at AlexWindshield to restore your i3 to factory specifications.
Detailed Step-by-Step Replacement Process for the BMW i3
Replacing the windshield on an I01 chassis is a complex procedure that demands patience, specialized tools, and a deep understanding of EV architecture. We do not rush; we follow a strict protocol to ensure safety and longevity.
Step 1: Pre-Inspection and Electronic Diagnostic Scan
Before touching the glass, we perform a comprehensive vehicle inspection. This includes checking the operation of the windshield wipers, the rain sensor, and most importantly, the KAFAS (Camera-based driver assistance system). We scan the vehicle's On-Board Diagnostics (OBD) specifically looking for pre-existing fault codes related to the ADAS (Advanced Driver Assistance Systems). This establishes a baseline for the vehicle’s health before we begin our work.
Step 2: Interior and Exterior Protection
Because the i3 features a unique interior with sustainable materials like open-pore eucalyptus wood and natural fibers, keeping the cabin pristine is a priority.
- We install heavy-duty seat covers and floor mats to protect the upholstery.
- Steering wheel covers are applied to prevent any transfer of debris or adhesive.
- On the exterior, we apply protective tape to the A-pillars and the roofline. Since the i3 body panels are thermoplastic and composite, they can scratch differently than steel; we tape off the surrounding areas to ensure the removal tools never make contact with the paint or the carbon frame.
Step 3: Disassembly of Cowl and Trim
Accessing the bottom edge of the glass on the i3 is challenging due to the deep dashboard design.
- We carefully remove the windshield wiper arms using a specialized puller to avoid damaging the wiper transmission threads.
- The plastic cowl (the panel at the base of the windshield) is unclipped. The i3 cowl is known for having fragile retaining clips; we use non-marring pry tools to release them without breakage.
- We disconnect the heating elements if the vehicle is equipped with a heated windshield, as well as the electrical connectors for the rain/light sensor and the ADAS camera module located near the rear-view mirror.
Step 4: The "Wire-Cut" Removal Method
This is the most critical difference between AlexWindshield and generic shops. We do not use reciprocating saws or standard cold knives on a BMW i3. The risk of cutting into the Carbon Fiber Reinforced Plastic (CFRP) frame is too high.
- We utilize a high-tensile fiber line or wire cutting system. This involves threading a cutting filament through the urethane bead.
- Using a pulley system attached to the glass (not the car body), we slice through the adhesive from the inside out.
- This method exerts zero pressure on the carbon fiber frame and ensures that the bonding surface remains perfectly intact. It allows us to remove the glass without a single scratch to the "Life Module" structure.
Step 5: Frame Preparation and Activation
Once the glass is removed, the old urethane bead must be trimmed down. We trim it to a thickness of approximately 1mm to 2mm, leaving a perfect base for the new bond. This is known as the "full cut" method.
- If there are any areas where the frame is exposed (which is rare with our wire method), we must use a specific carbon-fiber compatible primer. Standard primers may not chemically bond correctly with the resin used in the i3’s CFRP.
- We clean the aperture with an activator to remove all grease, silicone, and dust. The surface must be chemically pure to accept the new adhesive.
Step 6: High-Voltage Safety and Glass Preparation
While the adhesive cures on the frame, we prepare the new OEM-equivalent windshield.
- The new glass is cleaned with a two-step alcohol-based solution.
- We transfer the rain sensor gel pad (replacing it with a new silicon pad if necessary) and the condensation sensor.
- We apply a high-quality glass primer to the ceramic frit band (the black border) of the new windshield. This protects the urethane from UV degradation and ensures a molecular bond.
Step 7: Urethane Application and Installation
For the BMW i3, we use a High-Modulus, Non-Conductive Urethane (HMNC). This is mandatory for two reasons:
- Structural Rigidity: The i3 relies on the glass for stiffness. High-modulus adhesive mimics the rigidity of the glass itself, preventing body flex.
- Electrical Isolation: As an EV with high-voltage components and sensitive electronics, the adhesive must be non-conductive to prevent interference with the radio antennas often embedded in the glass and the complex sensor arrays.
Using a battery-operated caulk gun for a consistent bead, we apply the urethane in a triangular profile (V-bead). This ensures that when the glass is set, the glue compresses evenly without trapping air bubbles, which could lead to leaks. Two technicians utilizing suction cups then carefully lift the windshield and set it into the frame, aligning it precisely with the VIN notch and roofline references.
Mandatory ADAS Calibration: The KAFAS Camera
The BMW i3 is equipped with advanced safety features that rely on a camera mounted behind the windshield. This system, known as KAFAS (Camera-based driver assistance systems), controls the Lane Departure Warning, Collision Warning, and Pedestrian Detection. When the windshield is replaced, the angle of the camera changes—even by a fraction of a millimeter. This microscopic shift is enough to throw the system off, meaning the car might not brake in time for a pedestrian or might drift out of a lane without warning.
At AlexWindshield, calibration is not an option; it is a requirement. We perform Dynamic Calibration for the BMW i3:
- Static Setup: We ensure the camera is firmly clipped into the new bracket on the glass.
- Dynamic Drive Cycle: We connect our specialized diagnostic tablet to the vehicle's OBD-II port. The system enters "Learning Mode."
- The Process: A trained technician drives the vehicle on marked roads in the GTA (such as Highway 404 or 407) at specific speeds. The camera reads the lane markings and traffic signs, recalibrating itself to the new glass curvature and position.
- Verification: Once the system indicates "Calibration Successful," we print a certificate verifying that your safety systems are fully operational.
Why Mobile Service in the GTA Matters
We understand that driving a BMW i3 with a shattered windshield is unsafe and stressful. That is why AlexWindshield offers a premium Mobile Auto Glass Service across the Greater Toronto Area. Whether your vehicle is parked at your home in Vaughan, your office in Markham, or a charging station in Richmond Hill, our mobile units are fully equipped workshops on wheels.
Our mobile vans carry:
- Generators to power our vacuums and lighting.
- Climate control measures to ensure the urethane is applied at the correct temperature (crucial during Canadian winters).
- The full array of calibration tools, meaning we don't just install the glass; we complete the safety calibration on-site.
The AlexWindshield Promise: Lifetime Warranty
Replacing the windshield on a BMW i3 (I01) is a task that requires specialized knowledge of carbon fiber composites, high-voltage safety awareness, and precision ADAS calibration. It is not a job for a generalist.
At AlexWindshield, we stand behind our craftsmanship. We offer a Lifetime Warranty on our workmanship for as long as you own the vehicle. This covers any air noises, water leaks, or issues related to the molding retention. When you choose us, you are choosing technicians who treat your i3 with the respect a technological marvel deserves.
Do not compromise on safety. Contact AlexWindshield today to schedule your BMW i3 windshield replacement in the GTA.


