Restoring British Elegance: Back Glass Replacement for Land Rover Range Rover Sport 2006-2013 (L320)
The first-generation Land Rover Range Rover Sport (L320) redefined luxury performance SUVs between 2006 and 2013, boasting an iconic, muscular silhouette where the rear auto glass plays a vital role in its distinguished, cohesive aesthetic. But when the back glass of your L320 shatters, it compromises much more than just the sophisticated look of your British luxury vehicle. A broken rear window exposes your premium leather interior to the unpredictable Canadian elements, breaches the security of your vehicle, and destroys the structural integrity of the cabin. At AlexWindshield, we understand that a vehicle of this pedigree requires specialized, master-level attention. We do not just replace auto glass; we restore the quiet, secure, and luxurious sanctuary of your Range Rover Sport.
Understanding the Complexity of the L320 Rear Glass
Replacing the back glass on a Land Rover Range Rover Sport 2006-2013 is a complex procedure that demands a deep understanding of European automotive engineering. This specific pane of glass is rarely just a simple piece of transparent material. It is a highly engineered, multifunctional automotive component designed to enhance the driving experience. Key features of the L320 back glass include:
- Integrated Defroster Grids: Essential for maintaining visibility during harsh Canadian winters, requiring precise electrical reconnection.
- Embedded Radio and GPS Antennas: Many L320 models feature hidden antenna traces within the rear glass, meaning a poor installation can ruin your vehicle's infotainment and navigation reception.
- Factory Privacy Tint: The rear glass must seamlessly match the exact solar-reflective privacy tint of the rear passenger windows to maintain the vehicle's aesthetic harmony.
- Tempered Glass Construction: Unlike laminated windshields, the back glass is engineered from tempered safety glass designed to shatter into thousands of small, granular pieces upon impact to prevent severe lacerations.
The Master Technician's Step-by-Step Back Glass Replacement Process
As a Master Technician at AlexWindshield, I adhere to a strict, factory-approved replacement protocol. A back glass replacement is heavily reliant on preparation, cleanliness, and the precise application of chemical bonding agents. Here is our meticulous A-to-Z process for safely and securely replacing the rear glass on your Range Rover Sport (L320).
Step 1: Vehicle Pre-Inspection and Extensive Interior Protection
The process begins with a comprehensive pre-inspection of the vehicle's tailgate, rear wiper assembly, and surrounding paintwork. Because tempered rear glass shatters violently, glass dust and fragments spread everywhere. We lay down heavy-duty protective moving blankets over your Range Rover's premium leather seats, cargo area carpeting, and exterior rear bumper. We also apply high-tack protective tape around the exterior edges of the tailgate to ensure our tools never come into contact with your vehicle's luxury paint job.
Step 2: Interior Tailgate Trim Panel Removal and Disconnections
To perform a flawless replacement, we cannot simply slap a new piece of glass over the old frame. We must gain full access to the inner workings of the rear tailgate. Using specialized non-marring pry tools, we carefully dismantle and remove the interior tailgate trim panels, access covers, and rear pillar garnishes. This vital step allows us to disconnect the delicate wiring harnesses for the rear defroster, the integrated antenna modules, and the high-mount stop light assembly without damaging the fragile factory connectors.
Step 3: Meticulous Broken Glass Vacuuming and Clean-Up
When a back glass breaks, thousands of sharp glass shards fall into the hollow cavity of the tailgate and onto the cargo floor. Leaving these inside will cause maddening rattles every time you drive or close the rear hatch. With the interior panels removed, we use high-powered, industrial-grade vacuums with specialized crevice attachments to extract every single shard of broken glass. We vacuum the cargo area, the spare tire well, the interior seating, and most importantly, deep inside the metal shell of the tailgate. Our goal is to leave your vehicle safer and cleaner than we found it.
Step 4: Old Adhesive Removal and Pinch Weld Preparation
Once the glass debris is fully cleared, we focus on the structural frame—the pinch weld. The remnants of the old, broken glass are still glued to the vehicle's frame by the original factory polyurethane. Using advanced cold-knife technology and precision power cut-out tools, we carefully pare down the old urethane bead. We do not remove it entirely; we trim it down to a thin, level base of 1-2 millimeters. This remaining layer acts as an excellent base for the new adhesive to bond to. We then thoroughly clean the entire pinch weld area using an alcohol-based, lint-free automotive surface cleaner to remove all dirt, grease, and environmental contaminants.
Step 5: Advanced Chemical Primer Application
Proper adhesion requires perfect chemical preparation. We apply a specialized, high-grade black glass primer to the vehicle's pinch weld, specifically treating any microscopic scratches in the paint that may have occurred during the removal process. This primer acts as a rust inhibitor, ensuring moisture never corrodes your tailgate frame. We also apply a specific glass primer to the ceramic frit band (the black painted edge) of the brand new replacement glass. This primer promotes a molecular bond between the glass and the urethane while blocking ultraviolet (UV) rays from degrading the adhesive over time. We allow the primer to undergo its mandatory chemical flash-off time.
Step 6: Precision Urethane Adhesive Application
The true strength of the installation relies on the quality of the adhesive. We exclusively use premium, fast-curing automotive-grade urethane adhesive. Using an electric caulking gun fitted with a specialized V-notch nozzle, we extrude a perfectly uniform, continuous bead of hot urethane directly onto the prepared pinch weld. The height, width, and consistency of this bead are hyper-critical; a perfectly applied V-bead ensures there are no air gaps, preventing future water leaks and annoying wind noise at highway speeds.
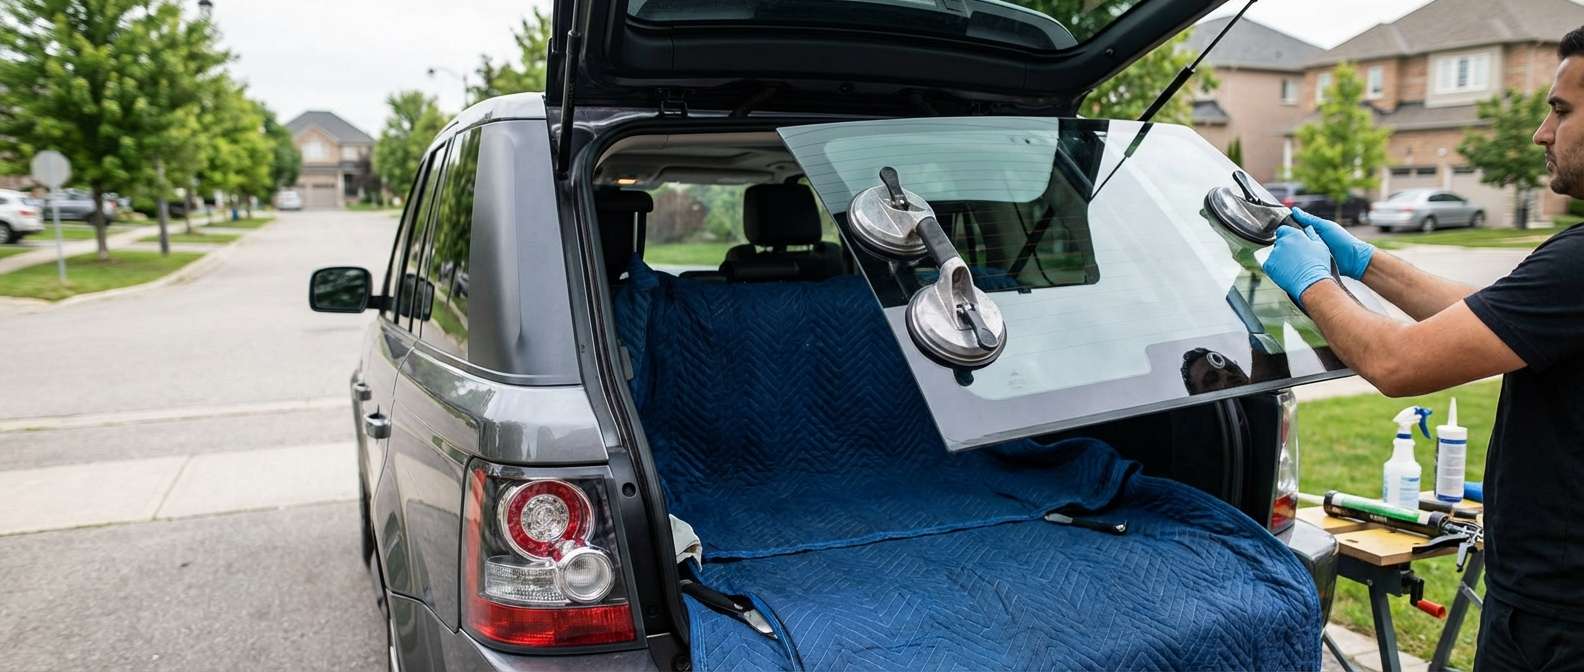
Step 7: Setting the New Premium Back Glass
With the high-quality adhesive applied, the clock is ticking before the urethane begins to skin over. Handling the heavy, cumbersome back glass of a Range Rover Sport requires absolute precision. Often utilizing suction cups and a two-technician lift strategy, we carefully align the premium replacement glass with the vehicle's body lines. Once properly positioned, we gently press the glass into the urethane bead, collapsing the V-notch to create a watertight, structural seal. We apply specific pressure to ensure the glass sits perfectly flush with the exterior tailgate contour.
Step 8: Reconnection, Trim Reassembly, and Final Quality Check
While the urethane undergoes its initial rapid cure, we begin the reassembly process. We meticulously reconnect the electrical tabs for the heated defroster grids and the internal antenna systems, testing them to ensure full electrical continuity. We reinstall the rear wiper motor, the wiper arm, and the high-mount brake light. Finally, we snap the interior tailgate trim panels back into place, ensuring every factory clip engages perfectly. We finish with a streak-free cleaning of the new auto glass using specialized hydrophobic foaming cleaners. The result is a factory-fresh appearance with uncompromised safety.
Premium Mobile Auto Glass Service Across the Greater Toronto Area (GTA)
Driving a Range Rover Sport with shattered back glass is both a safety hazard and an incredibly stressful experience. That is why AlexWindshield brings the glass shop directly to your driveway, office, or heated garage. We are proud to offer unparalleled, fully equipped mobile auto glass services across the entire Greater Toronto Area (GTA). You do not need to risk driving a compromised luxury vehicle through heavy Ontario traffic.
Our rapid-response mobile service units frequently operate in the most demanding urban and suburban environments. We proudly provide priority back glass replacement and auto glass repair services to the following key regions:
- Vaughan: From Woodbridge to Maple, we service residential and commercial clients, ensuring your luxury SUV is road-ready in no time.
- Richmond Hill: We cater to the discerning drivers of Richmond Hill, providing discreet, hyper-professional mobile glass installations right in your driveway.
- Markham: Whether you are parked at a corporate office or at home in Unionville, our mobile technicians arrive fully equipped to handle your L320 Range Rover glass replacement with zero hassle.
Why Choose AlexWindshield for Your Range Rover?
Your Land Rover Range Rover Sport is an investment in luxury and capability. Trusting its structural integrity to a discount glass shop can lead to disastrous electrical faults, severe water leaks, and rusting tailgates. At AlexWindshield, we separate ourselves from the competition through our unwavering commitment to automotive excellence.
- OEM-Quality Auto Glass: We source only premium glass that meets or exceeds original equipment manufacturer specifications, guaranteeing perfect fitment, exact privacy tint matching, and flawless defroster performance.
- Master Technician Expertise: European luxury vehicles possess complex electrical and trim systems. Our specialized training ensures no broken clips, no scratched paint, and no dashboard warning lights.
- Unmatched Cleanup Protocol: We treat your vehicle like our own, ensuring every microscopic shard of shattered tempered glass is safely removed from your interior and tailgate assembly.
Contact Us Today for a Lifetime Guarantee
Do not let a shattered rear window ruin your driving experience or leave your luxury SUV vulnerable to the harsh weather of the GTA. When you choose AlexWindshield, you are choosing peace of mind. Every single back glass replacement we perform is backed by our comprehensive, industry-leading Lifetime Warranty covering both water leaks and workmanship defects for as long as you own the vehicle. If you demand the absolute highest standard of auto glass repair for your Land Rover Range Rover Sport 2006-2013 (L320), the choice is clear.
Contact AlexWindshield today to schedule your mobile back glass replacement in Vaughan, Richmond Hill, Markham, or anywhere across the Greater Toronto Area. We bring clarity, safety, and British elegance back to your luxury SUV.


