Restoring a British Icon: Expert Back Glass Replacement for the Land Rover Range Rover L322 (2003-2012)
The 2003-2012 Land Rover Range Rover, known by its chassis code L322, is an undisputed icon of British automotive engineering that masterfully bridged the gap between rugged off-road capability and uncompromising, aristocratic luxury. One of its most defining and beloved features is the signature split-folding tailgate, designed for everything from loading heavy cargo to serving as a seating area for a polo match picnic. However, when the upper tailgate back glass shatters—whether due to a sudden impact, extreme temperature fluctuations, or an unfortunate break-in—that pristine elegance is instantly compromised. A shattered back glass leaves your luxurious leather interior exposed to the harsh Canadian elements and creates a significant safety hazard.
At AlexWindshield, we understand that working on a luxury SUV of this caliber requires far more than a standard glass swap. It demands the meticulous hand of a Master Technician. From navigating the complex wiring of the integrated defrosters and antennas to managing the specialized upper liftgate hardware, we execute every step with precision. If you are dealing with a broken back window, our premium mobile auto glass replacement services are here to restore your Range Rover to its factory glory.
Premium Auto Glass Services Across the Greater Toronto Area (GTA)
Driving a Range Rover with a shattered back glass is not only incredibly uncomfortable due to wind noise and exhaust fumes entering the cabin, but it is also highly dangerous as tempered glass shards can blow into the passenger area. That is why AlexWindshield brings the repair shop directly to your driveway or workplace. We proudly offer comprehensive mobile auto glass services across the Greater Toronto Area (GTA), with a specialized focus on serving our luxury vehicle clients in Vaughan, Richmond Hill, and Markham.
Whether you are parked at a corporate office in Markham, at home in Vaughan, or running errands in Richmond Hill, our fully equipped mobile service vans arrive with the exact OEM-quality glass, premium adhesives, and specialized tools required to complete the job safely and flawlessly on-site.
The Complexity of the Range Rover L322 Upper Tailgate Glass
Unlike standard rear windshields, the back glass on the 2003-2012 Range Rover L322 is a complex component integrated directly into the upper half of the split tailgate mechanism. Before diving into the replacement process, it is crucial to understand what makes this specific glass unique:
- Tempered Safety Glass: The back glass is designed to shatter into thousands of small, granular, pebble-like pieces upon impact to prevent lethal lacerations. This necessitates a massive cleanup effort.
- Integrated Defroster Grid: Essential for Canadian winters, the heating elements are baked into the glass and must be perfectly reconnected to the vehicle's electrical harness.
- Embedded Antenna Systems: The L322 utilizes the rear glass to house AM/FM and sometimes navigation antenna lines, requiring delicate handling of the terminal connectors.
- Through-Glass Hardware: The rear wiper motor assembly and wiper arm are mounted directly through pre-drilled holes in the glass, requiring complete disassembly of the wiper system.
Master Technician’s Step-by-Step Back Glass Replacement Process
At AlexWindshield, we do not cut corners. As a Master Technician, I follow a strict, manufacturer-approved procedure to ensure that your Range Rover L322 back glass is installed with structural integrity and leak-proof perfection. Here is our detailed, A to Z process:
Step 1: Extensive Pre-Inspection and Interior Protection
The moment we arrive at your location in the GTA, we conduct a thorough pre-inspection of the upper tailgate, hinges, and surrounding body panels to check for any collateral damage caused by the impact that broke the glass. Because shattered tempered glass is incredibly invasive, we immediately deploy heavy-duty protective drop cloths over your Range Rover’s premium leather seats, cargo area, and exterior paint to prevent scratching during the repair.
Step 2: Disassembly of the Upper Tailgate and Trim Panels
To perform a proper replacement, we must access the internal cavity of the upper tailgate. Using specialized non-marring bone tools, we carefully unclip and remove the interior tailgate trim panels. We also meticulously unbolt the rear wiper arm from the outside, remove the exterior rubber grommets, and disconnect the rear wiper motor housed on the inside of the tailgate. Finally, we disconnect the wiring harnesses for the rear defroster and embedded antenna systems, securing the cables safely out of the way.
Step 3: Comprehensive Glass Shard Vacuuming
When back glass breaks, the sheer volume of glass shards is staggering. The most critical part of our preparation is the cleanup. We use high-powered industrial shop vacuums to extract every single piece of broken glass from the cargo area carpet and seats. More importantly, because we removed the interior tailgate panels in the previous step, we can vacuum deep inside the upper tailgate frame. If these shards are left inside the tailgate cavity, they will create an infuriating rattling noise every time you open the trunk or drive over a bump in Richmond Hill or Markham. We ensure the frame is 100% free of debris.
Step 4: Removal of the Old Polyurethane Adhesive
With the hardware removed and the glass cleared, the old bead of urethane adhesive remains bonded to the vehicle's pinch weld. Using a specialized cold knife and precision scraping tools, we carefully cut back the old urethane. Master Technicians know never to strip it down to the bare metal; we leave a perfectly smooth, thin 1mm to 2mm base layer of original urethane to serve as the ideal bonding foundation for the new adhesive.
Step 5: Pinch Weld Cleaning and Primer Application
The pinch weld (the metal frame where the glass sits) is then thoroughly cleaned with a specialized auto glass foaming cleaner to remove dirt, grease, and dust. If there are any superficial scratches on the metal from the removal process, we treat them with a high-quality anti-corrosion auto glass primer. This step is non-negotiable, as skipping primer on exposed metal will lead to rust, which eventually compromises the structural integrity of the seal and causes severe water leaks.
Step 6: Preparing the New Range Rover Back Glass
We source only premium, OEM-equivalent glass for the Range Rover L322 to ensure perfect curvature, optical clarity, and electrical compatibility. Before installation, the inner ceramic frit band of the new glass is scrubbed clean and treated with a specialized glass primer. This primer chemically reacts with the urethane, ensuring an unbreakable molecular bond between the glass and the adhesive.
Step 7: Extruding High-Quality Urethane Adhesive
Using a battery-powered caulking gun, we apply a fresh, continuous bead of premium, fast-curing polyurethane adhesive. The adhesive is applied in a precise "V-bead" shape around the perimeter of the pinch weld. The V-bead guarantees that when the glass is compressed, the urethane spreads evenly without leaving any air pockets or gaps, completely eliminating the risk of water leaks or wind noise.
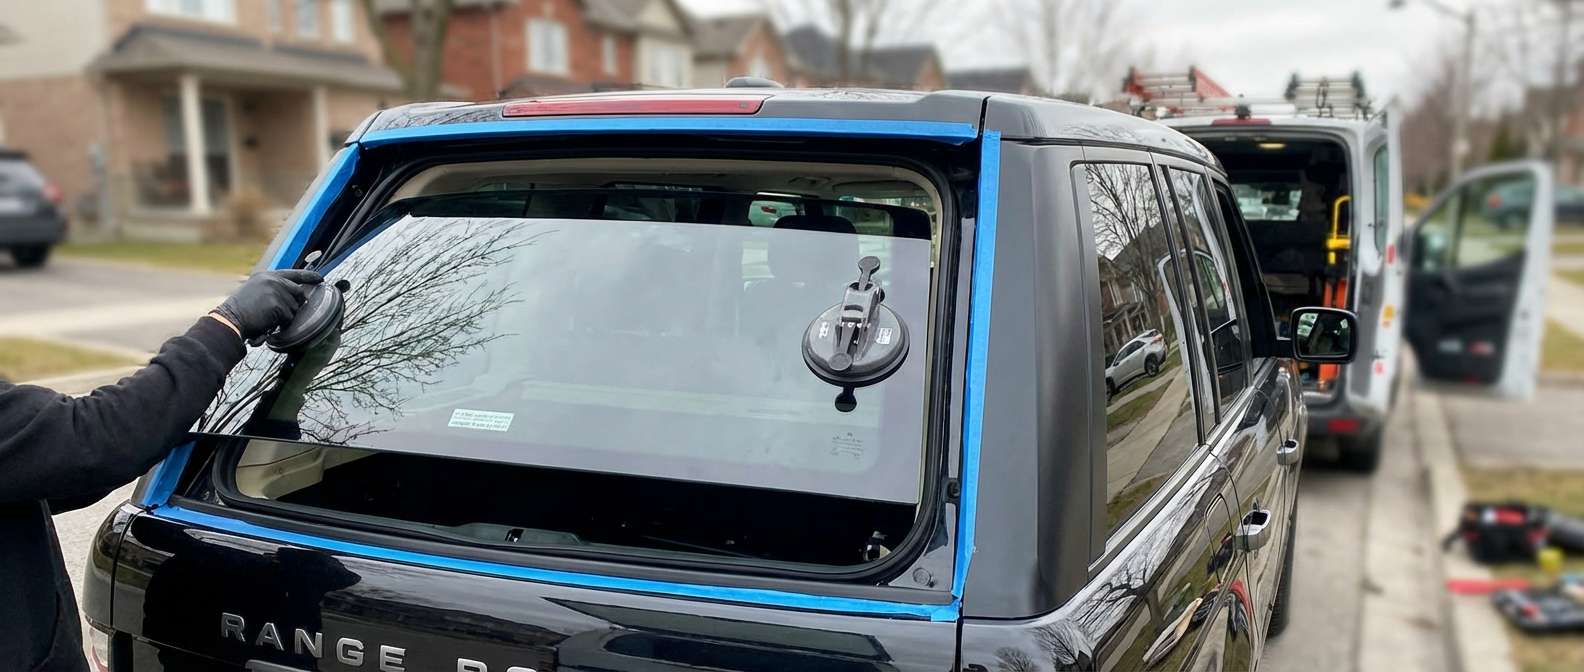
Step 8: Precision Installation of the New Glass
Because the upper tailgate of the L322 sits high, precision is key. Using heavy-duty suction cups, two technicians carefully lift the newly primed back glass and align it flawlessly within the upper tailgate frame. We apply gentle, even pressure around the edges to compress the V-bead urethane to the correct depth, ensuring the glass sits perfectly flush with the exterior bodylines of your Range Rover.
Step 9: Reassembly and Electrical Reconnection
While the urethane begins its rapid curing process, we begin reassembling the hardware. We remount the rear wiper motor, meticulously feed the wiper spindle through the new glass, and reattach the exterior grommets and wiper arm. Next, we carefully plug in the electrical connectors for the rear defroster grid and the AM/FM radio antennas. Finally, we reinstall the interior upper tailgate trim panels, ensuring every clip snaps back into its factory position.
Step 10: Final Cleaning and Quality Assurance
The last step is a rigorous quality check. We clean the new back glass with premium, streak-free glass cleaner and wipe down the entire cargo area. We test the rear wiper functionality and verify the electrical continuity of the defroster. We then inform the client of the Safe Drive-Away Time (SDAT), ensuring the urethane has cured sufficiently before the vehicle hits the roads of the GTA.
Choose AlexWindshield: The Trusted Experts in the GTA
Replacing the back glass on a luxury vehicle like the 2003-2012 Land Rover Range Rover L322 is a highly technical task that should never be left to amateurs. The complex tailgate mechanics, the intricate electrical systems, and the sheer amount of broken glass require the expertise of a true Master Technician.
When you choose AlexWindshield, you are choosing unparalleled craftsmanship, deep technical knowledge, and the ultimate convenience. Whether you are located in the bustling streets of Markham, the suburban enclaves of Richmond Hill, or the commercial hubs of Vaughan, our mobile auto glass replacement team is ready to serve you.
We stand firmly behind our work. Every back glass replacement we perform comes with the comprehensive AlexWindshield Lifetime Warranty. This warranty guarantees that your new glass is free from manufacturing defects and completely protects you against any water leaks, wind noise, or workmanship errors for as long as you own your Range Rover. Do not let a shattered back window ruin your driving experience. Contact AlexWindshield today for industry-leading mobile auto glass replacement across the Greater Toronto Area.


