Restoring the Safari Experience: Premium Sunroof Replacement for the Land Rover LR4 (Discovery 4) 2010-2016
The Land Rover LR4 (Discovery 4), produced between 2010 and 2016, is globally celebrated for its stadium seating, unparalleled off-road pedigree, and an iconic "safari-style" roof design. The expansive, multi-panel panoramic sunroof system is the crown jewel of this vehicle's cabin, flooding the luxurious interior with natural light and providing a commanding view of both the urban skyline and the rugged trail. However, when that primary glass panel shatters from a rogue highway rock, a heavy hail storm, or extreme temperature fluctuations, the premium driving experience is instantly compromised. A shattered sunroof not only exposes your sophisticated interior electronics to the elements but also poses a severe safety hazard to you and your passengers.
As a Senior SEO Specialist and Master Technician at AlexWindshield, I have overseen and executed countless intricate glass replacements on high-end European SUVs. Replacing the sunroof on an LR4 is not a generic job; it requires a deep understanding of Land Rover's complex roof cassette system, meticulous attention to detail, and a flawless sealing technique. If you are dealing with a shattered or heavily cracked roof glass, our specialized mobile team is equipped to bring dealership-level expertise directly to your driveway.
Why Trust AlexWindshield with Your Land Rover LR4 Sunroof?
The 2010-2016 Land Rover LR4 features a heavy, heavily contoured glass panel designed to integrate seamlessly with the vehicle’s aerodynamic profile and water management system. A subpar installation can lead to catastrophic water leaks, wind noise, and damage to the headliner and internal tracking motors. At AlexWindshield, we eliminate these risks through our mastery of European auto glass.
Furthermore, driving an LR4 with a blown-out sunroof is dangerous and highly uncomfortable. To provide maximum convenience, we offer premium mobile auto glass services across the Greater Toronto Area (GTA). Whether you are parked at your home in Vaughan, at your office in Richmond Hill, or at a commercial plaza in Markham, our fully equipped mobile workshop comes to you. We bring the glass, the tools, and the expertise directly to your location, saving you the hassle of a dangerous commute and an expensive tow.
The AlexWindshield Master Technician Step-by-Step Sunroof Replacement Process
Replacing the mechanical sunroof glass on a Land Rover LR4 requires precision engineering and absolute cleanliness. Because sunroof glass is typically tempered, an impact causes it to explode into thousands of tiny, granular shards that infiltrate every crevice of the cabin. Here is the rigorous, A-to-Z process we follow to restore your Discovery 4 back to showroom condition:
Step 1: Comprehensive Interior Protection
Before any mechanical work begins, we must protect the luxurious interior of your LR4. We lay down heavy-duty, reinforced drop cloths over the premium leather seats, center console, and dashboard. We apply low-tack automotive masking tape to the delicate trim pieces and the edges of the roofline to ensure our tools do not scratch the vehicle's paint or interior surfaces. Protecting your vehicle’s pristine condition is our absolute priority.
Step 2: Shattered Glass Extraction and Deep Vacuuming
Unlike a laminated windshield, a shattered sunroof drops thousands of sharp glass granules directly into the cabin and the intricate tracking mechanisms of the roof cassette. Our technicians utilize high-powered, industrial-grade vacuums equipped with specialized micro-nozzles. We meticulously vacuum the seats, floor mats, and cup holders. Crucially, we spend significant time vacuuming the sunroof tracks, the motorized rails, and the edges of the headliner. Even a single shard of glass left inside the tracks can cause the new sunroof motor to bind, grind, or fail prematurely.
Step 3: Hardware Deconstruction and Frame Removal
With the cabin safely cleared of debris, we move to the structural removal. We carefully detach the interior weather stripping and, if necessary, partially lower the front section of the headliner to access the sunroof cassette mounting bolts. We disconnect the electronic motor harnesses and the wind deflector arm. The remaining broken glass frame and the damaged sealing assembly are meticulously unbolted and lifted out of the roof cavity.
Step 4: Surface Prep, Cleaning, and Drainage Clearing
A waterproof seal is only as good as the surface it bonds to. We use specialized scraper tools to remove the old adhesive, sealant, and dirt from the vehicle’s metal roof frame, taking it down to a thin, even layer of base urethane. Next, we clean the pinch weld with high-grade, alcohol-based glass cleaners to remove any microscopic grease or debris. Because Land Rovers rely heavily on their sunroof drainage systems, we take this opportunity to blow compressed air through the front and rear drain tubes. This ensures that rainwater flows safely out of the vehicle rather than backing up and staining your headliner.
Step 5: Primer Application and Urethane Adhesive
To guarantee a lifelong, leak-proof seal, we apply an OEM-approved black body primer to any exposed bare metal on the pinch weld, as well as to the bonding edge of the new LR4 replacement glass. This primer promotes molecular adhesion and prevents future rust from developing on your roof. Once the primer flashes (dries), we apply a thick, triangular bead of high-quality, fast-curing polyurethane adhesive. We use a battery-operated caulking gun to ensure the urethane bead is perfectly consistent, providing the structural integrity needed to support the heavy Land Rover glass.
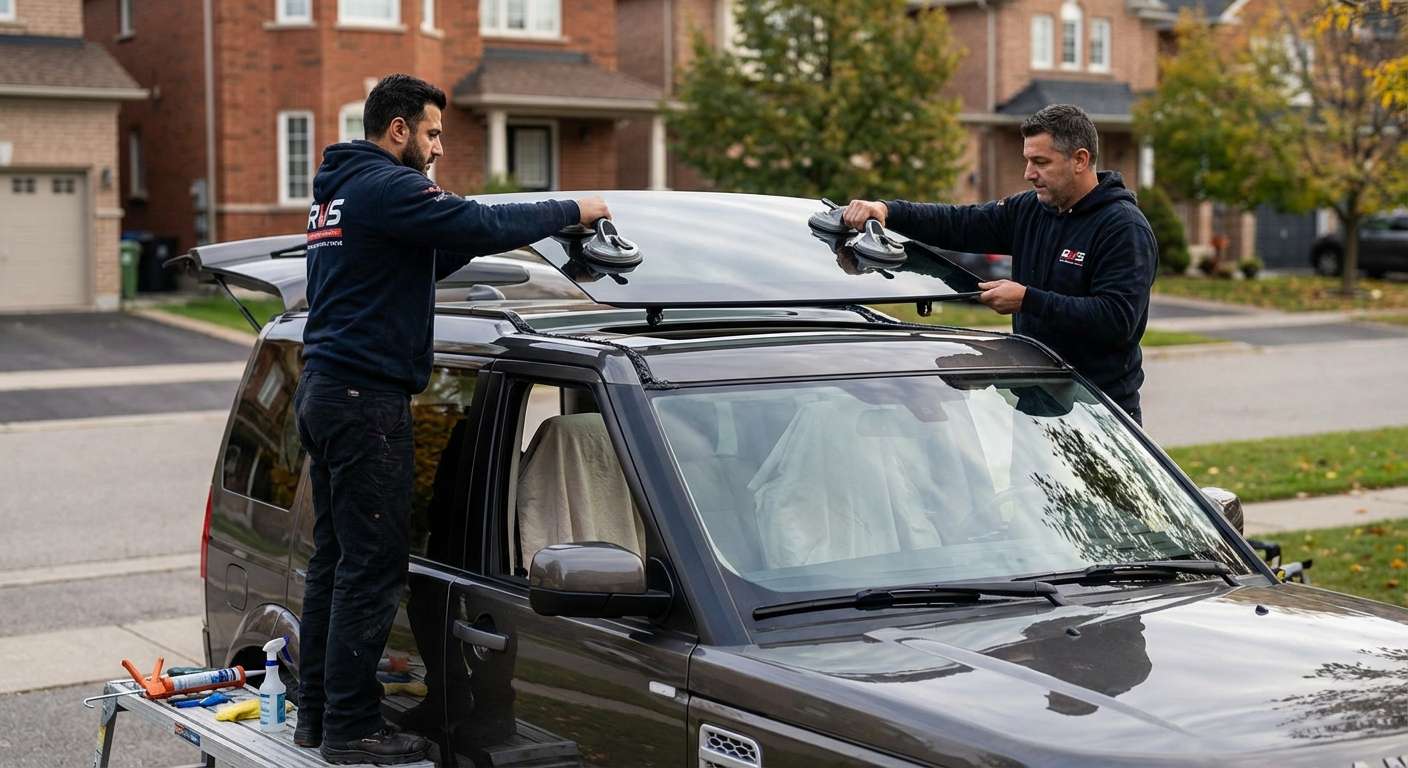
Step 6: Precision Glass Installation and Track Alignment
The new sunroof glass is heavy and awkwardly shaped. Utilizing heavy-duty suction cups, two master technicians carefully hoist the new glass panel over the LR4. We lower the glass perfectly onto the fresh urethane bead in one fluid motion, ensuring we do not smear the adhesive. Once the glass makes contact, we apply firm, even pressure to set it deeply into the urethane. We then reconnect the track mounting brackets, perfectly aligning the glass so that it sits completely flush with the vehicle's roofline, ensuring optimal aerodynamics and zero wind noise.
Step 7: Reassembly, Calibration, and Leak Testing
We reattach all electronic harnesses, motor connections, and interior trim pieces. We cycle the sunroof through its tilt and slide functions (once the urethane has safely cured enough to permit movement) to ensure the track alignment is flawless and the motor operates smoothly without resistance. Finally, we perform a rigorous water test. We simulate heavy rain over the roof of your LR4 to verify that the high-quality adhesive seal is absolutely watertight and that the drain tubes are functioning correctly.
Serving the Heart of the GTA: Vaughan, Richmond Hill, and Markham
At AlexWindshield, we understand that our clients lead busy lives. Taking a day off work to sit in a repair shop waiting room is simply not an option for most. That is why we have engineered our business around a premier mobile service model that covers the entire Greater Toronto Area (GTA).
- Vaughan: Whether you are near Vaughan Mills or commuting down the 400, our mobile units can be dispatched directly to your location, securing your vehicle against the unpredictable Ontario weather.
- Richmond Hill: For professionals working in the business sectors of Richmond Hill, we can perform the entire sunroof replacement right in your corporate parking lot, ensuring zero disruption to your workday.
- Markham: From residential driveways in Cornell to commercial centers near Highway 7, our technicians arrive fully prepared to execute complex Land Rover glass repairs on site.
Driving with a compromised roof structure is not an option. Let our mobile fleet bring the auto glass shop directly to you, providing unparalleled convenience without sacrificing an ounce of technical quality.
Crucial Post-Installation Care for Your Land Rover LR4
After we complete the replacement of your sunroof, we will guide you through a brief set of post-installation instructions to ensure the polyurethane adhesive cures to its maximum structural strength. We highly recommend the following:
- Keep the Windows Cracked: Leave a window slightly rolled down (about an inch) for the first 24 hours. This prevents air pressure buildup when shutting the heavy LR4 doors, which could otherwise push the fresh sunroof glass out of its wet adhesive seal.
- Avoid Car Washes: Do not take your Discovery 4 through a high-pressure commercial car wash for at least 48 to 72 hours. Hand washing is acceptable, but the high-pressure jets can compromise the curing urethane.
- Refrain from Opening the Sunroof: Keep the mechanical tilt and slide functions deactivated for at least 24 hours to allow the bonding agents to fully solidify.
Choose AlexWindshield: The True Auto Glass Experts
Your Land Rover LR4 was built for premium comfort and rugged durability. Do not trust its specialized multi-panel roof system to just anyone. At AlexWindshield, we pride ourselves on delivering an elite standard of workmanship that matches the pedigree of your vehicle. We utilize only the finest OEM-equivalent glass, industry-leading urethane adhesives, and the most advanced installation techniques in the auto glass industry.
We stand confidently behind our craftsmanship. Every single sunroof replacement we perform comes backed by our comprehensive Lifetime Warranty, covering you against any air leaks, water leaks, or manufacturer defects for as long as you own your Discovery 4. When you need uncompromising quality, rapid mobile deployment across Vaughan, Richmond Hill, Markham, and the wider GTA, and a team that treats your vehicle as if it were their own, there is only one name to remember.
Contact AlexWindshield today to schedule your Land Rover LR4 sunroof replacement and restore the absolute luxury and safety of your driving experience.


