Restoring the Iconic Greenhouse of the Land Rover LR4 (Discovery 4) 2010-2016
The Land Rover LR4, known globally as the Discovery 4, manufactured between 2010 and 2016, is a masterclass in rugged luxury. Celebrated for its iconic stepped roof, asymmetrical rear design, and signature stadium seating, this premium SUV relies heavily on its expansive greenhouse to provide unparalleled visibility for all seven passengers. The rear quarter glass is not merely a cosmetic window; it is a precisely engineered, bonded structural component that ensures cabin insulation, structural rigidity, and passenger safety. When this glass is shattered—whether by flying highway debris or an unfortunate break-in—it immediately compromises the security and aesthetic integrity of your Land Rover. As a Master Technician at AlexWindshield, I understand that replacing the quarter glass on an LR4 is a highly specialized procedure that demands exacting precision, specialized tools, and an uncompromising commitment to safety.
The Technical Complexity of Land Rover LR4 Quarter Glass Replacement
Unlike roll-down door windows, the quarter glass on the 2010-2016 Land Rover LR4 is a fixed panel, chemically bonded directly to the vehicle's body frame using heavy-duty urethane. Furthermore, because this panel is constructed from tempered glass, a localized impact will cause the entire pane to shatter into thousands of granular pieces. These fragmented glass shards forcefully scatter into the cargo area, the third-row seating tracks, and deep within the interior trim panels. To effectively execute a professional quarter glass replacement, a technician must do far more than simply glue a new piece of glass into place. The process requires meticulous deconstruction of the interior, exhaustive debris extraction, precise chemical preparation, and structural rebonding.
Step-by-Step Quarter Glass Replacement Process from A to Z
Phase 1: Pre-Installation Inspection and Interior Protection
The procedure begins with a comprehensive assessment of the damage and the surrounding bodywork. Before any tools are utilized, we must ensure that the vehicle's premium interior is completely protected. We apply heavy-duty protective drop cloths over the leather third-row seats, the cargo floor, and the surrounding exterior paint. Protecting the Land Rover's specialized aluminum body panels and luxurious interior from incidental scratches or stray adhesive is our foremost priority during the quarter glass replacement process.
Phase 2: Interior Trim Removal and Complete Shard Extraction
Because tempered glass shatters explosively, a massive amount of glass fragments will inevitably fall into the gap between the exterior body and the interior cargo panels. To ensure no rattling occurs post-installation and to protect passengers from hidden hazards, we perform a deep interior teardown.
- Panel Deconstruction: We carefully unclip and remove the interior D-pillar trim, loosen the cargo area side panels, and detach the seatbelt anchor covers. Using specialized non-marring nylon pry tools ensures the LR4's delicate interior clips are preserved.
- Vacuuming Broken Glass Shards: With the inner body cavity exposed, we utilize high-suction industrial vacuums equipped with micro-crevice attachments to meticulously extract every single shard of glass. We vacuum the cargo floor, the third-row folding seat mechanisms, and the deepest recesses of the interior door frames. Compressed air is also used to dislodge stubborn fragments trapped in the sheet metal folds.
Phase 3: Extraction of the Damaged Glass and Old Urethane
Once the interior is immaculate, we turn our attention to the exterior. The perimeter of the LR4 quarter glass is surrounded by specialized encapsulated molding. If the glass has completely shattered, the remaining jagged edges held by the urethane bead must be safely removed.
- Cutting the Urethane: We employ a precision wire-cutting system or a specialized cold knife to slice through the factory polyurethane bead. The wire system is drawn carefully around the perimeter, slicing the bond without applying any stressful leverage against the Land Rover's painted aluminum frame.
- Pinch Weld Trimming: After the damaged glass framework is fully detached, the old urethane track on the pinch weld (the metal frame where the glass sits) is trimmed down to a thin, uniform base layer of approximately 1 to 2 millimeters. This thin layer acts as the ideal bonding surface for the new adhesive.
Phase 4: Surface Cleaning and Primer Application
The foundation of a safe, leak-proof auto glass installation lies in the chemical preparation of the bonding surfaces. Any contamination on the pinch weld or the new glass will result in a compromised seal.
- Deep Cleaning: The newly trimmed pinch weld is thoroughly cleaned using a high-grade, alcohol-based auto glass cleaner to remove dust, natural oils, and microscopic debris. The ceramic frit band (the black painted edge) of the replacement quarter glass is also scrubbed and prepped.
- Applying Glass Primer: We apply a technologically advanced black glass primer to any microscopic scratches on the vehicle's metal pinch weld to prevent future rust and corrosion. Additionally, a specialized primer is applied to the edge of the new encapsulated quarter glass. This primer acts as a chemical bridge, activating the surface to ensure maximum adhesion with the urethane.
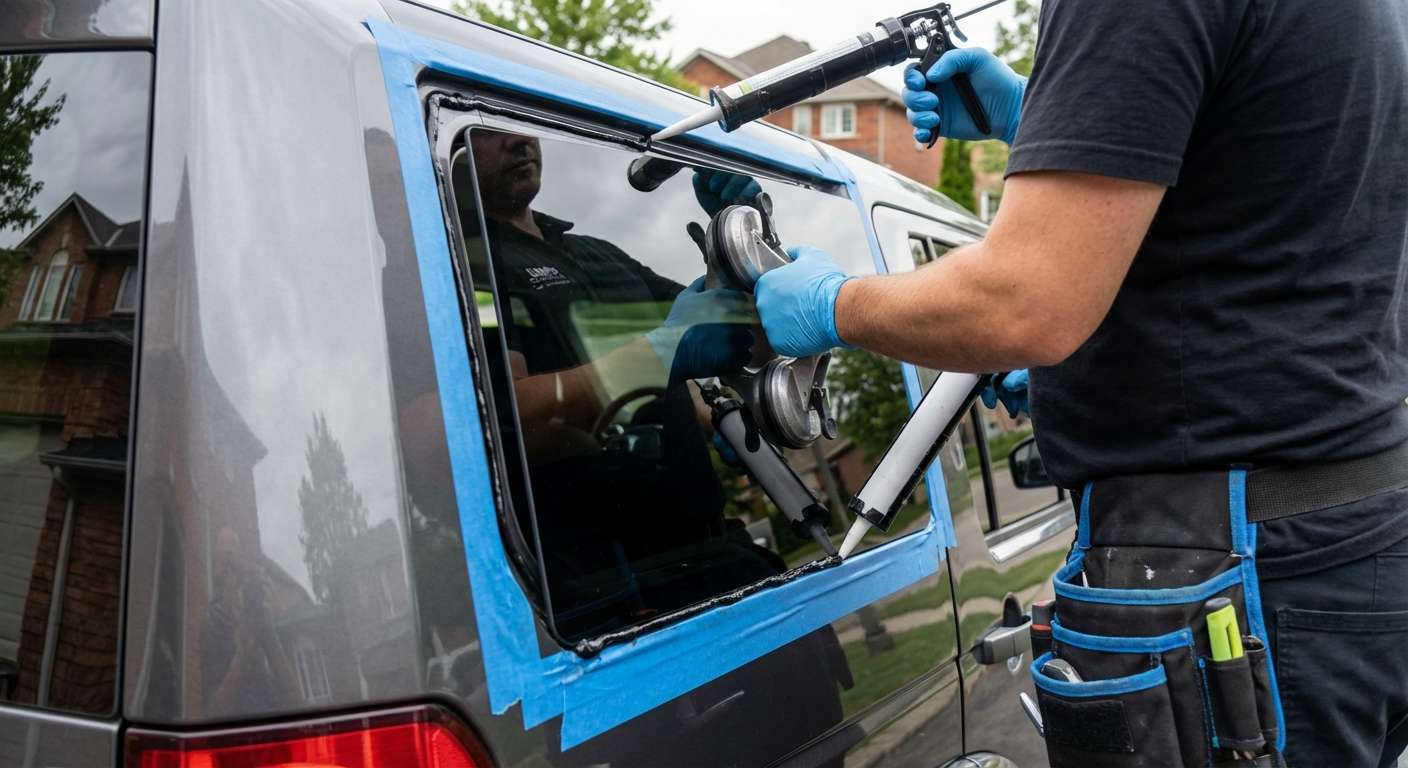
Phase 5: Installation Using High-Quality Adhesive
With both surfaces chemically prepped and flashed off (dried), we proceed to the most critical structural phase of the replacement.
- Urethane Application: We load our power caulking gun with a premium, OEM-grade, fast-curing polyurethane adhesive. This high-quality adhesive is applied in a perfectly uniform, triangular bead directly on top of the old trimmed urethane track. The triangular shape ensures that when the glass is compressed, the adhesive spreads evenly without interior push-out or exterior gaps.
- Setting the Quarter Glass: Precision is paramount. Using specialized suction cup grips, the technician carefully aligns the new Land Rover LR4 quarter glass with the body frame contours. The glass is gently pressed into the urethane bead, ensuring the encapsulated molding sits flush with the exterior bodylines. The panel is then secured with specialized retention tape while the fast-curing adhesive begins its cross-linking chemical reaction.
Phase 6: Reassembly and Final Quality Assurance
While the urethane securely cures, our technicians begin the reassembly phase. The interior D-pillar and cargo trim panels are meticulously realigned and snapped back into their factory positions. We double-check all seatbelt anchors and electronic connections (such as rear climate control vents or internal antennas). After a final, rigorous round of vacuuming and an exterior glass polish, the vehicle undergoes a leak-test simulation to guarantee a watertight, wind-noise-free seal. The result is a factory-perfect restoration of your Land Rover Discovery 4.
Premium Mobile Auto Glass Services Across the Greater Toronto Area (GTA)
Driving an elite vehicle like the Land Rover LR4 requires auto glass services that match its pedigree. At AlexWindshield, we eliminate the hassle of bringing your vehicle to a traditional body shop. Our state-of-the-art mobile service fleet brings our Master Technicians directly to your driveway, office parking lot, or garage. We proudly offer comprehensive, expedited service across the entire Greater Toronto Area (GTA).
Whether you are navigating the heavy commuter traffic along Highway 400 in Vaughan, commuting through the bustling tech and business corridors of Markham, or running errands in the suburban neighborhoods of Richmond Hill, our mobile units are fully equipped to perform onsite luxury glass replacement. We understand the local climate—from freezing Ontario winters to humid summers—which is why we utilize advanced climate-adaptive urethanes that cure safely regardless of the ambient temperature in the GTA.
Why Choose AlexWindshield for Your Land Rover Discovery 4?
When it comes to servicing a premium British engineered SUV like the Land Rover LR4 (2010-2016), you cannot afford to trust generic, corner-cutting glass shops. As a Master Technician at AlexWindshield, I ensure that every single quarter glass replacement adheres to the strictest OEM safety protocols. From the meticulous extraction of tempered glass shards from your interior to the precise application of our high-quality adhesive, we treat your Land Rover as if it were our own.
We stand firmly behind our craftsmanship. Every auto glass installation performed by AlexWindshield comes backed by our comprehensive Lifetime Warranty, covering any leaks, whistling, or manufacturer defects for as long as you own the vehicle. Don't let shattered glass disrupt your journey or compromise the luxury of your Discovery 4. Trust the dedicated local experts for all your mobile auto glass needs across Vaughan, Richmond Hill, Markham, and the broader GTA. Contact AlexWindshield today to schedule your precise, professional quarter glass replacement and experience true automotive service excellence.


