The 2017-2022 Kia Niro: A Masterclass in Aerodynamic Crossover Design and Why Its Back Glass Matters
The 2017-2022 Kia Niro revolutionized the subcompact crossover market by proving that unparalleled hybrid and electric vehicle efficiency does not have to come at the expense of aesthetic appeal or everyday utility. Unlike the bulky, boxy hybrids of the past, the Kia Niro features a gracefully tapered roofline that culminates in a highly specialized rear hatch. The back glass of the 2017-2022 Kia Niro is not merely a transparent window; it is a meticulously engineered structural component that houses complex defroster grid lines, integrates seamlessly with the rear wiper assembly, and plays a crucial role in maintaining the vehicle's aerodynamic drag coefficient. When this specific piece of glass shatters, it compromises not only your visibility and security but also the structural integrity of your liftgate and the overall thermal efficiency of your cabin.
As a Master Technician at AlexWindshield, I have witnessed firsthand how the unique curvature and integrated electronics of the Kia Niro's rear glass require a highly specialized approach to replacement. Tempered rear glass explodes into thousands of tiny, razor-sharp pieces upon impact, infiltrating every crevice of your cargo area. Restoring your vehicle to its factory-safe condition requires far more than just slapping on a new pane of glass. It demands surgical precision, technical expertise, and a rigorous adherence to safety standards.
Your Premier Local Choice for Auto Glass in the Greater Toronto Area
When you are driving a sophisticated vehicle like the Kia Niro, you cannot trust your rear glass replacement to just anyone. AlexWindshield is proud to be the leading authority on specialized auto glass services across the Greater Toronto Area (GTA). We understand that a shattered back window is a high-stress emergency, which is why we bring our state-of-the-art mobile auto glass services directly to your driveway, workplace, or emergency location.
Our mobile replacement fleets are fully equipped and routinely dispatched throughout the region, with specialized rapid-response availability in Vaughan, Richmond Hill, and Markham. Whether you are parked outside a busy office complex in Markham, running errands in Vaughan, or sitting securely in your home driveway in Richmond Hill, our master technicians arrive with the exact OEM-quality glass your 2017-2022 Kia Niro requires. We navigate the GTA traffic so you do not have to drive a compromised, drafty, and unsafe vehicle across town.
Understanding the Anatomy of the Kia Niro Back Glass
Before diving into the replacement process, it is essential to understand what makes the 2017-2022 Kia Niro back glass unique. Unlike a front windshield, which is made of laminated glass that cracks but holds its shape, the rear window is constructed from tempered safety glass. Upon a heavy impact, tempered glass is designed to shatter completely into small, granular chunks to prevent large, guillotine-like shards from injuring passengers.
Additionally, the Niro's rear glass is deeply integrated into the vehicle's electrical system. It features an embedded thermal defroster grid required for clearing frost during brutal Ontario winters, and a pre-drilled bore hole that mounts the rear windshield wiper motor assembly. Replacing this glass means managing electrical harnesses, dealing with intricate interior tailgate paneling, and ensuring a watertight seal on a hatch that is constantly opened and slammed shut. This is where the AlexWindshield master technician protocol shines.
Master Technician Protocol: Step-by-Step Back Glass Replacement (A to Z)
At AlexWindshield, we do not cut corners. Our comprehensive, step-by-step back glass replacement process guarantees that your 2017-2022 Kia Niro is restored to pristine, factory-level safety. Here is exactly how we perform the job.
Step 1: Comprehensive Damage Assessment and Interior Protection
The moment our technician arrives at your location in the GTA, the first priority is safety and vehicle preservation. We begin by inspecting the entire rear hatch area of your Kia Niro to ensure there is no structural damage to the metal liftgate frame that could impede a proper glass seal. Because the rear glass is completely shattered, the interior of your vehicle is exposed to the elements and covered in glass dust.
We lay down heavy-duty protective tarps over the rear bumper to prevent any scratches from our tools or belt buckles. Inside the cabin, we fold down the rear passenger seats and drape protective drop cloths over the premium fabric or leather upholstery. Protecting the interior from rogue adhesive drips and sharp glass fragments is a non-negotiable standard at AlexWindshield.
Step 2: Intensive Glass Cleanup and Vacuuming (The Critical Step)
When a back glass breaks, it creates a massive mess. Thousands of tiny tempered glass shards fall onto the cargo floor, lodge themselves into the carpeting, and worst of all, fall down inside the hollow cavity of the liftgate door. If left uncleaned, these shards will rattle every time you open the trunk or hit a bump, creating an infuriating noise for the lifespan of the car.
Our technicians use high-powered, industrial shop vacuums equipped with specialized micro-nozzles to extract all broken glass shards from the vehicle's interior. We meticulously vacuum the cargo mat, the spare tire well, and the rear seat crevices. We do not stop there; this intensive vacuuming process is repeated throughout the entire replacement procedure as more hidden shards are exposed.
Step 3: Tailgate Interior Panel Removal and Hardware Disconnection
To safely access the mounting points for the rear glass and effectively clean out the liftgate cavity, we must carefully dismantle the interior of your hatch. Using specialized, non-marring trim removal tools, we unclip the plastic interior door panels surrounding the Kia Niro's rear window. We take extreme care not to snap the delicate plastic retention clips that hold these panels in place.
Once the interior liftgate panel is removed, we have direct access to the vehicle's wiring. We carefully unplug the electrical connectors for the rear defroster grid. Next, using a socket set, we unbolt and remove the exterior rear wiper arm, followed by the internal wiper motor assembly. We also remove the high-mount third brake light if it obstructs the pinch weld. With the door panel removed, we perform a secondary deep-vacuuming deep inside the metal shell of the tailgate to extract the final hidden glass shards.
Step 4: Removing the Old Adhesive and Preparing the Pinch Weld
The shattered remnants of the original glass are still firmly glued to the metal frame of the hatch (the pinch weld) via a thick bead of old factory urethane. Using an specialized auto glass cut-out tool—such as a cold knife or an advanced wire-cutting system—we carefully slice through the old adhesive bed around the perimeter of the liftgate.
Once the glass rim is removed, we perform a "close cut." We trim down the old urethane adhesive, leaving a flat, uniform base of about 1 to 2 millimeters. This remaining thin layer provides the perfect bonding surface for the new adhesive. We then treat the bare metal frame to a rigorous surface cleaning using specialized, alcohol-based glass cleaners to remove dirt, moisture, and automotive grease. A perfectly clean surface is the secret to a leak-proof installation.
Step 5: Primer Application and High-Quality Urethane Adhesive Extrusion
Before applying the new glue, we must prime the surfaces. If there are any microscopic scratches on the painted pinch weld caused by the removal process, we apply a high-grade black metal primer to seal the metal and prevent future rust. We also apply a specialized glass primer to the black ceramic band (the frit) on the perimeter of the brand-new OEM-quality Kia Niro back glass. This primer acts as a chemical activator, ensuring the adhesive bites into the glass.
Next comes the most critical structural step. Using an electric caulking gun, our master technician extrudes a continuous, perfectly triangular bead of premium, fast-curing polyurethane adhesive directly onto the prepared pinch weld. This high-quality adhesive is strictly regulated for automotive use; it provides structural rigidity to the roofline and guarantees a permanently waterproof seal against harsh GTA rain and snow.
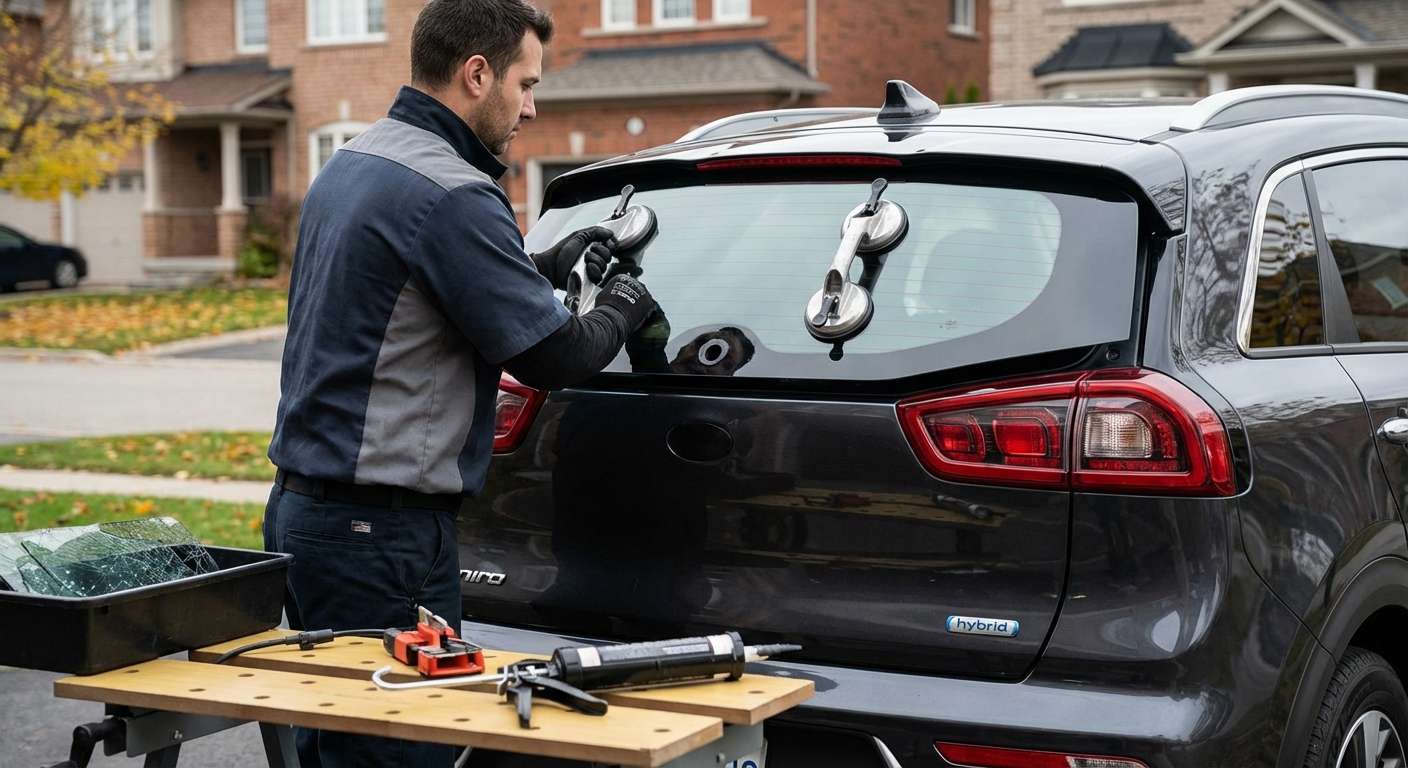
Step 6: Precision Installation of the New Kia Niro Back Glass
With the adhesive bead perfectly laid out, it is time to set the new glass. We attach heavy-duty, industrial-grade suction cups to the exterior of the new back glass. Lifting the glass requires steady hands and perfect spatial awareness. We carefully align the glass with the upper roofline and the side channels of the liftgate.
Once perfectly centered, we gently press the glass into the urethane bed. We apply firm, even pressure around the entire perimeter to ensure the adhesive spreads uniformly and creates a flawless, airtight seal. We use specialized automotive retention tape to hold the glass firmly in its perfect position while the fast-curing urethane begins its chemical bonding process.
Step 7: Reassembly, Hardware Reconnection, and Final Quality Check
While the heavy-duty adhesive cures, our master technician works in reverse to reassemble your Kia Niro. We carefully feed the rear wiper motor shaft back through the pre-drilled hole in the new glass and bolt the motor back into the liftgate frame. We securely reattach the exterior wiper arm and ensure the blade rests in the correct factory position.
Next, we reconnect the vital electrical harnesses for the rear thermal defroster grid, ensuring an unimpeded flow of electricity to melt winter ice. We snap the interior tailgate plastic door panels back into place, ensuring every single clip seats firmly with no annoying rattles. Finally, we clean the new back glass to a streak-free, crystal-clear shine using specialized automotive glass cleaner, and perform one last sweeping vacuum of your cargo area.
Essential Post-Installation Care for Your New Back Glass
After our AlexWindshield master technician completes the installation, we will provide you with a few simple but crucial guidelines to ensure the longevity of your new back glass. While our advanced urethane adhesive sets rapidly, we recommend the following precautions for the first 24 to 48 hours:
- Leave the retention tape on: Do not remove the strips of tape at the top of the glass for at least 24 hours. They prevent gravity from shifting the glass while the glue achieves maximum hardness.
- Avoid high-pressure car washes: Hand wash only for the first two days. High-pressure jets can compromise the fresh urethane seal.
- Keep a window slightly cracked: When closing your doors, the sudden spike in cabin air pressure can push outward against the newly installed glass. Keeping a side window rolled down half an inch relieves this pressure.
- Avoid slamming the liftgate: Close your rear hatch gently until the adhesive is entirely cured.
Contact AlexWindshield Today for Expert Kia Niro Glass Replacement
Dealing with a shattered rear window is stressful, but getting it fixed correctly does not have to be. As a master technician, I can assure you that precision, high-quality materials, and exhaustive attention to detail are the only ways to restore the safety and comfort of your 2017-2022 Kia Niro.
AlexWindshield is your trusted expert for premium, mobile auto glass services across the GTA, proudly servicing Vaughan, Richmond Hill, and Markham. We bring the auto glass shop directly to you, saving you time, towing fees, and immense frustration. Best of all, every single replacement we perform is backed by our comprehensive Lifetime Warranty on workmanship and leaks, giving you ultimate peace of mind on the road.
Do not let a broken back glass disrupt your life or compromise your safety. Contact AlexWindshield today to schedule your mobile Kia Niro back glass replacement, and let our master technicians get you back on the road with unmatched clarity, structural integrity, and confidence.


