The 2011-2019 Ford Explorer: Restoring the Fifth-Generation Icon's Side Visibility
When Ford reinvented the 2011-2019 Explorer by transitioning it to a state-of-the-art unibody platform, they completely redefined the modern family SUV. This fifth-generation powerhouse traded its old truck-based roots for sophisticated handling, spacious interiors, and expansive acoustic glass that delivers a whisper-quiet cabin. However, that massive side profile and large greenhouse mean your door glass is highly susceptible to road debris, vandalism, and side-impact collisions. At AlexWindshield, we know that a shattered door window on your Explorer isn't just a cosmetic nuisance; it represents an immediate breach of your vehicle's security, climate control, and structural integrity. As a Master Technician, I have seen exactly how compromised door glass can ruin the premium driving experience this rugged SUV was designed to offer.
Unlike standard static glass, the door glass of the 2011-2019 Ford Explorer is an active, moving component of a complex electromechanical system. It interacts with the heavy-duty window regulator, strict weather seals, and the vehicle's internal anti-theft sensors. A proper replacement requires far more than simply slotting in a new pane; it demands precise technical calibration, specialized tools, and a meticulous approach to interior safety. Leaving a cracked or shattered door glass unattended exposes your pristine interior to the unpredictable Canadian elements and gives thieves an open invitation. You need a fast, specialized, and highly resilient solution to get your SUV back to factory standards.
Trusted Mobile Auto Glass Services Across the Greater Toronto Area (GTA)
Driving a Ford Explorer with a broken door window is unsafe and highly inconvenient, which is why AlexWindshield brings the repair shop directly to your driveway, office, or emergency location. We are proud to offer premium mobile auto glass replacement services across the entire Greater Toronto Area (GTA). Whether you are navigating the busy commercial districts of Vaughan, parked in a residential neighborhood in Richmond Hill, or running errands across the tech hubs of Markham, our fully equipped mobile service fleet is ready to deploy. We understand that GTA drivers deal with everything from extreme winter freezes to scorching summer heat, meaning your new door glass must be installed with absolute perfection to withstand harsh thermal cycling.
Step-by-Step Door Glass Replacement Process for the 2011-2019 Ford Explorer
As a senior technician, I adhere to a strict, uncompromising methodology to ensure that every replacement meets or exceeds Original Equipment Manufacturer (OEM) safety standards. Here is the detailed, step-by-step technical process we use to replace the door glass on your 2011-2019 Ford Explorer.
Step 1: Complete Interior Protection and Damage Assessment
Before any tools are lifted, our priority is the protection of your Explorer's premium interior. We begin by laying down heavy-duty protective covers over the front or rear seats, the center console, and the surrounding floorboards. We carefully tape off the painted exterior door frame to prevent any accidental scratches during the extraction process. A thorough damage assessment is then conducted to determine if the window regulator motor or the surrounding weatherstripping sustained any collateral damage when the glass broke.
Step 2: Removal of Door Panels and Hardware
To access the internal cavity of the door, we must carefully perform the removal of door panels. The 2011-2019 Explorer features hidden retaining bolts behind the inner door handle cover and the armrest bezel. Using specialized non-marring nylon pry tools, we unclip the robust plastic trim pieces without snapping the delicate retention clips. We then extract the 7mm and 8mm Torx screws, disconnect the intricate wiring harnesses for the power locks, window switches, and ambient lighting, and safely lift the interior door panel away. Finally, we carefully peel back the factory vapor barrier, ensuring the waterproof butyl adhesive remains intact for reassembly.
Step 3: Meticulous Glass Shard Vacuuming and Debris Removal
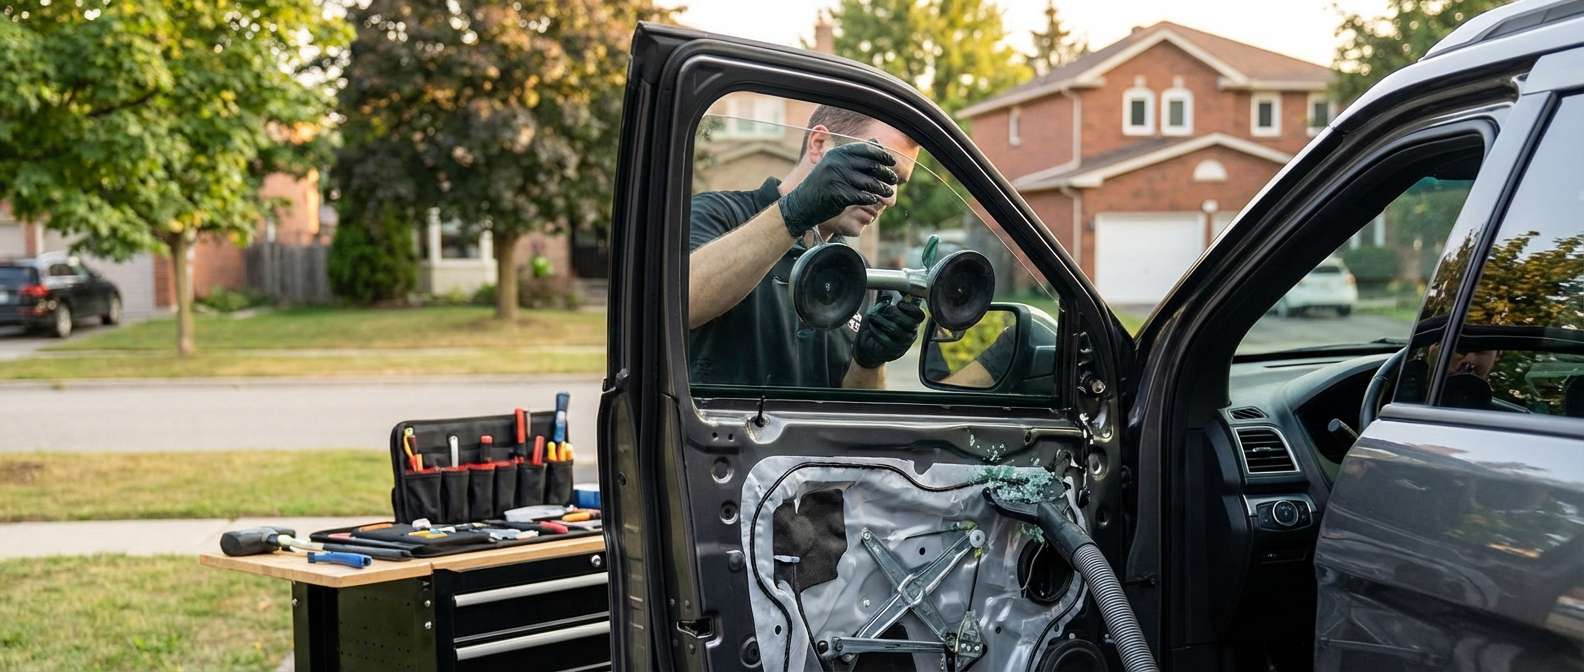
When tempered door glass shatters, it explodes into thousands of tiny, sharp cubes that fall deep into the inner door shell and scatter across the cabin. Leaving even a single piece of glass inside the door mechanism will cause severe scratching on the new window or jam the regulator gears. We utilize high-powered, industrial shop vacuums with specialized crevice attachments, dedicating significant time to vacuuming all broken glass shards from the vehicle's interior, seats, carpets, and the deepest crevices of the metal door frame. We also flush out the rubber window run channels to ensure the track is completely free of hidden debris.
Step 4: Removal of the Old Glass Remnants and Regulator Preparation
With the inner door cavity exposed and cleaned, we lower the power window regulator to the service position. We then unbolt the retaining clamps or release the snap-clips holding the shattered remnants of the removal of the old glass. The mounting brackets are carefully extracted and inspected. If the lifter channels are warped or compromised, we reshape them to ensure perfect alignment for the incoming glass pane.
Step 5: Surface Cleaning, Primer Application, and Adhesive Sealing
While many modern door glasses rely heavily on mechanical bolts, ensuring a perfectly tight, rattle-free fit on specific replacement parts often requires secondary bonding at the base channel. We start with rigorous surface cleaning, wiping down the mounting brackets and the base of the new glass with high-grade isopropyl alcohol to remove all manufacturing oils and dust. Next, we execute a precise primer application to the bonding surfaces. Once the primer flashes off, we proceed with the installation of the new glass using high-quality adhesive injected directly into the regulator lifting channels. This industrial-grade adhesive creates an unbreakable, waterproof bond that guarantees the glass will not shift, rattle, or detach from the regulator tracks, even when slamming the heavy Explorer doors.
Step 6: Installation and Alignment of the New Door Glass
With the adhesive prepped and the regulator in position, we carefully angle the new OEM-quality door glass into the upper window frame. We slide the glass down the rubber run channels, ensuring it drops perfectly into the prepared regulator brackets. The retaining bolts are torqued precisely to Ford's factory specifications. Before the adhesive fully cures, we manually shift the glass to ensure the vertical alignment is completely parallel with the B-pillar and C-pillar, guaranteeing a seamless, wind-noise-free seal when the window is rolled up.
Step 7: System Testing and Final Reassembly
Before closing everything up, we reconnect the power window switch to run a full diagnostic cycle. We roll the window up and down multiple times, checking for smooth operation, checking the auto-reversal pinch-protection safety feature, and listening for any abnormal friction noises. Once the mechanical operation is verified as flawless, we meticulously re-seal the vapor barrier to prevent future water leaks. The door panel is then aligned with the structural pins and snapped firmly back into place. All wiring harnesses are reconnected, hidden screws are tightened, and cosmetic trim covers are restored. A final cleaning of the newly installed glass using ammonia-free automotive glass cleaner leaves your Explorer looking immaculate.
Why Choose AlexWindshield for Your Ford Explorer Auto Glass Needs?
Your 2011-2019 Ford Explorer is built for endurance, and its replacement parts should be just as tough. As the leading mobile glass specialists in the industry, AlexWindshield refuses to cut corners. We do not use cheap, distorted aftermarket glass that rattles in the tracks; we source only the highest quality materials that match Ford's strict acoustic and structural standards.
When you choose us, you are choosing unparalleled convenience and technical mastery. Our extensive coverage throughout the GTA, including rapid dispatch to Vaughan, Richmond Hill, and Markham, means you never have to drive an unsafe, exposed vehicle to a distant repair shop. We bring our expertise to your doorstep, saving you time and stress.
- Master Technicians: Every installation is performed by heavily trained experts who understand the unique structural nuances of the Ford Explorer unibody frame.
- Impeccable Cleanup: We guarantee an aggressive, detail-oriented removal of all broken glass, leaving your interior safer and cleaner than we found it.
- Premium Materials: From our OEM-equivalent glass to our industry-leading primers and adhesives, we use only the best products on the market.
- Comprehensive Mobile Service: We service all major hubs across the GTA, providing reliable, on-the-spot repairs at your home or workplace.
Don't let a shattered window compromise the safety, security, and comfort of your family SUV. Trust the dedicated experts at AlexWindshield to restore your Ford Explorer 2011-2019 to showroom condition. Every door glass replacement we perform is backed by our comprehensive Lifetime Warranty, covering any leaks, manufacturer defects, or workmanship errors for as long as you own the vehicle. Contact AlexWindshield today and experience the gold standard in mobile auto glass replacement.


