Restoring the Rugged Utility of Your 2005-2009 Subaru Outback
The 2005-2009 Subaru Outback—representing the legendary BP generation—is celebrated for its symmetrical all-wheel drive, undeniable durability, and cargo capacity. Whether you are navigating dense urban streets or exploring rugged weekend trails, this iconic wagon relies heavily on its expansive rear liftgate glass for optimal visibility. Unfortunately, this large pane of tempered glass is highly vulnerable to flying trail debris, reversing mishaps, shifting cargo, and the severe temperature fluctuations we experience throughout Ontario. When the rear window shatters, it compromises your vehicle's security, exposes your interior to the elements, and disables crucial rear visibility features. At AlexWindshield, we do not just replace auto glass; we restore your Subaru to its factory-safe condition with precision engineering and master-level craftsmanship.
Premium Mobile Back Glass Replacement Across the GTA
Dealing with a shattered back window is stressful enough without the hassle of driving a dangerously compromised vehicle to a repair shop. That is why AlexWindshield brings our state-of-the-art mobile auto glass service directly to your driveway, workplace, or secure parking garage. We proudly serve the entire Greater Toronto Area (GTA), with specialized rapid-response mobile units frequently operating in Vaughan, Richmond Hill, and Markham. Our mobile technicians arrive fully equipped with the specialized tools, OEM-quality replacement glass, and premium adhesives required to perform a flawless installation wherever you are, ensuring your Subaru Outback is back on the road safely and efficiently.
Understanding the 2005-2009 Subaru Outback Back Glass
Replacing the back glass on a third-generation Subaru Outback is a highly technical procedure that requires specific expertise. Unlike a standard side window, the rear liftgate glass on the 2005-2009 Outback integrates several critical electrical and mechanical components. This includes the defroster grid essential for Canadian winters, the integrated radio antenna lines (on specific trims), and the mounting points for the rear wiper motor assembly. A masterful replacement requires meticulous dismantling of the rear tailgate, careful handling of the electrical harnesses, and absolute precision during the urethane bonding process to guarantee a leak-proof seal.
The AlexWindshield Master Technician Process: Step-by-Step Replacement
As Master Technicians, we adhere to strict automotive glass replacement safety standards. Here is our comprehensive, A-to-Z process for replacing the back glass on your 2005-2009 Subaru Outback:
Step 1: Vehicle Assessment and Interior Protection
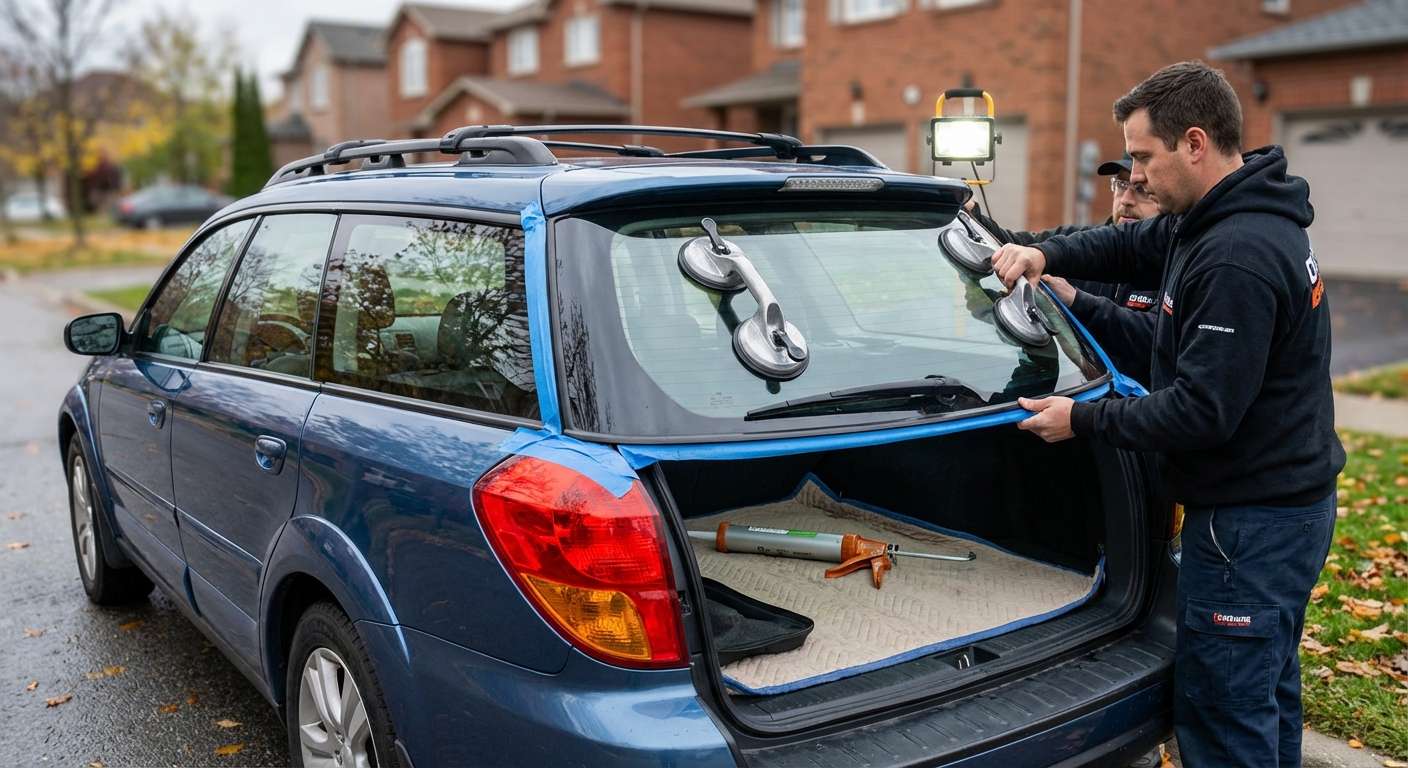
Before any physical work begins, our technicians perform a thorough pre-inspection of the vehicle's tailgate. We document the condition of the paint, the wiper assembly, and the interior cargo area. Because tempered back glass shatters into thousands of tiny, pebble-like pieces upon impact, protecting the interior is our immediate priority. We lay down heavy-duty drop cloths over the cargo area floor, fold down the rear seats, and use protective tape to shield the exterior paint surrounding the liftgate frame from any accidental tool strikes.
Step 2: Tailgate Panel Removal and Hardware Disconnection
To properly install a new rear windshield and eliminate the annoyance of rattling glass shards, we must gain access to the inner workings of the liftgate. Our technicians carefully remove the interior plastic tailgate trim panels using specialized nylon pry tools to prevent damaging or snapping the retaining clips. Once the interior paneling is removed, we systematically disconnect the defroster wire tabs, unplug the high-mount third brake light if necessary, and unbolt the rear wiper motor armature that protrudes through the glass.
Step 3: Meticulous Glass Extraction and Deep Vacuuming
This is one of the most critical steps in back glass replacement. A shattered rear window leaves thousands of glass fragments lodged inside the tailgate cavity and spread across the trunk. Using high-powered industrial shop vacuums equipped with specialized narrow nozzles, we meticulously extract every single glass shard from the cargo area, the seams of the seats, and most importantly, deep inside the hollow metal door panel of the tailgate. Failing to vacuum the interior panel completely results in a permanent rattling noise every time you close the trunk or drive over a bump. At AlexWindshield, we ensure your Outback is left completely shard-free and impeccably clean.
Step 4: Old Urethane Removal and Pinch Weld Preparation
With the old glass fragments cleared, we address the vehicle's frame, known as the pinch weld. The original factory urethane (the heavy-duty adhesive that holds the glass to the car) is still bonded to the frame. Using specialized cold knife extraction tools and power cut-out tools, our technicians carefully slice away the old adhesive bead, trimming it down to a thin, uniform base of about 1-2 millimeters. This process requires a steady hand to avoid scratching the painted metal underneath, which could eventually lead to rust. We then thoroughly clean the entire bonding area with a specialized, alcohol-based auto glass surface cleaner to remove dust, grease, and moisture.
Step 5: Primer Application and Corrosion Prevention
A flawless seal is impossible without proper chemical preparation. We apply an advanced glass primer to the black ceramic band (the frit) of the brand-new replacement glass to promote molecular adhesion. Simultaneously, we inspect the vehicle's pinch weld for any bare metal scratches that may have occurred during the removal of the original urethane. We apply a specialized metal primer to these areas. This step is absolutely vital for two reasons: it ensures the new adhesive bonds with maximum structural integrity, and it completely seals the metal to prevent rust formation, which is a common issue in harsh Canadian climates.
Step 6: High-Quality Urethane Adhesive Application
Once the primer has flashed (dried to the exact required specification), we prepare the adhesive. At AlexWindshield, we exclusively use premium, fast-curing automotive-grade polyurethane adhesive. Using a heavy-duty electric caulking gun, we apply a consistent, V-shaped bead of urethane perfectly aligned along the pinch weld. The height and width of this bead are precisely calculated to match Subaru's factory specifications, ensuring that when the glass is pressed into place, the adhesive spreads evenly without seeping into the interior or leaving microscopic gaps that could cause water leaks or wind noise.
Step 7: Precision Installation of the New Back Glass
Installing the large back glass of a Subaru Outback requires perfect alignment. Our technicians carefully lift the new, OEM-equivalent glass and guide it perfectly into the tailgate opening. We use heavy-duty suction cup grips to maintain total control of the glass as we gently press it into the fresh urethane bed. Once seated, we secure the glass with specialized retention tape to hold it perfectly in place while the urethane begins its curing process. We then re-attach the rear wiper motor assembly, bolt down the wiper arm perfectly aligned with the resting position, and reconnect the defroster electrical tabs to ensure your rear window heating grid functions flawlessly.
Step 8: Final Inspection, Panel Reassembly, and Clean-Up
With the new glass securely bonded, we snap the interior tailgate trim panels back into place, ensuring every clip is properly seated. We perform a final, comprehensive diagnostic check: testing the rear wiper blade sweep, engaging the rear defroster to ensure electrical continuity, and conducting a final wipe-down of the glass with foaming glass cleaner to leave a streak-free shine. We then perform a secondary vacuum sweep of the interior to guarantee absolutely no residual glass dust remains, leaving your Subaru Outback cleaner than when we arrived.
Why the Right Glass and Adhesive Matter
- OEM-Equivalent Glass Quality: We use glass that perfectly matches the curvature, tint, and defroster grid specifications of the 2005-2009 Subaru Outback. This ensures zero visual distortion and a perfect weather-tight fit.
- Advanced Urethane Adhesives: The back glass is a structural component of your tailgate. We utilize industry-leading urethane that features an exceptionally fast Safe Drive-Away Time (SDAT), meaning you can safely drive your vehicle shortly after the installation is complete, regardless of the weather in the GTA.
- Enhanced Visibility and Safety: A properly installed rear window restores the structural integrity of the vehicle's rear cabin, protecting passengers in the event of an accident or rollover.
The AlexWindshield Guarantee: Trust the Local Experts
When you choose AlexWindshield for your 2005-2009 Subaru Outback back glass replacement, you are choosing unparalleled technical expertise and uncompromising quality. We understand the specific nuances of the Greater Toronto Area (GTA) driving environment, and we build our replacements to withstand it all. Whether you are at home in Vaughan, at the office in Richmond Hill, or out running errands in Markham, our mobile auto glass replacement fleet is ready to deliver master-class service directly to you.
We stand firmly behind our craftsmanship. Every back glass replacement performed by AlexWindshield comes backed by our comprehensive industry-leading Lifetime Warranty. This warranty guarantees that your new installation will be completely free from air leaks, water leaks, and manufacturer defects for as long as you own your vehicle. Do not let a shattered rear window compromise the utility and safety of your Subaru. Trust the true auto glass professionals to restore your vehicle safely, securely, and conveniently.


