Reviving the First-Generation Powerhouse: Expert Mazda CX-9 (2007-2015) Windshield Replacement
The first-generation Mazda CX-9 (2007-2015) redefined the mid-size crossover SUV segment by combining sports-car-inspired driving dynamics with formidable three-row family utility. Built with a sweeping, aerodynamic profile, the expansive windshield of this celebrated crossover does much more than provide a clear view of the road. It acts as a primary structural pillar of the vehicle's cabin, bearing up to 30% of the roof's structural integrity in the event of a rollover crash and ensuring proper passenger airbag deployment. When your CX-9 suffers a severe rock chip, a sprawling crack, or complete glass compromise, an immediate, professional intervention is not just about aesthetics—it is a critical requirement for your family's safety.
At AlexWindshield, we do not believe in taking shortcuts. As a senior auto glass technicians, we understand the specific aerodynamic curves and sophisticated hardware embedded in the glass of your Mazda CX-9. From acoustic damping layers to rain-sensing wiper brackets, we restore your vehicle to its precise factory specifications.
Premier Auto Glass Solutions Across the Greater Toronto Area
Navigating the bustling highways of Southern Ontario demands pristine visibility. We proudly provide top-tier auto glass services across the Greater Toronto Area (GTA). Our fully equipped mobile response units are designed to bring the auto glass shop directly to your location, maximizing your convenience without sacrificing technical precision.
Whether you are parked at a corporate plaza in Vaughan, resting in your home driveway in Richmond Hill, or running errands at a shopping center in Markham, our technicians arrive promptly with the exact OEM-quality glass your 2007-2015 Mazda CX-9 requires. We eliminate the stress of driving a compromised vehicle through heavy GTA traffic by delivering our state-of-the-art mobile windshield replacement services right to your doorstep.
The Master Technician's Approach: Step-by-Step Windshield Replacement Process
Replacing the windshield on a 2007-2015 Mazda CX-9 requires advanced technical expertise, a steady hand, and an uncompromising commitment to safety protocols. Below is our rigorous, A-to-Z technical workflow that guarantees a flawless, factory-grade installation every single time.
Step 1: Meticulous Vehicle Preparation and Interior Protection
Before any tools are drawn, we must protect the sophisticated interior of your Mazda CX-9. The replacement process involves sharp tools, heavy glass, and chemical adhesives, making comprehensive vehicle protection our absolute first priority.
- Dashboard and Seat Protection: We lay down heavy-duty, anti-static protective drop cloths across the dashboard, center console, and front leather or cloth seats.
- Steering Wheel Cover: A specialized protective sheath is placed over the steering wheel to prevent any accidental transfer of industrial dirt or urethane.
- Exterior Fender Drapes: We apply soft, non-abrasive fender covers to the exterior paintwork surrounding the cowl and A-pillars to protect your vehicle's clear coat from tool friction and belt buckles.
Step 2: Careful Removal of Exterior Trims and Components
To access the precise edge of the auto glass, we must strip away the exterior aerodynamic components that secure the lower and side borders of the windshield.
- Wiper Arm Extraction: We carefully unbolt and remove the windshield wiper arms, ensuring the splines and mounting nuts are securely stored.
- Cowl Panel Removal: The plastic rain cowl at the base of the windshield is meticulously detached. We ensure the delicate plastic retaining clips (which often become brittle in 2007-2015 models) are preserved or replaced.
- Rearview Mirror and Sensor Disconnection: From the interior, we gently detach the rearview mirror, disconnect the rain sensor wiring harnesses, and unplug any early-generation forward-facing camera modules.
Step 3: Precision Extraction of the Damaged Glass
Removing the shattered or cracked windshield requires breaking the original factory urethane bond without damaging the vehicle's metal frame.
- Urethane Cutting: We utilize advanced wire-cutting systems and cold knives to slice through the dense layer of old adhesive securing the glass to the vehicle's pinch weld.
- Pinch Weld Protection: By using precision auto-feed wire tools, we ensure that the cutting wire smoothly separates the glass from the frame without scratching the vital paint layer on the steel pinch weld beneath.
- Glass Removal: Using heavy-duty vacuum suction cups, two technicians (or a mechanized setup tool) carefully lift the damaged windshield out of the frame and transport it safely away for recycling.
Step 4: Pinch Weld Surface Cleaning and Preparation
The foundation of a safe windshield installation is a perfectly prepared pinch weld. The new adhesive must bond flawlessly to the existing substrate.
- Urethane Trimming: We use specialized ultra-sharp scrapers to trim the old urethane down to a highly consistent 1-2 millimeter base layer, which provides the ideal bonding surface for the fresh adhesive.
- Debris Extraction: Industrial vacuums and soft-bristle brushes are used to remove any microscopic glass shards, dirt, and accumulated road grime from the deep crevices of the window channel.
- Chemical Wash: We treat the entire perimeter with a specialized, alcohol-based auto glass cleaner to strip away any grease, wax, or moisture.
Step 5: Professional Primer Application
Primer serves two indispensable functions: it promotes aggressive chemical adhesion and prevents future rust formation that could severely compromise vehicle safety.
- Metal Treatment: If any tiny, microscopic scratches occurred on the bare metal during the removal phase, we immediately apply a specialized anti-corrosion black primer to seal the metal and prevent long-term rust.
- Frit Band Priming: We apply a high-grade glass primer to the black ceramic frit band on the inside edge of the new OEM-quality windshield. This activates the glass surface, allowing it to fuse chemically with the urethane adhesive.
Step 6: Application of High-Quality Urethane Adhesive
The adhesive is the lifeblood of the installation. We exclusively use premium, high-viscosity, fast-curing automotive urethane.
- V-Bead Extrusion: Using an electronic caulking gun, we extrude a perfectly uniform, continuous "V-shaped" bead of high-quality urethane adhesive along the vehicle's pinch weld. The V-shape guarantees an airtight, watertight seal with zero gaps once the glass is compressed.
- Joint Sealing: We pay special attention to the overlapping joints of the urethane to ensure there is absolutely no possibility of wind noise or water intrusion.
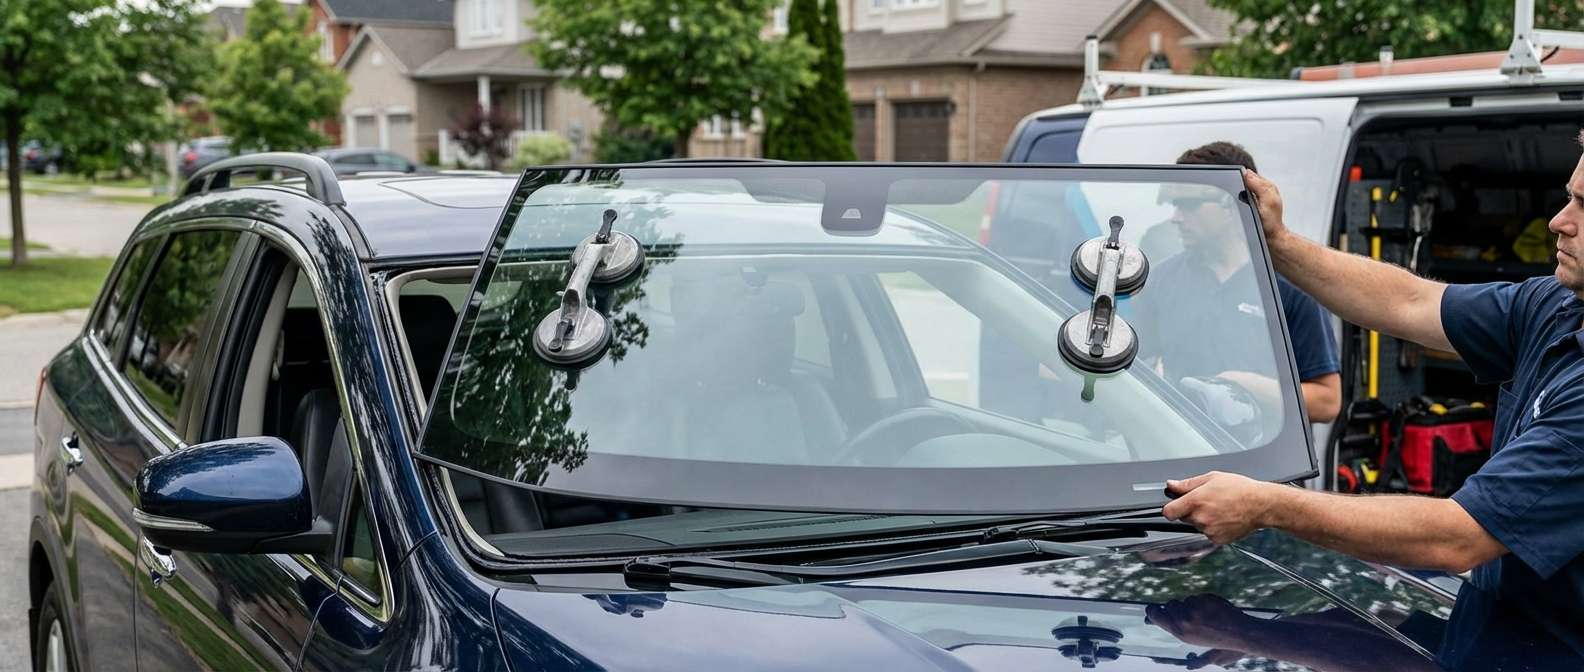
Step 7: Flawless Glass Installation and Curing
Timing is critical. Once the urethane is applied, the glass must be set precisely before the adhesive begins to skin over.
- Precision Setting: Utilizing heavy-duty suction cups, our master technicians carefully hover the new windshield over the frame, aligning the VIN notch and the cowl brackets perfectly before lowering it into the wet urethane.
- Gentle Compression: We apply gentle, even pressure around the entire perimeter of the glass to properly seat the windshield and flatten the V-bead into a robust, structural bond.
- Component Reassembly: While the urethane begins its rapid chemical cure, we meticulously reinstall the cowl panel, wiper arms, exterior trims, and interior rearview mirror components.
Crucial Safety Step: Mandatory ADAS Camera Calibration for Mazda CX-9
For high-trim versions of the Mazda CX-9 (2007-2015), particularly the Grand Touring models outfitted with early Advanced Driver Assistance Systems (ADAS), a simple physical installation is only half the job. These vehicles utilize complex forward-sensing cameras and laser modules mounted directly behind the upper portion of the windshield to control features like rain-sensing wipers, automatic headlamps, and early collision warning systems.
When a new windshield is installed, the camera's original viewing angle is inevitably altered by microscopic fractions of a millimeter. Even the slightest deviation in glass curvature or exact mounting position can completely blind or misguide these vital safety sensors. Therefore, mandatory ADAS camera calibration is an absolute necessity.
At AlexWindshield, our technicians utilize highly advanced computer diagnostics and specialized optical targeting systems to recalibrate your Mazda CX-9's forward-facing cameras. We meticulously align the camera's software with the new glass, ensuring that your vehicle's safety mechanisms react with split-second accuracy to the physical world outside. Skipping this step risks phantom braking, delayed collision alerts, and severely compromised driver safety. We guarantee your ADAS systems will be restored to strict OEM safety standards before we hand you back the keys.
The AlexWindshield Advantage: Mobile Service with a Lifetime Warranty
Replacing the windshield of your Mazda CX-9 should be a seamless, stress-free experience. As the most trusted name in auto glass repair and replacement across the Greater Toronto Area, AlexWindshield combines master-level technical craftsmanship with ultimate consumer convenience. Our dedicated mobile fleet brings our premier service directly to your location in Vaughan, Richmond Hill, and Markham, saving you valuable time.
We stand firmly behind the precision of our work and the superiority of our materials. That is why every single windshield replacement performed by AlexWindshield is backed by our comprehensive Lifetime Warranty. We guarantee our auto glass installations against any air leaks, water leaks, or manufacturer glass defects for as long as you own your vehicle. When you choose AlexWindshield, you are not just buying a piece of glass; you are investing in structural safety, optical clarity, and ultimate peace of mind on the road.


