Preserving the Ultimate Acoustic Sanctuary: Lexus LS 430 (2001-2006) Vent Glass Replacement
The 2001-2006 Lexus LS 430 set a monumental benchmark in the luxury automotive world, engineered to deliver a ride so eerily quiet that you could hear a pin drop even at highway speeds. Achieving this legendary cabin tranquility required an obsessive attention to aerodynamics and hermetic sealing. When the vent glass on your LS 430 shatters, that meticulously crafted acoustic sanctuary is instantly compromised. Not only does a broken vent window expose your premium interior to the harsh Canadian elements, but it also creates unbearable wind noise and poses a severe security risk. At AlexWindshield, we understand that working on a flagship luxury vehicle requires an uncompromising level of precision and respect for automotive craftsmanship.
As a Master Technician, I have seen firsthand how improperly installed auto glass can ruin the driving experience of a luxury vehicle like the LS 430. Rushed jobs lead to water leaks, aggressive wind whistling, and interior rattles. That is why our specialized vent glass replacement process goes far beyond a simple swap. We perform a clinical, factory-standard restoration of your vehicle's side profile, utilizing premium materials and meticulous techniques to ensure your Lexus remains as silent, secure, and stately as the day it rolled off the assembly line in Tahara.
The Master Technician's Blueprint: Step-by-Step Vent Glass Replacement
Replacing the vent glass on a Lexus LS 430 involves navigating intricate interior trim pieces, managing specialized encapsulated glass modules, and ensuring perfect adhesive bonding. Because vent glass is constructed of tempered glass, a break means thousands of tiny, razor-sharp shards are scattered throughout the cabin and deep inside the door cavity. Here is our comprehensive, step-by-step technical process for restoring your LS 430.
Step 1: Meticulous Interior Protection and Prep
Before any tools are lifted, we secure the work area. The Lexus LS 430 boasts premium semi-aniline leather, intricate Japanese ash wood trims, and plush carpeting that must be protected at all costs.
- Seat and Console Shielding: We drape heavy-duty, scratch-resistant protective blankets over the rear seats, door sills, and center console to prevent any stray glass shards or tools from damaging the luxurious upholstery.
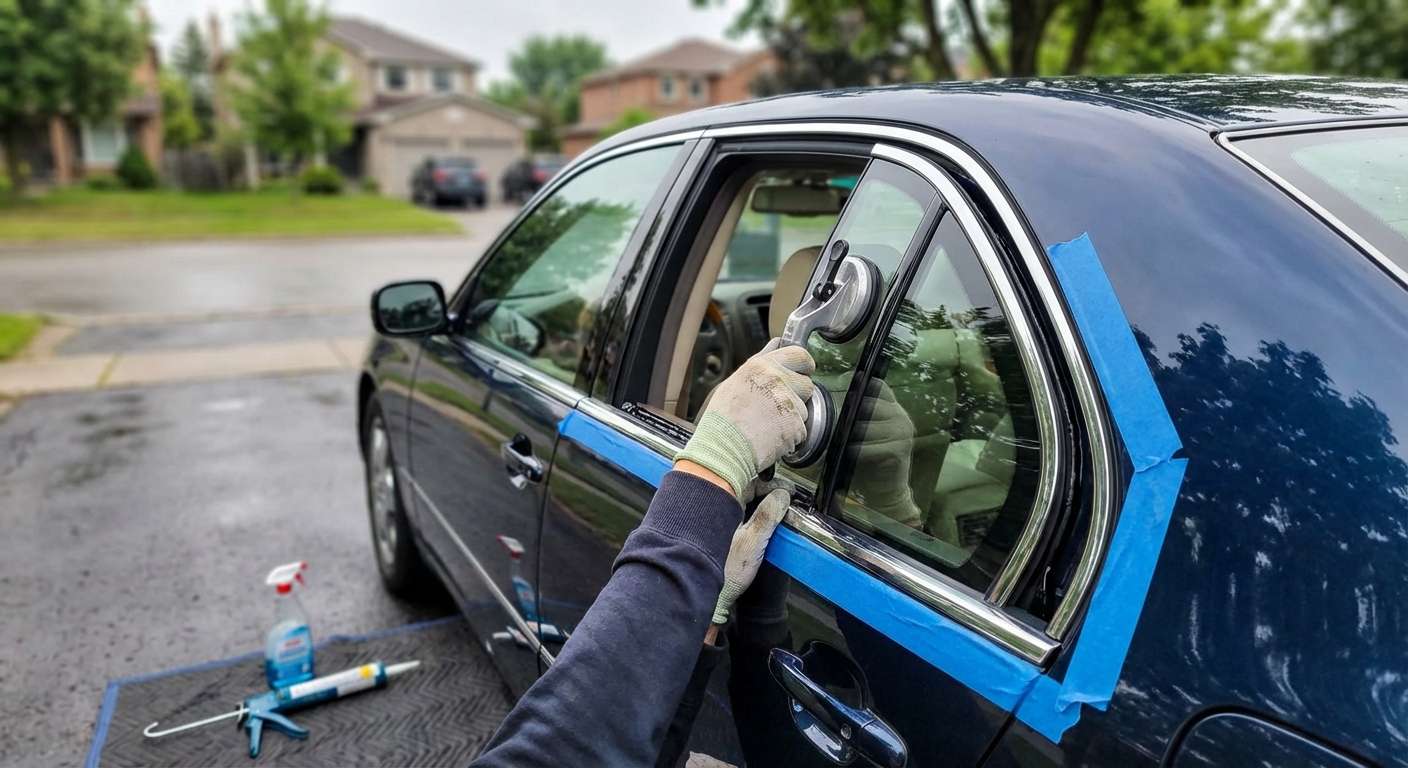
- Exterior Masking: Automotive-grade protective tape is applied to the exterior paint and C-pillar surrounding the vent glass frame to guard the vehicle's clear coat during the removal and extraction processes.
- Safety Gear Protocol: Our technicians equip themselves with cut-resistant Kevlar gloves and safety glasses to safely handle the shattered tempered glass.
Step 2: Interior Door Panel Removal and Component Disconnection
To access the structural mounting points of the vent glass and adequately remove the shattered remnants, the interior door panel must be carefully detached. This is a delicate procedure on the LS 430, requiring deep knowledge of hidden fasteners and high-end electronics.
- Non-Marring Tool Application: We use specialized nylon pry tools to gently unclip the fine wood trim and switchgear without leaving a single microscopic scratch.
- Hardware Extraction: We locate and remove all hidden Phillips screws and 10mm bolts securing the door card to the inner steel frame.
- Electrical Disconnection: The door panel is carefully supported while we disconnect the ambient courtesy lights, window switch harnesses, and the delicate wiring for the Mark Levinson audio speakers.
- Vapor Barrier Peel: We carefully peel back the factory weather-sealing vapor barrier, ensuring the butyl adhesive remains intact for seamless reassembly later.
Step 3: Comprehensive Shattered Glass Extraction
This is arguably the most critical step for any door or vent glass replacement. Tempered vent glass explodes into thousands of granular pieces upon impact. If left inside the door cavity, these shards will cause maddening rattles, block drainage weep holes (causing rust), and eventually jam the primary window regulator mechanisms.
- Deep Cavity Vacuuming: Using a high-powered, industrial HEPA vacuum with specialized micro-crevice attachments, we extract every single glass shard from the bottom of the door shell.
- Regulator Track Cleaning: We meticulously blow out and vacuum the window tracks and the primary glass regulator channels to ensure zero friction or grinding occurs when operating the main door window.
- Cabin Sweeping: The floor mats, seat crevices, and surrounding interior spaces are thoroughly vacuumed to ensure complete safety for your passengers.
Step 4: Old Glass Frame Removal and Surface Cleaning
With the area clear of debris, we focus on extracting the remaining broken glass housed within the vehicle's frame and preparing the bonding surface.
- Adhesive Cutting: Using a specialized cold knife and precision wire-cutting tools, we carefully slice through the original factory urethane bead that holds the vent glass encapsulation to the vehicle's pinchweld.
- Frame Extraction: The remnants of the old vent glass frame are carefully pulled away from the body of the Lexus.
- Pinchweld Trimming: We trim the old urethane down to a thin, 1-2 millimeter base layer. This creates the optimal foundation for the new adhesive to bond chemically.
- Chemical Surface Cleaning: The bare metal and surrounding encapsulation areas are aggressively cleaned using an alcohol-based, lint-free preparation solvent to remove dirt, road grime, and any residual oils that could compromise the seal.
Step 5: Pinchweld Primer Application
A vital step that separates professional Master Technicians from amateurs is the proper use of automotive glass primer. This is non-negotiable for structural integrity and longevity.
- Bare Metal Treatment: Any areas on the pinchweld where the factory paint was inadvertently scratched during the removal process are coated with a high-performance black glass primer.
- Corrosion Prevention: This primer acts as an impenetrable barrier against moisture, completely neutralizing the risk of hidden rust developing inside the window frame.
- Adhesion Promotion: The primer creates a highly reactive chemical surface that ensures the fresh urethane adhesive bites into the metal and the new glass encapsulation with maximum tensile strength.
Step 6: High-Quality Adhesive Extrusion and Glass Installation
The Lexus LS 430 requires a perfectly sealed vent window to maintain its aerodynamic drag coefficient and silence exterior wind noise. We achieve this using advanced chemical adhesives.
- Urethane Extrusion: We load a high-modulus, fast-curing automotive urethane into an electric caulking gun. A perfectly uniform, continuous V-shaped bead of adhesive is extruded along the pinchweld. This premium adhesive is engineered to absorb road vibrations and withstand extreme Canadian temperature fluctuations.
- Precision Setting: Handling the brand-new, OEM-quality vent glass with suction cups, we carefully align the module into the frame. We use precise pressure to compress the urethane bead, ensuring a perfectly flush fitment with the adjacent C-pillar and door moldings.
- Curing Protocol: The glass is temporarily secured with specialized retention tape while the high-quality adhesive undergoes its initial flash-cure, locking the glass permanently into place.
Step 7: Reassembly and Rigorous Quality Control
With the new vent glass securely bonded, we reverse the disassembly process to restore the interior of the Lexus.
- Vapor Barrier and Panel Reinstallation: The weather barrier is resealed, electrical harnesses are reconnected, and the heavy leather door panel is snapped securely back into its original factory retaining clips.
- Trim Reattachment: The beautiful wood trim pieces are seated firmly back into place.
- Final Polishing: We clean the newly installed vent glass, as well as the surrounding windows, using an ammonia-free, streak-less glass cleaner.
- Acoustic and Weather Check: A final inspection is conducted to ensure the rubber moldings sit perfectly flat and that the acoustic seal meets the strict standards expected of a Lexus LS 430.
Elite Mobile Auto Glass Services Across the Greater Toronto Area (GTA)
At AlexWindshield, we know that driving with shattered auto glass is stressful and dangerous. That is why we bring our Master Technician expertise directly to you. We offer comprehensive mobile auto glass replacement services tailored to fit the busy schedules of luxury car owners across the Greater Toronto Area (GTA).
Whether you are at a corporate boardroom in Markham, parked in your residential driveway in Richmond Hill, or out running errands at a shopping center in Vaughan, our fully equipped mobile service vans arrive on-site with all the premium tools, vacuums, and adhesives required for a flawless installation. We transform your parking spot into a professional auto glass facility, ensuring your Lexus LS 430 is repaired swiftly without you ever having to navigate GTA traffic with a broken window.
Trust AlexWindshield: Your Dedicated Auto Glass Experts
Your 2001-2006 Lexus LS 430 is a masterpiece of automotive engineering, and it deserves to be serviced by technicians who respect its legacy. Do not settle for subpar glass replacements that lead to annoying wind whistles, interior water damage, or damaged luxury trim panels.
By choosing AlexWindshield, you are choosing unparalleled technical expertise, premium OEM-equivalent glass, and advanced structural adhesives. We back every single installation with our comprehensive Lifetime Warranty against leaks, wind noise, and workmanship defects, giving you total peace of mind on the road.
If you need your Lexus LS 430 vent glass replaced, or require any other auto glass service—including windshield replacements requiring strict ADAS camera calibration—contact the premier experts in the GTA. Reach out to AlexWindshield today to schedule your mobile appointment in Vaughan, Richmond Hill, Markham, or beyond, and let us restore the perfect silence and security to your luxury ride.


