Restoring the L-Finesse: Back Glass Replacement for the Lexus IS 250 and IS 350 (2006-2013)
The second-generation Lexus IS 250 and IS 350 (2006-2013) redefined the compact luxury sport sedan segment with its aggressive "L-finesse" design language, sweeping aerodynamic roofline, and premium cabin experience. However, that sleek rear profile relies heavily on a perfectly intact back glass. Far beyond being a simple structural window, the rear windshield on the XE20 Lexus IS houses integrated radio antennas and a highly efficient thermal defroster grid essential for Canadian winters. When this glass shatters, you lose more than just visibility—you lose critical vehicle functionality, interior security, and protection from the elements.
As a Master Technician and auto glass specialist, I understand the precise engineering that went into your Lexus. A standard "slap-and-go" glass installation simply does not cut it for luxury vehicles. At AlexWindshield, we specialize in premium Lexus IS 250/350 back glass replacement. We combine OEM-quality materials, advanced chemical bonding agents, and rigorous safety protocols to restore your vehicle to its factory-original condition.
Your Local Auto Glass Experts in the Greater Toronto Area (GTA)
Navigating through heavy traffic with a shattered back window is incredibly dangerous and exposes your luxury interior to weather, exhaust fumes, and road debris. That is why AlexWindshield brings the auto glass shop directly to your driveway or workplace. We proudly offer comprehensive mobile auto glass services across the Greater Toronto Area (GTA), with specialized daily service routes prioritizing the communities of Vaughan, Richmond Hill, and Markham.
Whether you are parked at home in Vaughan, at an office complex in Richmond Hill, or shopping in Markham, our fully equipped mobile service vans arrive on-site with all the advanced tools, vacuums, and premium adhesives required to perform a flawless, dealership-level installation.
The Danger of Tempered Auto Glass and the Need for Immediate Action
Unlike the front windshield, which is made of laminated glass designed to crack but stay intact, the rear glass of your 2006-2013 Lexus IS 250/350 is manufactured using tempered safety glass. When compromised by an impact, vandalism, or extreme temperature fluctuations, tempered glass is engineered to completely shatter into thousands of small, blunt-edged shards. While this prevents large, lethal guillotine-like shards from entering the cabin during an accident, it creates a massive localized mess.
These tiny glass fragments embed themselves deep into the Lexus's perforated leather seats, the rear parcel shelf, the child seat anchors, and even down into the trunk cavity. Driving with these loose shards is a safety hazard for passengers and pets. Complete and meticulous extraction of these shards is a mandatory part of our professional service.
A to Z Master Technician Step-by-Step Back Glass Replacement Process
At AlexWindshield, our replacement process for the Lexus IS is incredibly thorough. We do not skip steps, and we never compromise on chemical cure times or vehicle cleanliness. Here is our master-level procedure for replacing your back glass:
Step 1: Thorough Pre-Inspection and Interior Protection
Before any tools are lifted, we conduct a comprehensive inspection of the vehicle's rear framework and trunk lid to check for impact damage. Because tempered glass shatters everywhere, our first priority is protecting the flawless luxury interior of your Lexus. We lay down thick, protective drop cloths over the rear leather seats, the center console, and the trunk floor. We also apply high-tack automotive tape around the exterior painted pillars and the trunk lid to ensure zero paint scratches occur during the extraction process.
Step 2: Interior Panel Removal and Electronic Disconnection
The 2006-2013 Lexus IS features thick interior C-pillar trims and a rear parcel shelf that house audio components and wiring. To access the bottom edge of the glass and the electronic wiring safely, we carefully use non-marring trim removal tools to unclip the rear interior C-pillar panels. Once accessed, we carefully disconnect the wiring harnesses for the rear defroster grid and the integrated AM/FM glass antenna. We also remove or protect the high-mount third brake light assembly located at the base of the rear window.
Step 3: Meticulous Vacuuming of Glass Shards
This is arguably one of the most critical steps in a back glass replacement. We utilize heavy-duty, industrial shop vacuums with specialized crevice attachments to extract every single piece of broken tempered glass. Our vacuuming process includes:
- Thoroughly vacuuming the rear parcel deck, speaker grilles, and third brake light housing.
- Folding down the rear seats (if applicable) and vacuuming deep into the leather seat crevices, seatbelt receivers, and child-seat LATCH anchors.
- Removing the trunk floor panels to vacuum the spare tire well, where glass often falls through the drainage channels.
- Blowing out hidden shards from inside the rear window channels using controlled compressed air.
Step 4: Removing the Old Urethane Bead
With the shattered glass fully cleared away, the original factory urethane adhesive bead remains bonded to the vehicle's pinch weld. Using a specialized cold knife or an advanced wire-cutting system, we meticulously cut back the old adhesive. We trim this old urethane down to a thin 1-2 millimeter base. This creates the perfect foundation for the new adhesive to bond to, a process known in the industry as a "chemical cross-link bond."
Step 5: Surface Cleaning and Pinch Weld Preparation
Contamination is the enemy of a safe auto glass installation. We clean the entire pinch weld and surrounding body channels using an alcohol-based, industry-grade active glass cleaner to remove dust, dirt, and old glass dust. If our tools exposed any bare metal on the pinch weld during the trimming process, we apply a high-quality black body primer. This is a crucial step; primer prevents microscopic rust from forming underneath the new adhesive, which could eventually lead to structural failure or water leaks.
Step 6: Prepping the New Lexus IS Back Glass
We source only premium, OEM-equivalent replacement glass designed specifically for the 2006-2013 Lexus IS 250 and IS 350. The new back glass is inspected for optical clarity and proper defroster/antenna line continuity. We scrub the bonding perimeter of the new glass with a specialized glass prep cleaner and apply a glass bonding primer. This ensures the urethane will grip the glass panel permanently.
Step 7: Applying the High-Modulus Polyurethane Adhesive
We use only industry-leading, crash-tested, high-modulus, non-conductive polyurethane adhesive. The "non-conductive" aspect is critical for your Lexus; standard adhesives can interfere with the radio antenna and defroster currents running through the glass. We use an electric caulking gun to apply a thick, triangular bead of hot urethane directly onto the prepared pinch weld, ensuring a continuous, gap-free seal that prevents any future wind noise or water intrusion.
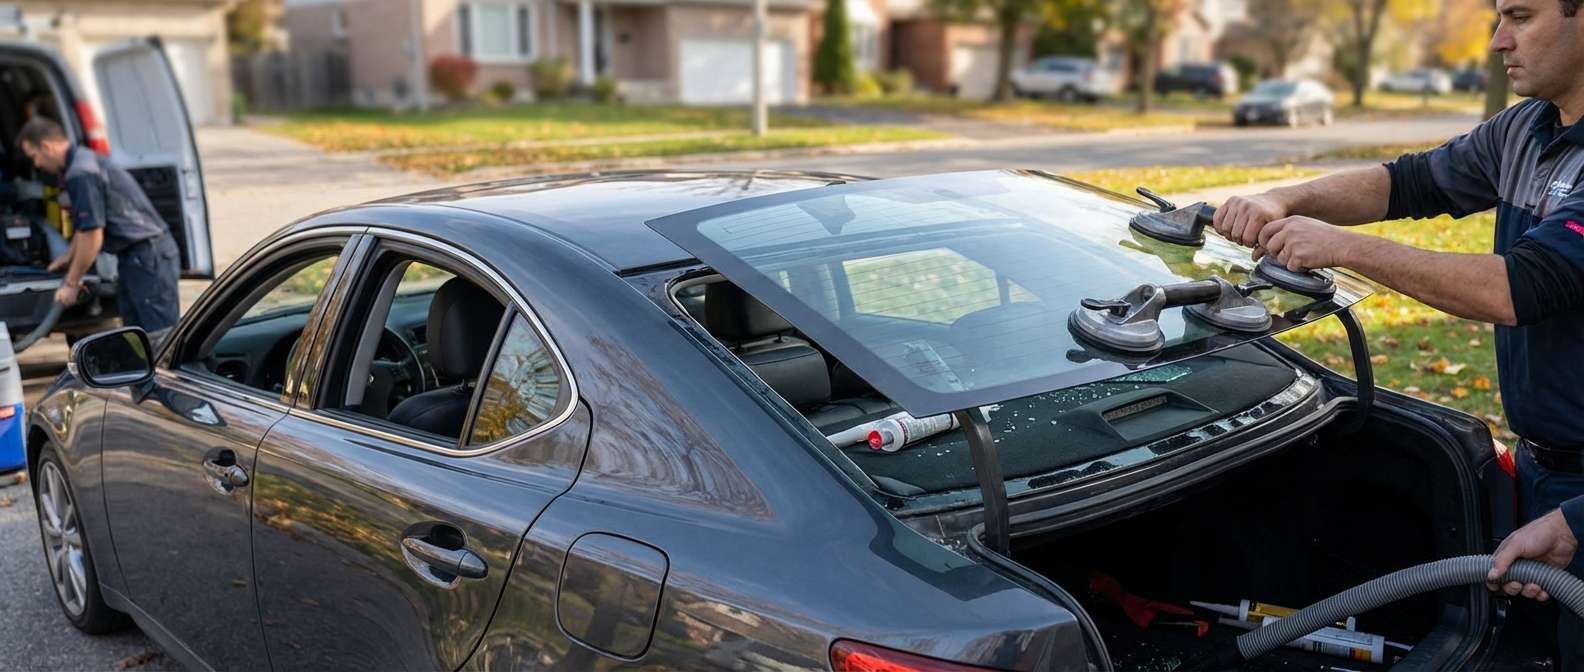
Step 8: Setting the New Glass and Reassembly
Using heavy-duty suction cups, the new back glass is carefully hoisted and perfectly aligned with the roofline and trunk gaps. Once set onto the urethane bead, we apply gentle, even pressure to ensure a complete, watertight seal. Next, we immediately reconnect the rear defroster tabs and the antenna terminal connections. We test the electronic continuity to ensure your defroster will work perfectly when the next Canadian snowstorm hits. Finally, we reinstall the interior C-pillar panels, the third brake light, and the rear parcel shelf trim, ensuring every factory clip snaps back securely into place.
Step 9: Final Inspection and Safe Drive-Away Time
We clean the newly installed glass to a streak-free shine. We then instruct the vehicle owner on the mandatory Safe Drive-Away Time (SDAT). Depending on the temperature and humidity in the GTA, the urethane requires specific time to cure before the vehicle is safely operable. We ensure you are fully informed on when your Lexus is safe to hit the highway.
Premium Mobile Auto Glass Service Tailored for the GTA
Your time is valuable. Driving to a traditional auto glass shop, waiting in a lobby for hours, and arranging a ride home is frustrating. AlexWindshield eliminates this hassle entirely. Our specialized mobile fleet brings this exact, master-level installation process straight to your location. Whether you are dealing with a shattered back window in a residential driveway in Markham, an underground parking garage in Richmond Hill, or a commercial lot in Vaughan, we provide seamless, uncompromised service.
By focusing specifically on the intricacies of luxury vehicles like the Lexus IS 250 and IS 350, we ensure that every electrical connection is secure, every glass shard is vacuumed, and every panel is perfectly aligned. We treat your vehicle with the exact level of precision and respect that a premium Japanese luxury car demands.
Backed by the AlexWindshield Lifetime Warranty
Auto glass replacement is a critical safety service, and you deserve absolute peace of mind. That is why every single back glass replacement performed by AlexWindshield is backed by our comprehensive Lifetime Warranty. We guarantee our workmanship against any wind noise, water leaks, or stress cracks for as long as you own your Lexus IS.
Do not let a shattered back window compromise the safety, security, and beauty of your Lexus. Trust the premier mobile auto glass experts in the GTA. Contact AlexWindshield today to schedule your fast, professional, and fully guaranteed Lexus IS 250/350 back glass replacement.


