Restoring an Off-Road Icon: Back Glass Replacement for Land Rover Defender 90/110 Classic 1993-1997
The 1993-1997 Land Rover Defender 90 and 110 Classic models are not just vehicles; they are rolling testaments to unyielding British engineering, safari-grade durability, and off-road supremacy. Whether you own the nimble, short-wheelbase Defender 90 or the expedition-ready Defender 110, these legendary 4x4s were purpose-built to conquer the harshest terrains on earth. However, even the most indestructible aluminum-bodied legends have their vulnerabilities. A shattered rear tailgate window instantly compromises your cabin's security, exposes your classic interior to the unpredictable Canadian elements, and detracts from the rugged, iconic aesthetic of your prized North American Specification (NAS) or global import Defender. When disaster strikes your classic rover, you require the precision of a Master Technician who understands the delicate balance between classic vehicle preservation and modern auto glass safety standards.
At AlexWindshield, we are deeply passionate about classic 4x4 restoration and maintenance. As the leading provider of mobile auto glass services across the Greater Toronto Area (GTA), we bring our specialized expertise directly to your driveway or garage. Whether your Defender is parked in a bustling commercial district in Vaughan, undergoing restoration in a suburban Richmond Hill garage, or sitting ready for a weekend trail run in Markham, our master technicians arrive fully equipped to deliver a flawless, factory-grade back glass replacement.
Understanding the Defender's Tempered Back Glass
Unlike the laminated safety glass used in your front windshield, the back glass of a 1993-1997 Land Rover Defender is manufactured from tempered glass. Through an extreme heating and rapid cooling process during manufacturing, tempered glass is designed for maximum strength. However, when it sustains a severe impact from shifting cargo, a rear-end collision, or an off-road branch strike, it does not crack—it completely shatters into thousands of small, blunt, granular pieces. This engineered safety feature prevents dangerous, jagged shards from injuring passengers, but it creates an absolute mess inside your vehicle's cargo area, jump seats, and deep within the tailgate door cavity.
Because the Defender's rear glass is mounted in the swinging rear tailgate (often carrying a heavy spare tire), replacing it requires meticulous attention to structural integrity, vibration resistance, and thorough debris removal. Leaving even a handful of glass granules inside the door panel can lead to maddening rattles on the trail and potential damage to your rear wiper motor or locking mechanisms.
Master Technician Step-by-Step Back Glass Replacement Process
At AlexWindshield, we do not cut corners. Our comprehensive, A-to-Z replacement protocol guarantees that your Land Rover Defender is treated with the utmost respect. Here is exactly how our Master Technicians execute a flawless back glass replacement:
Step 1: Thorough Pre-Inspection and Interior Protection
Before any tools are lifted, we conduct a comprehensive inspection of the rear tailgate, the spare tire carrier, and the surrounding aluminum body panels to ensure there is no hidden structural damage. Classic Defenders are treasures, so we prioritize the protection of your interior. We lay down heavy-duty protective drop cloths over your rear cargo area, inward-facing jump seats, and floorboards to catch any stray debris during the extraction process.
Step 2: Tailgate Door Panel Removal
To perform a proper replacement, we must access the internal cavity of the rear door. Our technicians carefully remove the interior tailgate door panels, taking great care not to damage the classic trim pieces, vintage retaining clips, or the rear wiper motor housing. Exposing the internal door structure is a mandatory step for both clean-up and proper mechanical access.
Step 3: Extensive Glass Shard Vacuuming
When tempered glass shatters, gravity pulls hundreds of granular pieces directly down into the internal cavity of the tailgate door. Using industrial-grade, high-suction vacuums equipped with specialized micro-crevice tools, we meticulously extract every single glass shard from your vehicle. We vacuum the exposed door cavity, the rear cargo carpet, the seat crevices, and the weather seals. Vacuuming all broken glass shards from the vehicle's interior is a non-negotiable step to ensure a rattle-free ride and prevent mechanical jams in your door latch.
Step 4: Removal of the Old Seal and Urethane
While some vintage Land Rovers utilized traditional rubber locking gaskets, many modernized replacements and late-model classics rely on advanced structural bonding. We carefully slice through any remaining old adhesive using specialized cold knives and auto glass cut-out wire. We pare down the old urethane bead to a flat base of about 1-2 millimeters, creating an ideal foundation for the new chemical bond, while ensuring the original pinch weld paint remains undisturbed.
Step 5: Surface Cleaning and Preparation
Any dirt, dust, or residual grease can compromise the structural bond of the new glass. We use a specialized, alcohol-based auto glass cleaner to thoroughly wash the tailgate pinch weld and the black ceramic frit band of the brand-new replacement glass. A pristine surface is critical for preventing future water leaks, especially given the Defender's flat, upright rear profile which takes the brunt of heavy rain.
Step 6: Crucial Primer Application
Classic Land Rovers are notorious for developing oxidation around window frames. To guarantee a watertight seal and prevent corrosion, we perform a vital primer application. We apply a high-tech, black glass primer to the ceramic band of the new back glass, and a specialized pinch-weld primer to any areas of bare metal on the tailgate frame. This primer not only prevents rust but acts as a chemical bonding agent that activates the urethane adhesive.
Step 7: Extruding the High-Quality Adhesive
Using a battery-operated caulking gun for absolute consistency, our Master Technicians apply a thick, continuous V-notch bead of high-quality adhesive (automotive-grade structural urethane) directly onto the primed pinch weld. We utilize advanced, fast-curing urethane designed to withstand the intense vibrations and torsional chassis flex that a Land Rover Defender experiences during off-road excursions.
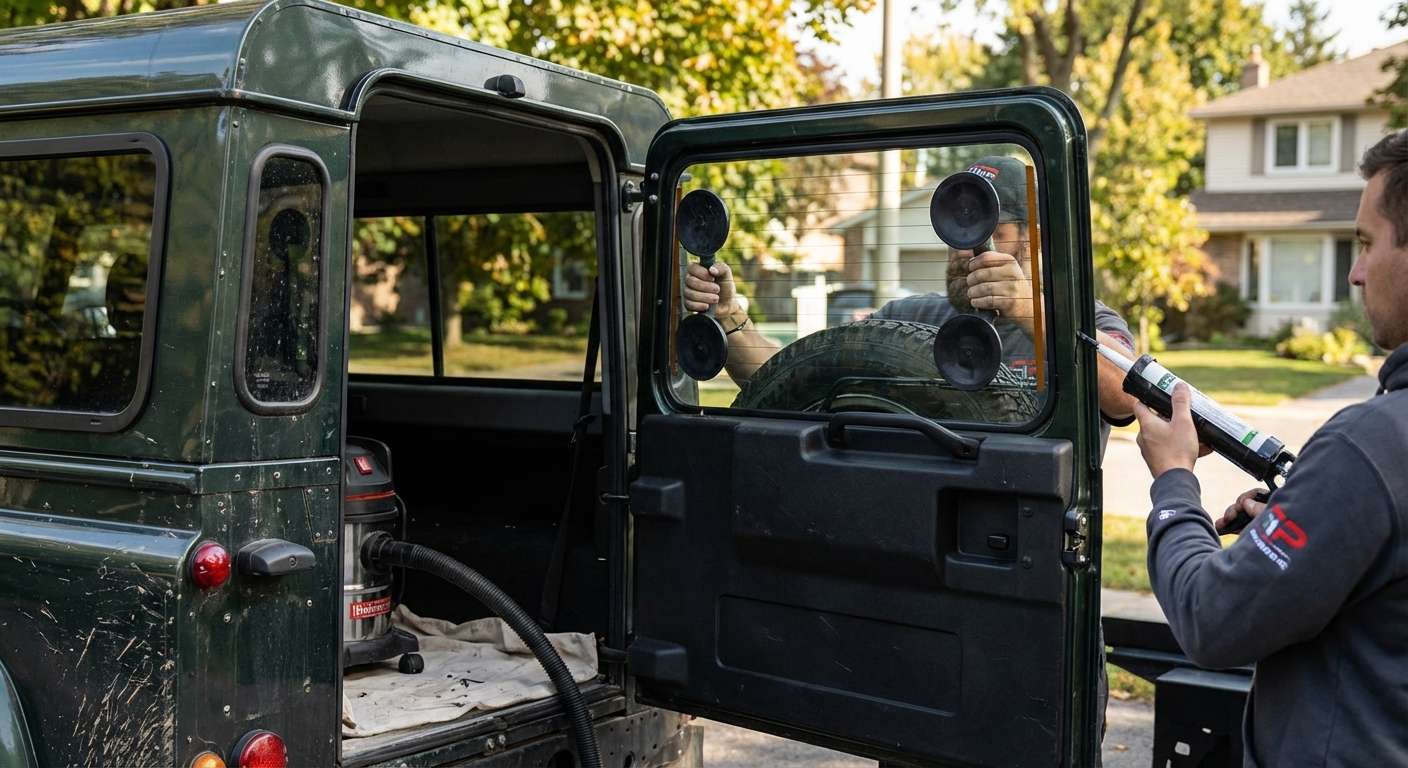
Step 8: Precision Glass Installation
Handling the new, OEM-equivalent tempered back glass requires a steady hand. Using heavy-duty suction cups, two technicians carefully lift and perfectly align the replacement glass into the tailgate frame. Once set onto the urethane bead, we apply firm, even pressure to ensure a deep, watertight seal. We then secure the glass with specialized retention tape to hold it in the perfect position while the structural adhesive begins its curing process.
Step 9: Reassembly of Components and Defrost Reconnection
With the new glass firmly in place, we reconnect the rear defroster wiring grid and the rear wiper assembly (if your specific 1993-1997 model is equipped with them). We meticulously reattach the interior tailgate door panels, securing all trim pieces to their factory original state. Every component is double-checked for proper alignment and function.
Step 10: Final Inspection and Safe Drive-Away Time (SDAT)
We perform one final sweep with the vacuum and polish the new back glass to a streak-free shine. The technician will then brief you on the Safe Drive-Away Time (SDAT)—the minimum curing time required for the high-quality adhesive to achieve maximum structural integrity before the vehicle is driven. Because we use premium, fast-cure urethane, you'll be back on the road (or trail) in no time.
Why the Right Materials Matter for Your Classic Land Rover
When dealing with a vintage masterpiece like the 1993-1997 Land Rover Defender 90 or 110, compromising on material quality is not an option. At AlexWindshield, our commitment to excellence includes:
- Premium Tempered Glass: We source OEM-equivalent glass that matches the exact dimensions, tint, and defroster grid patterns of your classic Defender, ensuring an authentic look and perfect fit.
- Advanced Structural Urethane: The flat vertical back of a Defender creates a low-pressure zone that sucks rain and dust against the tailgate. Our high-quality adhesive creates an impenetrable, weather-proof barrier.
- Anti-Corrosion Primers: We treat the bare metal of your classic frame with respect, using industry-leading primers that stop rust in its tracks and promote a lifetime bond.
Your Trusted Mobile Auto Glass Experts in the GTA
Replacing the back glass on a specialized classic vehicle shouldn't require an inconvenient trip to a dusty body shop, nor should it disrupt your busy schedule. AlexWindshield proudly operates a fleet of fully-stocked mobile service vehicles serving the entirety of the Greater Toronto Area. If you are stuck at your office in Markham, relaxing at home in Richmond Hill, or working on your Defender project in a Vaughan garage, our master technicians come directly to you.
We bring the auto glass shop to your doorstep, providing a seamless, stress-free experience without ever compromising on the technical rigor or environmental controls required for a perfect installation. We handle everything from the painstaking cleanup of glass shards to the final, pristine installation of your new window.
Contact AlexWindshield Today
Your 1993-1997 Land Rover Defender Classic is an automotive icon that deserves nothing less than master-level craftsmanship. Do not let a shattered rear window keep your legendary 4x4 off the road. AlexWindshield is recognized as the trusted expert for premium, mobile auto glass services throughout the GTA. We stand behind our meticulous A-to-Z replacement process by offering an industry-leading Lifetime Warranty against leaks, wind noise, and workmanship defects. Restore the security, weatherproofing, and classic beauty of your Defender today—contact AlexWindshield to schedule your professional back glass replacement.


