The 2011-2016 Hyundai Elantra: Mastering the "Fluidic Sculpture" Back Glass Replacement
The fifth-generation Hyundai Elantra (2011-2016) completely revolutionized the compact car segment with its aggressive, aerodynamic "Fluidic Sculpture" design. While this sweeping rear roofline gives the Elantra its signature sleek profile, it also means the rear window is a massive, highly contoured, and heavily stressed structural component of the vehicle. When this specific back glass shatters, it does not simply crack like a front windshield; because it is manufactured from tempered safety glass, it violently explodes into thousands of tiny, sharp cubes. This leaves your cabin exposed to the elements, compromises your vehicle's structural integrity, and creates a severe safety hazard inside your passenger and cargo areas.
As a Master Technician at AlexWindshield, I have replaced countless rear windows on this specific Elantra generation. Achieving a flawless, factory-grade seal on the 2011-2016 model requires more than just dropping a new piece of glass into place. It demands an encyclopedic understanding of Hyundai's pinch weld architecture, precise handling of the integrated thermal defroster grids, and a meticulous, step-by-step technical execution. Below is our comprehensive, expert-level breakdown of exactly how we restore your vehicle to pristine condition.
Comprehensive Step-by-Step Back Glass Replacement Process
At AlexWindshield, we do not cut corners. Our A-to-Z replacement protocol is engineered to guarantee structural safety, eliminate wind noise, and ensure absolute water tightness. Here is our exact technical process for the 2011-2016 Hyundai Elantra.
Step 1: Complete Vehicle Preparation and Interior Protection
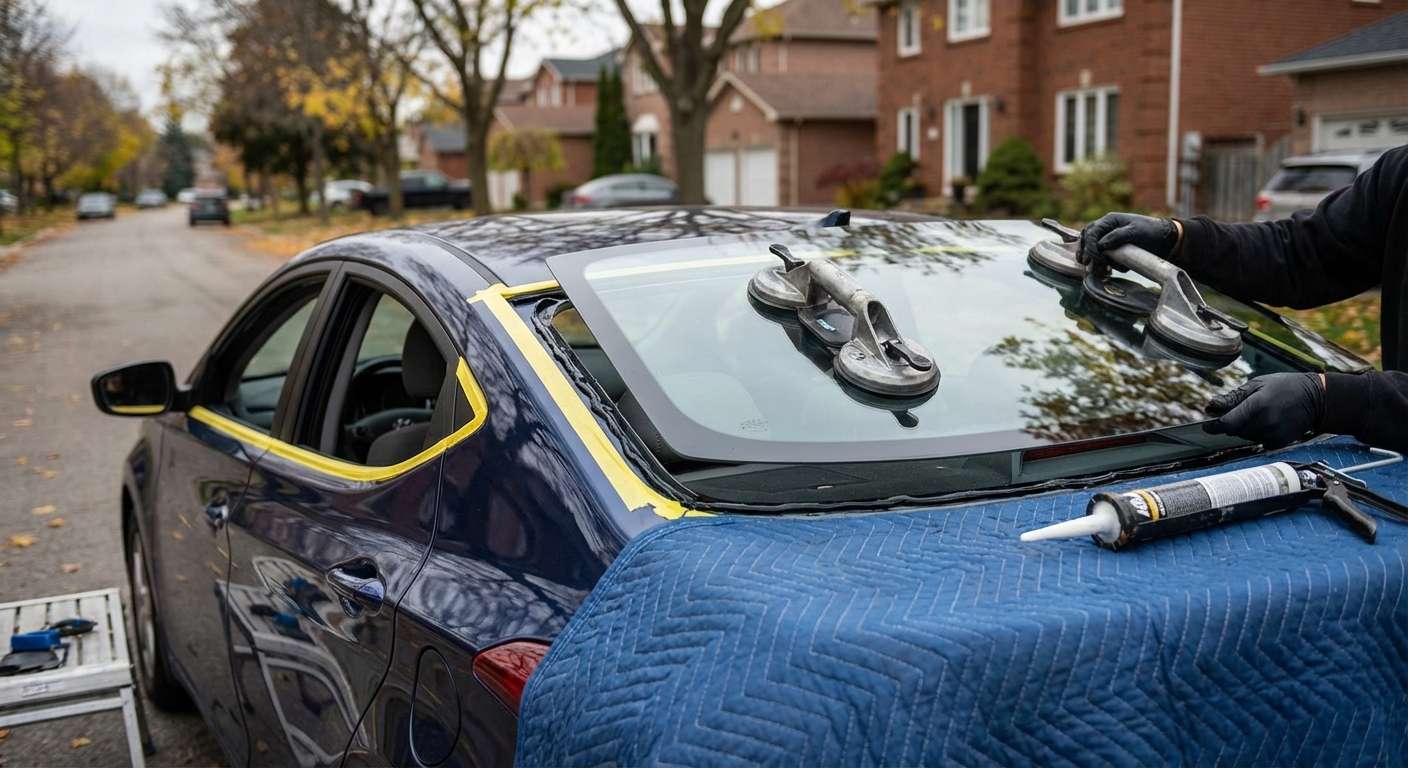
Before any heavy tools are deployed, we meticulously prepare the vehicle. We begin by applying heavy-duty protective blankets over the Elantra's trunk lid, rear bumper, and rear seating area to prevent any accidental scratches to the paint or upholstery during the extraction process. We also use specialized automotive masking tape around the exterior window frame to protect the clear coat. Because the back glass is located directly above the rear parcel shelf, protecting the interior fabrics from urethane smudges and tool marks is our absolute first priority.
Step 2: Extensive Glass Clean-Up and Interior Panel Removal
Unlike laminated windshields that stay intact when struck, rear windows are tempered. When shattered, glass fragments infiltrate every crevice of your car. Similar to how we meticulously handle the removal of door panels for side window replacements, replacing the back glass requires the careful removal of interior trim panels, specifically the C-pillar trims and the rear parcel shelf. This step is mandatory. Once the panels are removed, we utilize high-powered industrial vacuums to extract all broken glass shards from the vehicle's interior. We fold down the Elantra's rear seats to vacuum the trunk cavity, deep clean the child seat anchor points, and meticulously extract shards from the rear seatbelt retractors to ensure no hidden glass causes future rattling or safety hazards.
Step 3: Removing the Old Glass and Urethane Seal
With the shattered glass fully cleared and the interior trim safely removed, we focus on extracting the remaining glass chunks still glued to the vehicle's frame. We disconnect the wiring harnesses for the rear defroster grid carefully, as ripping these can damage the vehicle's internal wiring. Next, using specialized auto glass cut-out tools—such as a cold knife or a professional wire-cutting system—we slice through the original factory polyurethane adhesive bead. We execute this with surgical precision to ensure the underlying steel pinch weld is not gouged or compromised.
Step 4: Precision Surface Preparation and Pinch Weld Cleaning
The secret to a lifetime-warrantied auto glass replacement lies in the surface preparation. Once the old glass is removed, we perform a "full cut-out." This means trimming the old urethane adhesive bead down to a uniform thickness of roughly 1 to 2 millimeters. This thin layer of original urethane provides an excellent base for the new adhesive to bond to. We then meticulously clean the entire pinch weld channel using specialized, alcohol-based auto glass cleaners to remove all dirt, road grime, dust, and microscopic debris. Any contaminants left on the pinch weld will cause the new adhesive to fail, leading to leaks.
Step 5: Advanced Primer Application for Maximum Adhesion
If our cutting tools exposed any bare metal on the Elantra's pinch weld during the removal process, we immediately apply a high-quality, anti-corrosive black glass primer to those specific spots. This prevents future rust formation, which is the number one cause of long-term auto glass failure. Furthermore, we apply an adhesion-promoting primer to the black ceramic frit band on the inside edge of the new Hyundai Elantra back glass. This chemical primer prepares the glass surface on a molecular level, ensuring the urethane adhesive cross-links perfectly with the glass.
Step 6: High-Quality Urethane Adhesive Application
With the pinch weld prepped and the new glass primed, it is time for the most critical step: applying the adhesive. At AlexWindshield, we exclusively use premium, rapid-curing, crash-tested polyurethane adhesive. Using an electric caulking gun, we apply a mathematically precise "V-bead" of urethane around the entire perimeter of the Elantra's rear window frame. The V-shape of the bead ensures that when the glass is pressed into place, the adhesive collapses evenly, eliminating any air pockets or gaps that could cause whistling wind noise or water ingress during heavy Canadian rainstorms.
Step 7: Precision Installation of the New Hyundai Elantra Back Glass
Handling the large, contoured rear window of the 2011-2016 Elantra requires a steady hand. Utilizing heavy-duty vacuum suction cups, two of our master technicians carefully lift the new, OEM-quality back glass over the vehicle. We align the glass perfectly with the vehicle's roofline and trunk deck gaps before lowering it directly onto the wet urethane bead. Once seated, we apply gentle, even pressure around the perimeter to "set" the glass into the adhesive. We then secure the glass temporarily with specialized auto glass retention tape to prevent gravity from shifting the glass downwards while the urethane begins its initial curing phase.
Step 8: Defroster Reconnection and Final Quality Check
Once the glass is set, we meticulously reconnect the electrical leads to the embedded thermal defroster grids. We test the defroster system to ensure electrical continuity—a vital feature for melting ice and snow during our harsh Ontario winters. We then reinstall the rear parcel shelf, secure the interior C-pillar trim panels, and perform one final vacuum of the entire cabin. Lastly, we clean the new back glass with an ammonia-free cleaner to a streak-free shine. We inform the customer of the Safe Drive-Away Time (SDAT) to ensure the urethane has properly cured before the vehicle hits the road.
Serving the Greater Toronto Area (GTA): Vaughan, Richmond Hill & Markham
Dealing with a shattered rear window is incredibly stressful, especially when your car is exposed to the unpredictable Ontario weather. You cannot safely drive a vehicle with a missing back glass, which is why AlexWindshield brings the glass shop directly to your driveway, office, or parking garage. We offer unparalleled, fully equipped mobile auto glass services across the entire Greater Toronto Area (GTA).
- Vaughan: Whether you are parked near Vaughan Mills or commuting along Highway 400, our mobile fleet will dispatch directly to your location, securing your Elantra before the weather turns.
- Richmond Hill: From the bustling centers along Yonge Street to the quiet residential neighborhoods, we provide rapid-response back glass replacement, ensuring you do not miss a beat in your daily schedule.
- Markham: If your Elantra suffers glass damage while you are at work in Markham's tech sector or running errands at Markville Mall, our technicians will arrive with precisely the right glass and tools to complete the job on-site.
Why Choose AlexWindshield for Your 2011-2016 Hyundai Elantra?
When it comes to the safety and structural integrity of your vehicle, you cannot afford to rely on amateur installations or cut-rate materials. The back glass of your Hyundai Elantra is a critical component that requires the touch of a seasoned professional. At AlexWindshield, we pride ourselves on blending deep technical expertise with unmatched customer convenience.
As the trusted auto glass experts in the GTA, we back every single one of our installations with a comprehensive Lifetime Warranty. This warranty covers you against any air leaks, water leaks, or manufacturer defects for as long as you own your 2011-2016 Hyundai Elantra. When you choose us, you are choosing premium OEM-grade glass, industry-leading polyurethane adhesives, and technicians who treat your vehicle with the absolute highest level of respect.
Do not leave your interior exposed to the elements or risk the safety of your passengers with hidden glass shards. Contact AlexWindshield today to schedule your mobile back glass replacement and experience the pinnacle of automotive glass repair in the Greater Toronto Area.


