Reviving a Classic: Expert Back Glass Replacement for the Hyundai Elantra 2001-2006
The third-generation Hyundai Elantra, built on the robust XD platform between 2001 and 2006, remains a testament to automotive durability and practical engineering. Still frequently spotted cruising Canadian highways, this compact classic is cherished for its reliable powertrain and comfortable ride. However, no amount of mechanical reliability can prevent the sudden and catastrophic shattering of a rear window. Whether compromised by an extreme temperature fluctuation during a brutal Ontario winter, struck by rogue highway debris, or subjected to an unfortunate act of vandalism, the back glass of your 2001-2006 Hyundai Elantra is made of tempered safety glass. When breached, it instantly disintegrates into thousands of tiny, pebble-like shards. As a Master Technician at AlexWindshield, I have spent years mastering the highly specific protocols required to restore this specific vehicle. We don't just replace the glass; we execute a flawless, factory-grade restoration that prioritizes your safety, your vehicle's structural integrity, and your peace of mind.
Premier Auto Glass Replacement Across the Greater Toronto Area
A shattered rear window exposes your vehicle's interior to the elements, making driving exceptionally hazardous and leaving your car vulnerable to theft and water damage. Recognizing the urgency of a back glass blowout, AlexWindshield provides rapid-response, premium mobile auto glass services across the Greater Toronto Area (GTA). You do not need to risk driving a compromised vehicle to a shop. Our fully equipped mobile service vans bring the expertise directly to your driveway, workplace, or emergency location.
We proudly serve the sprawling communities of the GTA, with dedicated rapid dispatch routes specifically optimized for Vaughan, Richmond Hill, and Markham. By utilizing state-of-the-art tools and climate-adaptive materials, we guarantee that whether you are parked in a residential driveway in Markham, a commercial lot in Richmond Hill, or an industrial complex in Vaughan, you receive the exact same meticulously controlled installation environment as you would inside our physical service bays.
The Anatomy of the 2001-2006 Hyundai Elantra Rear Window
Before diving into the technical replacement procedures, it is crucial to understand what makes the back glass of the 2001-2006 Hyundai Elantra unique. Unlike the laminated glass used for windshields, the rear window is constructed from thermally tempered safety glass. This glass undergoes rapid heating and cooling during manufacturing, creating high internal tension. While highly resistant to blunt force, a sharp impact on the edge or surface will cause the entire pane to fracture instantly.
Furthermore, the back glass on this specific generation of the Elantra houses a complex, integrated electro-conductive thermal grid—your rear defroster. A successful replacement requires not only ensuring a watertight seal but also properly integrating these electrical components so that your visibility remains unhindered during frosty Canadian mornings.
Our Master Technician A-to-Z Replacement Process
At AlexWindshield, we adhere to strict, manufacturer-approved auto glass replacement standards. Replacing the back glass on a 2001-2006 Hyundai Elantra is an intricate, multi-step procedure that demands precision, patience, and absolute cleanliness.
Step 1: Vehicle Preparation and Comprehensive Interior Protection
The moment our mobile technician arrives, the first priority is protecting the interior of your Elantra. Because tempered glass shatters violently, glass granules invariably blast into the rear seating area, the trunk cavity, and down the interior pillar channels. We begin by laying heavy-duty protective drop cloths over the rear seats, the parcel shelf (rear deck), and the exterior trunk lid to prevent any accidental scratching of your vehicle's paintwork during the procedure.
Step 2: Intensive Glass Extrication and Trim Panel Removal
Unlike a windshield replacement where the glass typically remains in one piece, a back glass replacement is essentially a localized hazardous material cleanup. It is absolutely mandatory to remove all interior obstructions to hunt down every single piece of broken glass. We carefully detach and remove the rear interior C-pillar trim panels, the rear deck/parcel shelf fabric, and open the trunk to remove the upper interior trunk liner. Once these panels are safely removed, we utilize high-powered, industrial-grade vacuums equipped with specialized crevice attachments. We systematically vacuum the entire rear cabin, inside the structural pillars, down inside the trunk weather channels, and across the floorboards. Removing these interior panels is non-negotiable; failure to do so results in trapped glass shards that will rattle annoyingly for the remaining lifespan of the vehicle.
Step 3: Removing the Old Glass Periphery and Urethane Seal
Even though the center of the glass has shattered, the outer perimeter of the tempered glass remains firmly glued to the vehicle's metal frame (the pinch weld) by the original factory urethane adhesive. Using specialized cold knife tools and specialized oscillating cut-out blades, we carefully slice through the hardened, decades-old urethane bead. We extract the remaining encrusted glass edge and then meticulously trim the old adhesive bead down to a uniform thickness of 1 to 2 millimeters. This thin layer of original urethane serves as an optimal bonding base for the fresh adhesive.
Step 4: Pinch Weld Decontamination and Primer Application
A new glass installation is only as strong as the surface it is bonded to. We thoroughly clean the pinch weld channel using specialized, alcohol-based auto glass cleaning agents to remove dirt, grease, and microscopic debris. If our technicians spot any bare metal scratches on the pinch weld—a common occurrence when removing 20-year-old auto glass—we immediately apply a specialized anti-corrosive metal primer. We then apply a high-grade glass frit primer to the edges of the brand-new back glass. This chemical primer promotes aggressive adhesion and acts as a UV barrier, preventing sunlight from degrading the urethane over time.
Step 5: High-Quality Urethane Adhesive Extrusion
With the frame prepped and the primers fully flashed (dried), we prepare our advanced urethane adhesive. At AlexWindshield, we exclusively utilize premium, crash-tested, fast-curing automotive urethane. Using a highly calibrated electric caulking gun, we extrude a perfectly uniform "V-bead" of urethane directly onto the pinch weld. The height and width of this triangular bead must be exact; too little will cause catastrophic water leaks and wind noise, while too much will result in messy squeeze-out and improper glass seating.
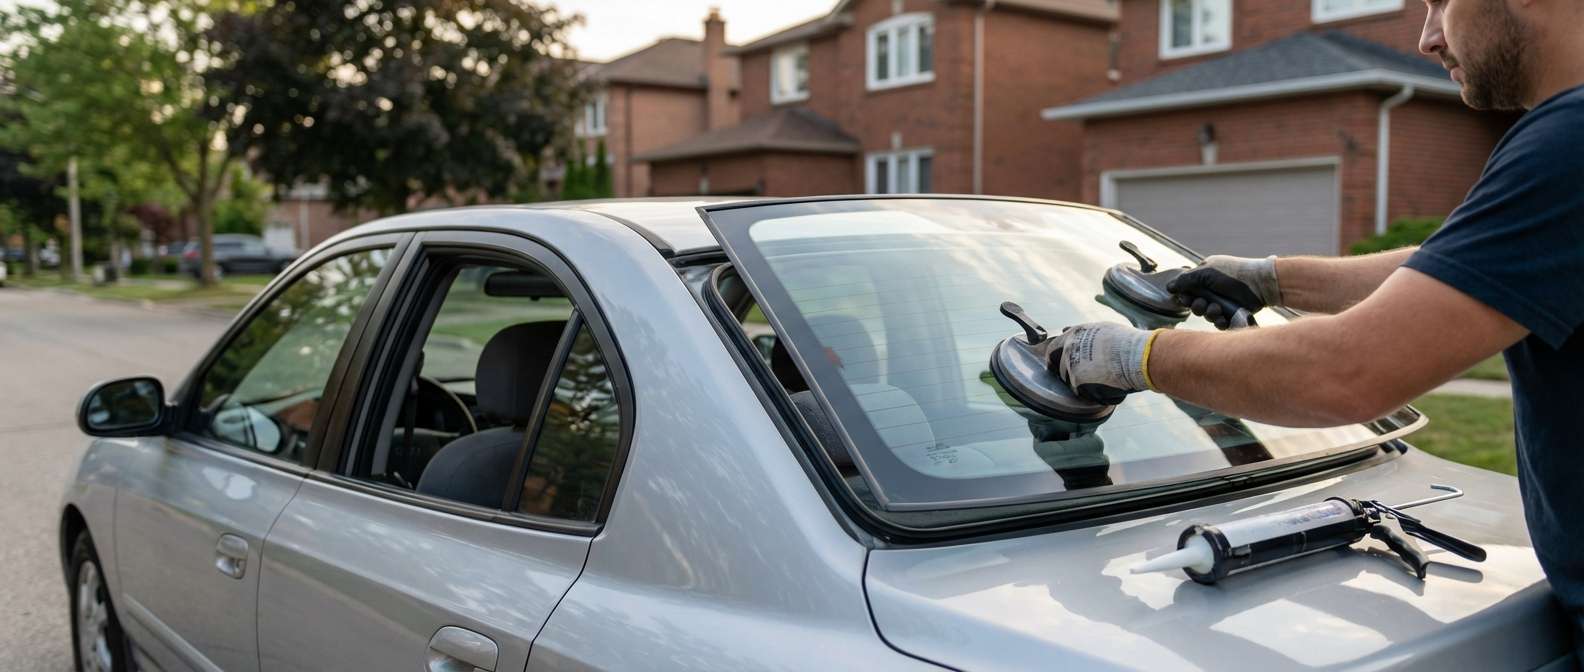
Step 6: Precision Glass Installation and Electrical Reconnection
Handling the newly primed back glass for the Hyundai Elantra requires a steady hand and perfect spatial awareness. Using heavy-duty suction cup lifters, our technicians carefully lower the glass into the exact center of the pinch weld opening. We apply firm, even pressure around the perimeter to compress the V-bead, ensuring the glass makes 100% contact with the adhesive, creating an impenetrable, watertight seal. Immediately following the setting of the glass, we reconnect the factory wiring harness to the new defroster grid tabs and test the circuit to ensure optimal thermal conductivity.
Step 7: Reassembly, Curing, and Final Cleanup
Once the glass is locked into place, we systematically reinstall the rear deck lining, the C-pillar trims, and the interior trunk panels that were previously removed for the vacuuming stage. We clean the newly installed rear window inside and out with streak-free automotive glass cleaner. Finally, we inform the customer regarding the urethane's Safe Drive Away Time (SDAT), which is the minimum time the vehicle must remain stationary for the chemical adhesive to cure sufficiently to meet federal safety crash standards.
Crucial Post-Installation Care for Your Hyundai Elantra
To guarantee the longevity and structural integrity of your newly installed back glass, we provide our customers with strict aftercare guidelines that must be followed for the first 48 hours post-installation:
- Leave the windows cracked: Keep at least one side window rolled down an inch. Shutting a door with all windows rolled up creates a massive spike in cabin air pressure, which can easily push the newly installed, uncured back glass outward, breaking the watertight urethane seal.
- Avoid automatic car washes: High-pressure water jets and abrasive, spinning mechanical brushes can compromise the curing adhesive. Hand washing with a gentle hose is acceptable after 24 hours.
- Do not remove retention tape: If our technicians applied special auto glass retention tape to the roofline to hold the glass perfectly aligned while the urethane sets, do not remove it for at least 24 hours.
- Avoid slammed doors and heavy vibrations: Close your doors gently and try to avoid heavily potholed roads during the initial curing phase.
Why Choose AlexWindshield for Your GTA Auto Glass Needs?
Replacing the back glass on a classic vehicle like the 2001-2006 Hyundai Elantra requires far more than just swapping out parts; it demands an intimate understanding of automotive anatomy, advanced chemical adhesives, and meticulous interior detailing to remove hazardous glass shards. Trusting an amateur can lead to severe water leaks, electrical defroster failures, and hazardous interior glass fragments left behind to endanger your passengers.
At AlexWindshield, we are deeply committed to elevating the standard of auto glass repair across the Greater Toronto Area. Whether you require our dispatch services in Vaughan, immediate assistance in Richmond Hill, or emergency mobile replacement in Markham, we guarantee absolute precision on every single job. We stand firmly behind the quality of our craftsmanship and the superiority of our materials, which is why every single back glass installation we perform is backed by our comprehensive Lifetime Warranty against leaks, wind noise, and workmanship defects. When disaster strikes your rear window, choose the Master Technicians who prioritize your safety. Choose unmatched convenience. Choose AlexWindshield.


