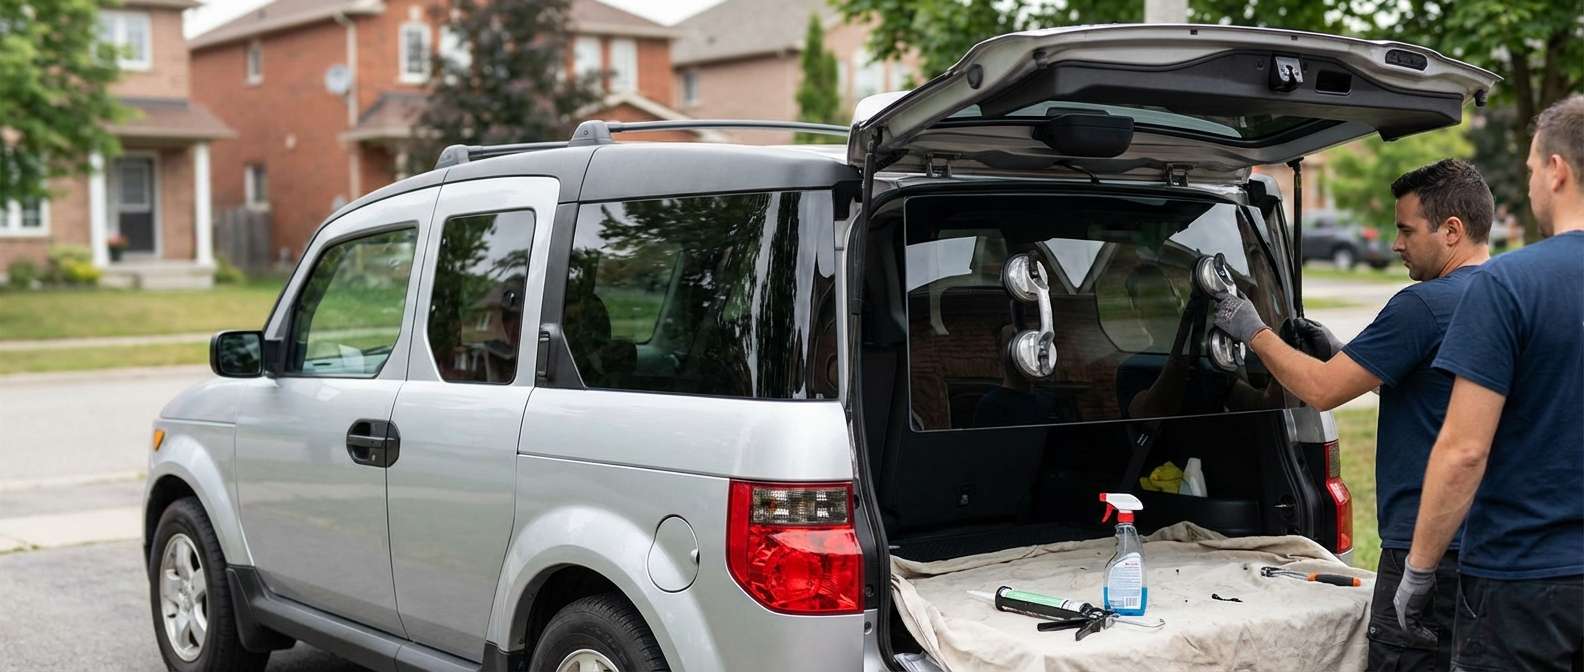
The Honda Element's Signature Clamshell: Restoring Your Utilitarian Masterpiece
The Honda Element's signature clamshell tailgate is a masterclass in versatile, utilitarian design, but when the upper back glass shatters, it instantly transforms your rugged adventure vehicle into an exposed, vulnerable box. Produced between 2003 and 2011, the Honda Element remains a beloved icon for campers, pet owners, and daily commuters alike. However, because of its upright, boxy stance and the distinct upper liftgate configuration, the rear window is highly susceptible to impact damage, sudden temperature changes, and structural stress. When you are faced with a shattered rear window, you need a specialized Honda Element back glass replacement service that understands the exact anatomy of this unique vehicle.
Unlike a front windshield, the back glass of your 2003-2011 Honda Element is manufactured using tempered glass. When compromised, it does not crack in a spiderweb pattern; instead, it violently explodes into thousands of tiny, sharp cubes. These glass shards scatter across your specialized urethane-coated cargo floor, nestle into the rear seat folding mechanisms, and plunge deep inside the interior cavity of the upper liftgate. At AlexWindshield, our Master Technicians do more than simply glue a new piece of glass onto your vehicle. We perform a comprehensive structural restoration and deep-cleaning process to return your Honda Element to its original, safe condition.
Why the 2003-2011 Honda Element Requires Specialized Auto Glass Expertise
The rear liftgate of the Honda Element is not a standard hatch. It houses a rear wiper motor assembly, delicate defroster grid connections, and heavy-duty gas struts that hold the upper hatch open. Proper replacement requires meticulous disassembly of these components. Choosing a generic repair service often results in malfunctioning defrosters, a misaligned rear wiper, or worse, lingering glass shards inside the door panel that rattle every time you hit a bump. As senior auto glass technicians, we approach this specific model with the technical precision it demands.
Complete Step-by-Step Back Glass Replacement Process
Step 1: Pre-Inspection and Extensive Interior Protection
Before any tools are deployed, our primary focus is safeguarding your vehicle's interior. A shattered back window leaves the cabin entirely exposed. We begin by carefully covering the rear waterproof seats and the cargo floor area of your Honda Element with heavy-duty protective drop cloths. We apply protective tape to the exterior painted surfaces surrounding the rear upper hatch to prevent any accidental scratches during the extraction of the old frame and adhesive. Protecting the interior is critical, as the sharp edges of tempered glass can easily gouge the unique interior plastics of the Element.
Step 2: Removing Hatch Trim and Disconnecting Electronics
To properly install the new glass and clean out the debris, we must gain access to the bare metal of the liftgate. Our technicians carefully unclip and remove the interior plastic door panels from the upper clamshell hatch. With the internal cavity exposed, we safely disconnect the wiring harnesses for the rear window defroster grids. We also unbolt and temporarily remove the rear wiper arm and motor assembly, which is mounted directly through a specialized aperture in the rear glass. If the gas lift supports (struts) are attached to the glass hardware, these are safely detached and supported.
Step 3: Meticulous Glass Vacuuming and Debris Removal
This is arguably one of the most vital steps in a tempered back glass replacement. Because the glass shatters, thousands of fragments fall into the inner workings of the rear hatch door shell. If left inside, these shards will damage the wiper motor wiring, block the hatch latching mechanism, and create an infuriating rattling noise while driving. Using high-powered industrial shop vacuums equipped with specialized micro-crevice tools, we extract every single broken glass shard from the interior panels, the lower tailgate crevice, and the vehicle’s cabin. We guarantee a thorough extraction of all broken glass shards from your vehicle's interior.
Step 4: Pinch Weld Preparation and Old Urethane Removal
With the workspace clean and safe, we turn our attention to the vehicle's frame, known as the pinch weld. The perimeter of the original back glass was held in place by a thick bead of polyurethane adhesive. Using specialized cold-knife extractors and precision oscillating tools, we meticulously pare down the old adhesive bead to a perfectly even thickness of 1-2 millimeters. This thin layer of original urethane provides the ultimate bonding base for the new adhesive. We never scratch down to the bare metal, as doing so can invite rust—a fatal flaw for any vehicle's structural integrity.
Step 5: Surface Cleaning and Primer Application
The newly exposed pinch weld and the bonding edge of the replacement glass must be completely devoid of dirt, oil, and moisture. We clean the frame and the ceramic frit band (the black painted edge) of the new OEM-quality replacement glass using a lint-free, alcohol-based auto glass cleaner. Once purified, we apply a high-performance, single-step black glass primer to any minor scratches on the pinch weld and directly onto the glass bonding edge. This primer is a chemical necessity; it acts as a molecular bridge, ensuring the urethane adhesive creates a permanent, water-tight, and chemically fused bond between the glass and the Honda Element's frame.
Step 6: High-Quality Adhesive Application and Precision Glass Placement
With the primer cured, we apply a continuous, precise triangle-shaped bead of high-quality, fast-curing auto glass urethane adhesive around the perimeter of the pinch weld. This structural adhesive is designed to meet or exceed original factory crash-safety standards. Because the Honda Element's back glass is large and uniquely shaped, it requires two technicians or specialized suction-cup lifting systems to perfectly align the glass. The glass is carefully set into the wet urethane. We press it firmly into place, ensuring the gap tolerances around the entire upper hatch are perfectly uniform, guaranteeing a flush, factory-grade fit.
Step 7: Reassembly and Final Quality Checks
While the advanced urethane rapidly cures, we begin the reassembly phase. We reinstall the rear wiper motor, securely threading the armature through the newly installed glass, and reattach the wiper blade. We reconnect the electronic defroster tabs, testing the circuit to ensure your rear defrost will function flawlessly during brutal Canadian winters. The interior plastic door panels of the hatch are clipped back into place, and the gas struts are re-secured. Finally, we perform a secondary vacuum sweep and clean the new glass to a streak-free shine. We conduct a rigorous water-leak test to ensure the seal is impenetrable.
Premier Local Auto Glass Service Across the Greater Toronto Area (GTA)
Dealing with a shattered rear window is a high-stress situation, leaving your cargo exposed to theft and the harsh Ontario weather. You shouldn't have to drive a compromised vehicle across town. AlexWindshield brings our state-of-the-art mobile auto glass repair shop directly to your driveway, workplace, or emergency location. We proudly offer comprehensive mobile service across the Greater Toronto Area (GTA).
- Vaughan: Whether you are parked near Vaughan Mills or commuting down the 400, our mobile units arrive fully equipped to replace your Element's back glass on-site, saving you time and towing fees.
- Richmond Hill: Navigating the busy streets of Richmond Hill with a missing back window is unsafe. We provide rapid dispatch to residential and commercial addresses throughout the area, ensuring your vehicle is secured promptly.
- Markham: From Unionville to the tech hubs, our Master Technicians deliver dealership-quality back glass replacements directly to your location in Markham, backed by decades of technical expertise.
No matter where you are situated in the GTA, our mobile fleet is engineered to execute complex tempered glass replacements in a controlled, safe, and highly efficient manner, unaffected by standard weather constraints.
Book Your Honda Element Back Glass Replacement Today!
Your 2003-2011 Honda Element was built for durability and adventure, but it requires expert care when structural glass is compromised. Do not trust your vehicle to fly-by-night operators who skip vital safety steps like interior vacuuming or use inferior glues. At AlexWindshield, we pride ourselves on delivering unmatched craftsmanship, utilizing only industry-leading urethanes and premium auto glass. Every single back glass replacement we perform is backed by our comprehensive Lifetime Warranty, covering any leaks, wind noise, or manufacturer defects for as long as you own your vehicle.
Restore the security, functionality, and aesthetic of your Honda Element today. Trust the local experts who understand the exact engineering of your vehicle. Contact AlexWindshield to schedule your fast, reliable, and professional mobile auto glass replacement anywhere in the GTA!


