Shattered Skies: Restoring the Overhead Luxury of Your 2015-2020 GMC Yukon and Yukon XL
The 2015-2020 GMC Yukon and its extended counterpart, the Yukon XL, are undisputed titans of the road. Built on General Motors' robust K2XX platform, these full-size SUVs offer an unparalleled blend of commanding highway presence, towing capability, and cavernous, luxurious interiors. For many owners—especially those driving the premium SLT or top-tier Denali trims—the power sunroof is a central feature of that luxury experience, flooding the cabin with natural light and fresh air. However, when a rogue rock on the highway, extreme thermal shock from a harsh Canadian winter, or sudden structural stress causes that overhead glass to shatter, your premium sanctuary is instantly compromised. A damaged sunroof exposes your Yukon's delicate electronics, premium leather seating, and headliner to catastrophic weather damage.
When disaster strikes overhead, you need a specialized technical approach to restore your vehicle's structural integrity and weather-tight seal. As a Master Technician at AlexWindshield, I have executed countless high-level auto glass replacements. Replacing the sunroof on a heavy-duty, modern SUV requires far more than just swapping out a pane of glass; it demands meticulous preparation, advanced chemical bonding, and a total commitment to interior safety. Below is our comprehensive, step-by-step master guide to GMC Yukon sunroof replacement.
Why Immediate Sunroof Replacement is Critical for Your Yukon
Unlike a minor rock chip on a windshield, a compromised or shattered sunroof is an automotive emergency. The 2015-2020 Yukon XL features complex overhead consoles, rear entertainment systems, and sophisticated climate control vents routed through the roofline. Leaving a damaged sunroof exposed—even with a temporary tarp or plastic wrap—invites moisture into the cabin, leading to mold growth, electrical shorts, and a sagging headliner. Furthermore, tempered sunroof glass is designed to break into thousands of tiny, blunt pieces upon impact. While this prevents large, dangerous shards from harming passengers, it means that microscopic glass fragments will infiltrate every crevice of your Yukon’s interior.
The AlexWindshield Master Technical Process: A to Z Sunroof Replacement
At AlexWindshield, we do not cut corners. Our sunroof replacement process for the 2015-2020 GMC Yukon and Yukon XL follows rigorous manufacturer guidelines to ensure a flawless, permanent, and factory-grade seal.
Step 1: Meticulous Interior Protection and Prep Work
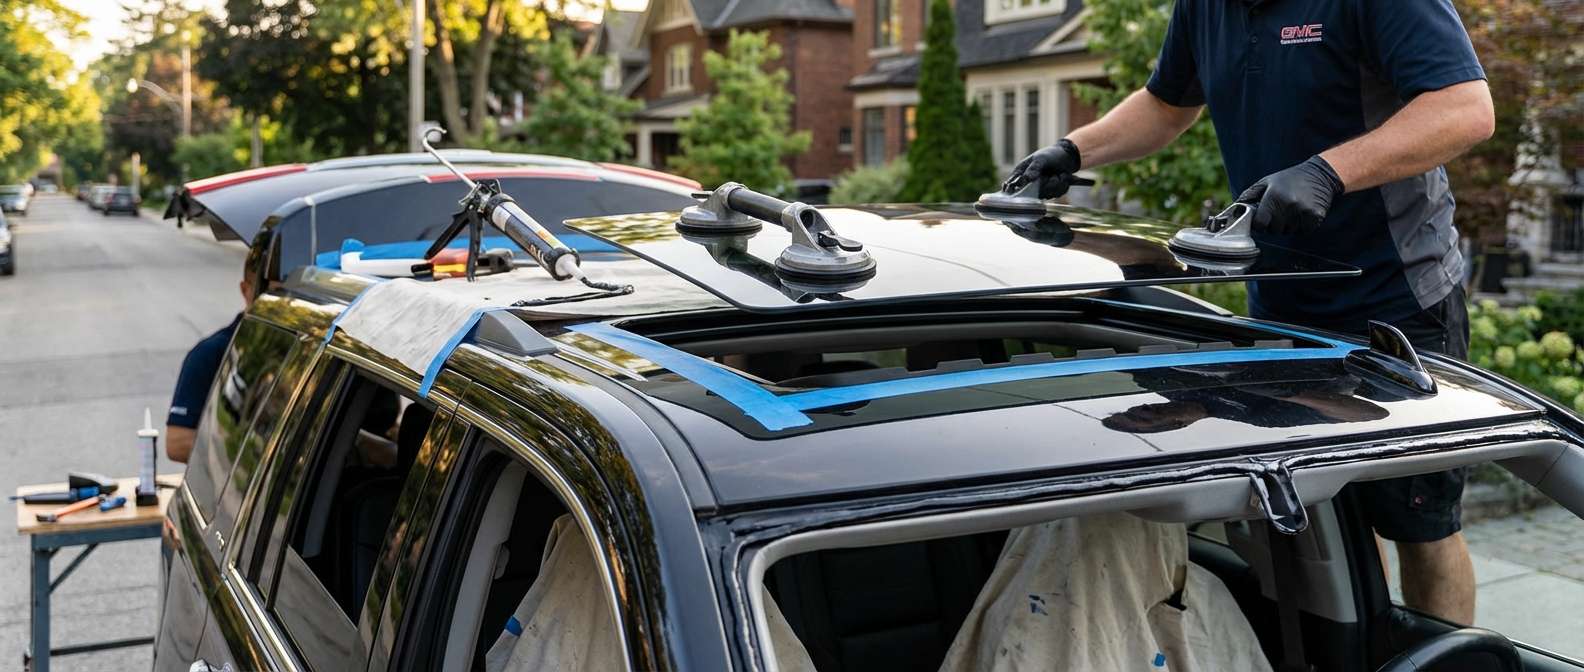
The very first step before any tools touch your vehicle is interior protection. The Yukon boasts a massive interior footprint, and we treat it with the utmost respect. We begin by covering the dashboard, steering column, center console, and all three rows of seating with heavy-duty protective drop cloths. We apply specialized low-tack masking tape to the edges of the headliner and the painted roofline surrounding the sunroof opening. This critical preparation step ensures that your pristine leather seats and sensitive interior trims are completely shielded from both debris and the powerful industrial adhesives used later in the process.
Step 2: Deep-Extraction Vacuuming of All Broken Glass Shards
Because sunroof glass is typically tempered, an impact usually results in the glass cascading directly into the cabin. We perform a highly detailed, deep-extraction vacuuming process. Utilizing industrial-grade HEPA vacuums equipped with specialized micro-crevice tools, we extract all broken glass shards from the vehicle's interior. We meticulously vacuum the perforated leather seats, the carpeting, the floor mats, and the interior door panels. Most importantly, we extensively vacuum the overhead sunroof tracks and the mechanical cassette assembly. Even a single remaining glass shard in the sliding mechanism can cause the new sunroof motor to jam, grind, or fail prematurely.
Step 3: Removal of the Old Glass Assembly and Hardware
With the interior safe and clear of debris, we shift our focus to the roofline. We carefully detach the mechanical linkages and unbolt the damaged glass panel from the sunroof carrier mechanism. In cases where the fixed surround glass or weather-sealed bonding perimeter is compromised, we use advanced cold-knife systems and precision wire-cutting tools to safely slice through the original factory urethane. We extract the remaining broken glass and framing with absolute precision, ensuring the aluminum and steel edges of your Yukon’s roof are not scratched or bent.
Step 4: Surface Cleaning and Drain Tube Inspection
The Yukon's sunroof system relies heavily on four corner drain tubes routed down the A-pillars and C-pillars to channel rainwater safely away from the vehicle. Over time, or following a glass shatter event, these tubes can become clogged with dirt, pine needles, or microscopic glass debris. We flush and clear these drain tubes using compressed air and specialized flexible routing wires. Following this, we perform a deep chemical cleaning of the bare metal pinch weld on the roof. We use specialized foaming glass cleaners and wax-and-grease removers to strip away old dirt, biological buildup, and moisture, leaving a surgically clean surface for the new adhesives.
Step 5: Precision Primer Application
One of the most critical steps in the entire replacement process—and one that amateur technicians often skip—is the primer application. Where the factory urethane has been trimmed down to the bare metal, the roof is susceptible to oxidation and rust. We apply a premium, scientifically formulated auto-glass primer to the metal pinch weld and the bonding surface of the new sunroof glass. This high-tech primer serves a dual purpose: it acts as a powerful anti-corrosion barrier for your Yukon’s steel roofline, and it acts as a chemical bonding agent, creating an aggressive molecular bridge between the vehicle's frame and the adhesive.
Step 6: High-Quality Adhesive Application
Once the primer has flashed and cured, it is time for the urethane. At AlexWindshield, we exclusively utilize industry-leading, fast-curing, high-quality polyurethane adhesive. Using an electric caulking gun equipped with a specialized V-notch nozzle, we lay down a mathematically perfect, continuous bead of urethane around the perimeter of the sunroof mounting channel. The consistency and height of this bead are crucial for the heavy SUV; it must be completely uniform to prevent wind noise, eliminate water leaks, and provide the exact structural rigidity mandated by General Motors for rollover safety.
Step 7: Installation of the New Premium Glass
With the adhesive precisely applied, two technicians coordinate the exact placement of the new, OEM-quality sunroof glass. Because the roof of the Yukon XL is significantly higher than most passenger vehicles, we utilize heavy-duty suction cup handles and elevated staging platforms to gently lower the glass into the roof aperture. The glass is carefully pressed into the wet adhesive bead, ensuring adequate wet-out and a seamless flush fit with the vehicle’s exterior roofline. We then bolt the moving glass panels (if applicable) back into the track assembly, torquing the T-25 or T-30 Torx screws to factory specifications.
Step 8: Motor Initialization, Calibration, and Quality Assurance Testing
While an ADAS forward-facing camera calibration is mandatory for a windshield replacement, a dynamic power sunroof requires its own specific calibration—known as motor initialization or relearning. We connect our advanced OBD2 diagnostic scanners to the Yukon's computer system to reset the sunroof control module. This ensures the one-touch open/close features work flawlessly and the anti-pinch safety sensors are properly calibrated. Finally, we conduct a rigorous high-pressure water test across the entire roofline to guarantee that your new sunroof is 100% weather-tight and road-ready.
Unmatched Mobile Service Across the Greater Toronto Area (GTA)
We understand that driving a premium SUV like a GMC Yukon with a blown-out sunroof is incredibly stressful, and finding the time to visit a traditional auto glass shop can disrupt your busy schedule. That is why AlexWindshield brings the auto glass shop directly to you.
Our fleet of fully equipped, state-of-the-art service vans provides comprehensive mobile auto glass replacement across the Greater Toronto Area (GTA). We specialize in rapid response and premium customer care in key regional hubs:
- Vaughan: Whether your Yukon is parked at a corporate plaza in Vaughan Metropolitan Centre, or resting in your residential driveway in Woodbridge, our mobile technicians arrive fully prepared to execute a flawless sunroof replacement on-site.
- Richmond Hill: Navigating the unpredictable weather near the Oak Ridges Moraine requires a perfectly sealed vehicle. We provide swift, precise mobile service to homes and businesses throughout Richmond Hill, ensuring your SUV is protected from the elements.
- Markham: From high-tech business parks to quiet suburban neighborhoods in Markham, our master technicians dispatch directly to your location, allowing you to continue your workday uninterrupted while we restore your vehicle’s glass to factory conditions.
The AlexWindshield Standard: Trust, Expertise, and a Lifetime Warranty
Your 2015-2020 GMC Yukon or Yukon XL is a significant investment, and its maintenance should only be entrusted to seasoned professionals. As a recognized authority in automotive glazing, AlexWindshield is dedicated to delivering flawless craftsmanship, using only industry-best materials, OEM-grade glass, and advanced chemical adhesives.
We do not just replace your auto glass; we engineer a long-lasting, weather-tight solution backed by our ironclad Lifetime Warranty. This warranty covers you against any leaks, wind noises, or manufacturer defects for as long as you own your vehicle. When you need a GMC Yukon sunroof replacement, do not settle for second best. Trust the master technicians at AlexWindshield—your premier, mobile auto glass experts serving the entire GTA.


