The Majestic Final Act: Vent Glass Replacement for Your 10th Generation Chevrolet Impala
The Chevrolet Impala 2014-2020 represents the majestic final act of a legendary American nameplate. With its sculpted bodylines, aggressive front fascia, and a meticulously refined cabin, this 10th-generation sedan is a true masterpiece of modern automotive design. However, its sleek, aerodynamic profile relies heavily on an intricate, multi-piece auto glass system. Among these components is the crucial but often overlooked vent glass. Located just behind the rear door windows or embedded within the rear quarter architecture, this small, fixed pane of glass is vital for both acoustic insulation and structural aesthetics. Unfortunately, due to its size and location, the vent glass is frequently targeted by thieves or shattered by unexpected road debris. When this specific glass is compromised, it immediately breaks the secure seal of your vehicle, exposing your premium interior to the harsh Canadian elements.
As a Master Technician at AlexWindshield, I have witnessed countless Impala owners express frustration over a shattered vent glass. Unlike a small windshield chip, tempered vent glass completely detonates upon impact, leaving thousands of razor-sharp fragments scattered throughout your vehicle's cabin and hidden deep within the door panels. Restoring your vehicle requires far more than just slapping a new piece of glass into place; it demands surgical precision, an obsessive attention to detail, and a deep understanding of General Motors' engineering standards.
Premium Mobile Auto Glass Service Across the Greater Toronto Area (GTA)
A shattered window shouldn't force you to take time off work or navigate chaotic traffic with a plastic bag taped to your door. At AlexWindshield, we bring our cutting-edge auto glass shop directly to your driveway, office parking lot, or garage. Our mobile service fleet is fully equipped to handle complex auto glass replacements across the entire Greater Toronto Area (GTA).
Whether you are parked near the bustling shopping centers in Vaughan, working in the high-tech business parks of Markham, or relaxing at your residential home in Richmond Hill, our dedicated technicians arrive fully prepared. We understand that local GTA weather can be unpredictable. Driving with an open or temporarily patched window is not just uncomfortable; it is a significant security risk. By offering rapid, on-site vent glass replacement services across Vaughan, Markham, and Richmond Hill, we ensure that your Chevrolet Impala 2014-2020 is secured, sealed, and restored to factory conditions without you ever having to leave your location.
The Master Technician's Step-by-Step Replacement Process
Replacing the vent glass on a Chevrolet Impala 2014-2020 is a meticulous procedure that requires specialized tools and strict adherence to safety protocols. As an industry-leading technician, here is my comprehensive, A-to-Z process for perfectly executing this repair.
Step 1: Vehicle Assessment and Interior Protection
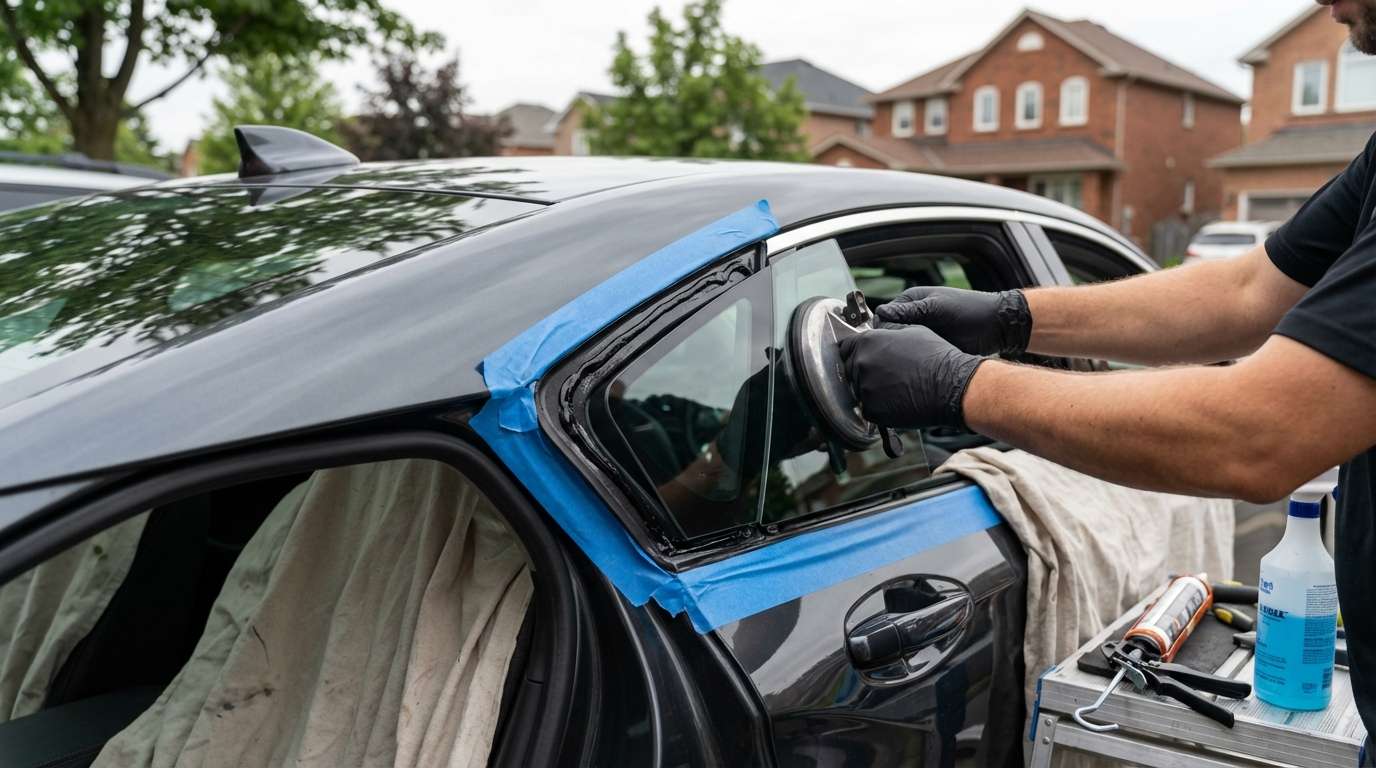
Before any tools are lifted, preparation is absolutely paramount. The Impala is known for its luxurious interior options, including perforated leather seating and soft-touch door trims. My first step is to completely isolate the work area. I lay down heavy-duty protective drop cloths over the seats, floor mats, and center console. I also apply specialized automotive masking tape around the exterior painted surfaces surrounding the vent glass frame. This guarantees that your Impala's pristine paint job and premium interior remain completely untouched by tools, chemicals, or abrasive glass shards during the replacement process.
Step 2: Comprehensive Shattered Glass Cleanup and Panel Removal
Because the vent glass in the Chevrolet Impala 2014-2020 is made of tempered glass, it does not crack like a windshield; it explodes into thousands of tiny, pebble-like shards. Skipping a thorough cleanup will result in annoying rattling noises every time you close your door or hit a bump. To prevent this, I carefully unclip and remove the interior door panels and trim pieces surrounding the affected area. Once the internal cavity of the door and the vehicle frame is exposed, I use a high-powered, industrial shop vacuum with specialized micro-attachments to extract every single fragment of broken glass. I vacuum the seats, the floorboards, the weatherstripping tracks, and deep inside the door shell. Only when the area is 100% free of debris do I move on to the extraction of the old frame.
Step 3: Removing the Old Urethane and Frame Preparation
The vent glass on this generation of Impala is encapsulated and bonded to the vehicle frame using a powerful urethane adhesive. Using a combination of a specialized cold knife and advanced wire-cutting systems, I carefully slice through the factory urethane bead. This releases the remaining glass fragments and the old rubber encapsulation. Once the old unit is removed, I use sharp paring tools to trim the remaining old adhesive down to a thin, uniform layer—typically about 1 to 2 millimeters thick. This process, known as leaving a base bead, is critical because the new high-quality adhesive bonds best to a freshly trimmed layer of existing urethane.
Step 4: Deep Surface Cleaning and Primer Application
A flawless seal requires a flawless surface. I treat the entire pinch weld area (the metal frame where the glass sits) with an alcohol-based, automotive-grade glass cleaner to remove any dirt, grease, or moisture. If the removal process exposed any bare metal on the vehicle's frame, or if there were existing micro-scratches, I immediately apply a specialized black automotive primer. This primer serves two vital purposes: it prevents any future rust or oxidation from forming on your Impala's frame, and it creates a necessary chemical bridge that allows the urethane to permanently bond to the metal and the new glass.
Step 5: High-Quality Adhesive Application
The structural integrity of your vehicle's cabin relies heavily on the adhesive used. At AlexWindshield, we never cut corners. I load a pneumatic caulking gun with an advanced, fast-curing, OEM-grade polyurethane adhesive. I carefully lay down a continuous, perfectly proportioned V-shaped bead of this high-quality adhesive along the perimeter of the prepared pinch weld. The V-bead ensures that when the glass is pressed into place, the adhesive spreads evenly without trapping any air bubbles, creating a watertight, hermetic seal that blocks out wind noise and moisture.
Step 6: Setting the New Chevrolet Impala Vent Glass
Timing and precision are critical in this phase. The new, OEM-equivalent vent glass—specifically measured and curved for the Chevrolet Impala 2014-2020—is prepped with its own layer of glass primer. Using specialized suction cups to avoid touching the bonding surface with my hands, I carefully align the new vent glass with the vehicle's body lines. I press it firmly into the high-quality adhesive, ensuring it sits completely flush with the surrounding exterior pillar trims and weatherstripping. I then secure the glass with specialized retention tape to hold it perfectly in place while the urethane begins its chemical curing process.
Step 7: Final Inspection and Reassembly
While the adhesive flashes off and cures, I begin the reassembly phase. I meticulously reinstall the interior door panels, weatherstripping, and interior trim pieces, ensuring every retaining clip clicks back into its factory position. I perform a secondary vacuuming of the interior just to be absolutely certain no hidden glass shards remain. Finally, I clean the newly installed vent glass to a streak-free shine and conduct a rigorous water-leak test to guarantee the integrity of the seal. I then review the safe drive-away time with the client, explaining exactly when the vehicle is safe to operate.
Why AlexWindshield is Your Trusted Auto Glass Expert
Replacing auto glass on a refined vehicle like the Chevrolet Impala 2014-2020 requires the steady hand and deep knowledge of a Master Technician. Settling for an amateur repair can lead to horrific wind noise, chronic water leaks, and severe rust damage hidden behind your trim panels. That is why drivers across the Greater Toronto Area (GTA) consistently trust our highly trained team.
- Unmatched Expertise: We specialize in the specific nuances of modern Chevrolet vehicles, ensuring your trim and clips remain perfectly intact.
- Ultimate Convenience: Our mobile fleet travels directly to you, whether you are in Vaughan, Richmond Hill, or Markham.
- Premium Materials: We use only OEM-equivalent glass and the industry's most advanced high-quality adhesive systems for unparalleled safety and longevity.
- Comprehensive Cleanup: We guarantee that every shard of dangerous broken glass is meticulously removed from your cabin and internal door frames.
Experience Peace of Mind with Our Lifetime Warranty
At AlexWindshield, we stand firmly behind the quality of our craftsmanship and the superiority of our materials. We are proud to offer an industry-leading Lifetime Warranty on our vent glass replacement services. This warranty covers any issues related to workmanship, including wind noise, water leaks, and manufacturer defects in the glass itself for as long as you own your vehicle. When you choose us for your auto glass needs, you are not just purchasing a piece of glass; you are investing in safety, security, and absolute peace of mind. Contact AlexWindshield today and let our Master Technicians restore your Chevrolet Impala to its rightful, majestic condition.


