Restoring a Classic: The 1998-2002 Lincoln Navigator Back Glass
The 1998-2002 Lincoln Navigator didn't just enter the luxury SUV market; it completely revolutionized it. As the genesis of the full-size American luxury utility vehicle, this iconic first-generation model combined a commanding road presence with an exceptionally plush interior. However, its expansive rear architecture, particularly the rear liftgate glass, remains vulnerable to the unpredictability of the road. Whether compromised by rogue road debris, extreme Canadian temperature fluctuations, or an unfortunate impact, a shattered back glass compromises your vehicle's security, interior climate, and sophisticated aesthetics. At AlexWindshield, we understand the engineering nuances of the classic UN93 platform, providing specialized, high-tier replacement services tailored specifically for your 1998-2002 Lincoln Navigator.
Expert Mobile Auto Glass Services Across the Greater Toronto Area (GTA)
When your rear window shatters, driving your SUV to a repair shop isn't just uncomfortable—it is unsafe and risks interior water damage if the weather turns. That is exactly why AlexWindshield brings our state-of-the-art mobile auto glass replacement service directly to your driveway, workplace, or emergency location. We proudly service the entire Greater Toronto Area (GTA), with dedicated, rapid-response mobile units frequently operating throughout Vaughan, Richmond Hill, and Markham. Whether you are parked outside a corporate office in Markham, running errands in Richmond Hill, or safely at home in Vaughan, our Master Technicians deliver dealership-level precision right to your doorstep.
The Technical Anatomy of the 1998-2002 Lincoln Navigator Rear Glass
Replacing the back glass on a first-generation Lincoln Navigator is significantly more complex than standard windshield installations. This specific model features a heavy-duty, tempered rear glass that often integrates a sophisticated rear defroster grid and specific factory privacy tinting designed to protect your cabin from UV rays. Furthermore, depending on the trim package, the glass interacts with gas-charged lift struts, heavy-duty hinges for the flip-up functionality, and the rear wiper motor assembly. Understanding these intricate mechanical connections is what separates standard glass installers from the Master Technicians at AlexWindshield. We don't just glue a piece of glass; we meticulously restore the complete rear visibility and mechanical ecosystem of your luxury SUV.
Step-by-Step Back Glass Replacement Process: From A to Z
Our commitment to excellence is reflected in our rigorous, step-by-step technical methodology. Here is exactly how AlexWindshield executes a flawless back glass replacement for your 1998-2002 Lincoln Navigator.
Step 1: Thorough Pre-Inspection and Vehicle Protection
Before any tools are deployed, our technicians conduct a comprehensive assessment of the rear liftgate. We check the structural integrity of the tailgate frame, the condition of the hinges, and the wiring harness for the defroster. Because replacing rear glass can be a messy process, we immediately prioritize protecting your Navigator's luxurious interior. We apply heavy-duty drop cloths over the third-row seating and cargo area, and apply protective automotive masking tape to the exterior painted surfaces surrounding the liftgate to prevent any accidental scratches during the extraction process.
Step 2: Interior Trim Removal and Component Disconnection
Unlike a windshield, back glass installation requires extensive interior disassembly. Our technicians use specialized non-marring nylon pry tools to safely remove the interior plastic trim panels of the rear liftgate. This exposes the internal wiring and structural shell. We carefully disconnect the electrical terminals for the rear heated defroster grid, ensuring the factory connectors are preserved. We also detach the rear wiper arm, the wiper motor assembly (if integrated through the glass), and carefully unbolt the gas-charged lift struts and upper glass hinges.
Step 3: The Crucial Cleanup – Vacuuming Broken Glass Shards
Because automotive rear windows are constructed from tempered glass, they are designed to shatter into thousands of small, blunt, popcorn-like fragments upon impact. These shards instantly flood the cargo area and fall deep into the inner cavity of the liftgate door shell. Vacuuming all broken glass shards from the vehicle's interior is a mandatory and critical step. Using high-powered industrial shop vacuums equipped with specialized micro-crevice tools, we extract every piece of glass from the cargo carpet, seat folds, and most importantly, from inside the tailgate panel. Failing to properly clean the liftgate shell results in maddening rattling noises every time you close the door or hit a bump. We guarantee a completely shard-free interior before proceeding.
Step 4: Removal of the Old Polyurethane and Frame Preparation
With the debris cleared, we focus on the pinch weld—the metal frame where the glass sits. Using a specialized cold knife and precision extractor tools, we carefully cut away the remaining original polyurethane adhesive. We "skive" (trim) the old adhesive down to a thin, uniform base layer of about 1 to 2 millimeters. This acts as an optimal bonding surface for the new urethane. The pinch weld is then thoroughly cleaned with industry-grade, residue-free solvents to eliminate any dust, grease, or moisture that could compromise the seal.
Step 5: Primer Application and Rust Prevention
Proper chemical preparation is non-negotiable for a safe, leak-proof installation. If any minor scratches occurred on the metal pinch weld during the removal of the old adhesive, we meticulously treat them with a specialized bare-metal rust-preventative primer. Simultaneously, we apply a high-quality glass primer to the black ceramic frit band on the inside edge of the new replacement glass. This black primer promotes aggressive chemical cross-linking with the urethane, ensuring the bond will hold under extreme driving stresses and temperature variations.
Step 6: High-Quality Urethane Adhesive Application
Using a heavy-duty electric caulking gun, our technicians apply a precise, continuous "V-bead" of premium, OEM-grade fast-curing polyurethane adhesive around the perimeter of the liftgate pinch weld. The V-shape of the bead is highly technical—it allows the urethane to compress perfectly when the glass is set, preventing any air pockets or potential water leak channels. We exclusively use advanced adhesives that meet or exceed federal safety standards, ensuring maximum structural rigidity for your Lincoln Navigator.
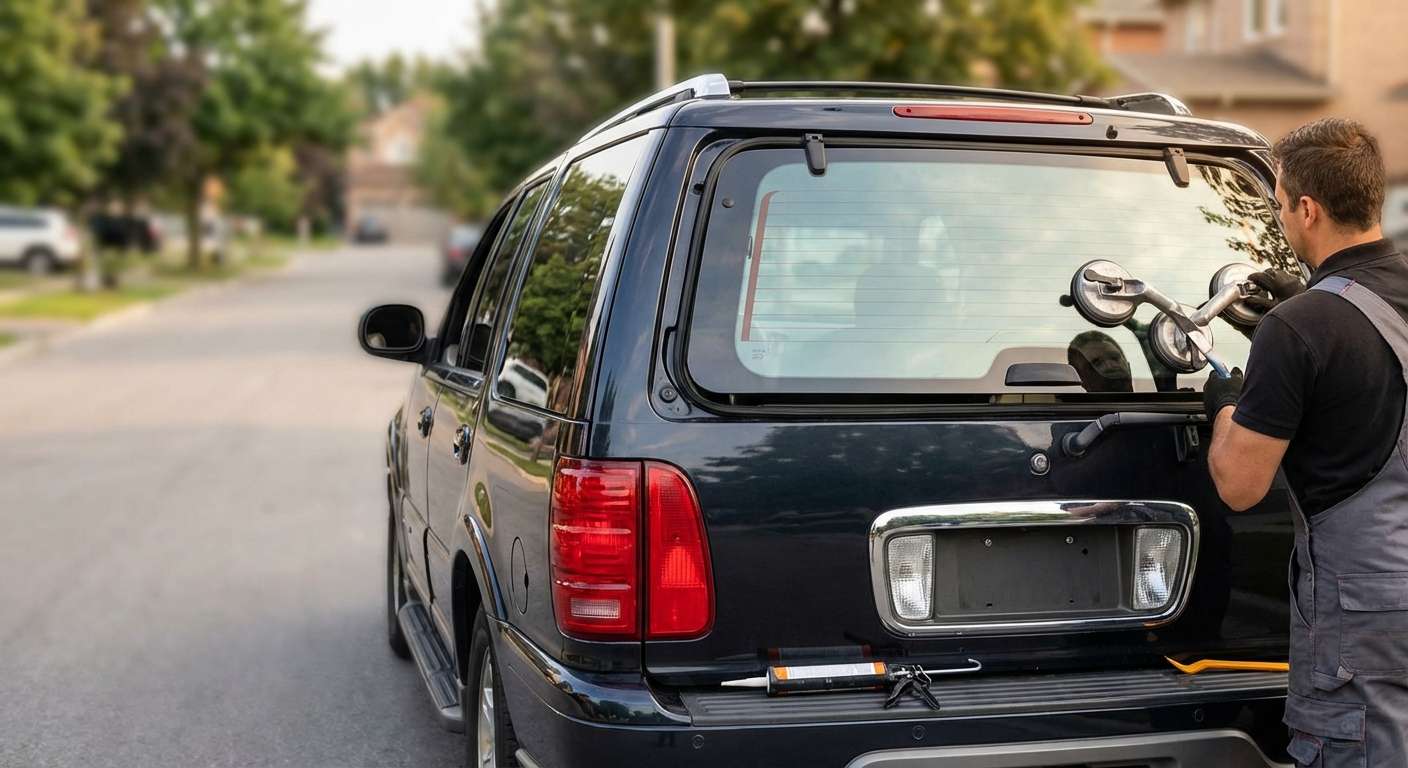
Step 7: Precision Installation of the New Back Glass
Handling the heavy, expansive rear glass of a 1998-2002 Navigator requires extreme precision. Using heavy-duty suction cup tools, two Master Technicians carefully align the new glass with the factory mounting points. The glass is gently pressed into the fresh urethane bead. We use specialized depth gauges to ensure the glass sits perfectly flush with the exterior bodylines of the vehicle, maintaining aerodynamic efficiency and restoring the sleek, factory-fresh appearance of your SUV.
Step 8: Reassembly and Defroster Testing
Once the glass is perfectly set, the reassembly phase begins. We reattach the upper hinges, reconnect the gas lift struts, and carefully secure the rear wiper assembly. The interior liftgate trim panels are snapped firmly back into their factory positions. We then reconnect the heating grid terminals and conduct a rigorous electrical test to ensure the rear defroster is functioning at optimal capacity. Finally, the exterior glass is treated with an ammonia-free auto glass cleaner, leaving a pristine, streak-free finish.
Post-Installation Care Guidelines for Your Navigator
To guarantee the longevity and safety of your new back glass, AlexWindshield recommends adhering to a few simple post-installation rules:
- Respect the Safe Drive-Away Time (SDAT): Allow the high-performance urethane to cure for at least 1 to 2 hours before driving. Our technicians will provide the exact time based on current humidity and temperature.
- Avoid Car Washes: Do not use high-pressure automated car washes for at least 48 to 72 hours. Hand washing is acceptable, provided you avoid the newly sealed perimeter.
- Leave Windows Slightly Open: Keep a side window cracked about an inch for the first 24 hours. This prevents the buildup of cabin air pressure from pushing against the curing adhesive when you close the doors.
- Avoid Slamming Doors: Close your doors and the rear liftgate as gently as possible during the initial curing phase.
Your Trusted Partner for Auto Glass in Vaughan, Richmond Hill, and Markham
Operating a classic luxury vehicle like the 1998-2002 Lincoln Navigator requires an auto glass partner you can trust implicitly. You don't have to navigate traffic with a taped-up rear window. Our mobile units are fully equipped to perform this highly technical replacement anywhere in the Greater Toronto Area (GTA). From the industrial sectors of Vaughan to the residential neighborhoods of Richmond Hill and the bustling commercial plazas of Markham, superior auto glass repair is just a phone call away.
Choose AlexWindshield for Unmatched Quality and a Lifetime Warranty
When it comes to the safety, security, and aesthetics of your classic luxury SUV, compromise is not an option. At AlexWindshield, we combine decades of technical expertise with the highest quality OEM-equivalent glass and advanced bonding materials available on the market. We are so confident in the precision of our Master Technicians that every back glass replacement comes backed by our comprehensive Lifetime Warranty, covering any leaks, wind noise, or manufacturer defects for as long as you own the vehicle. Don't let a shattered rear window disrupt your schedule or compromise your Lincoln Navigator. Contact AlexWindshield today to experience the premier mobile auto glass service in the GTA, and let us restore your classic SUV to its original, uncompromising glory.


