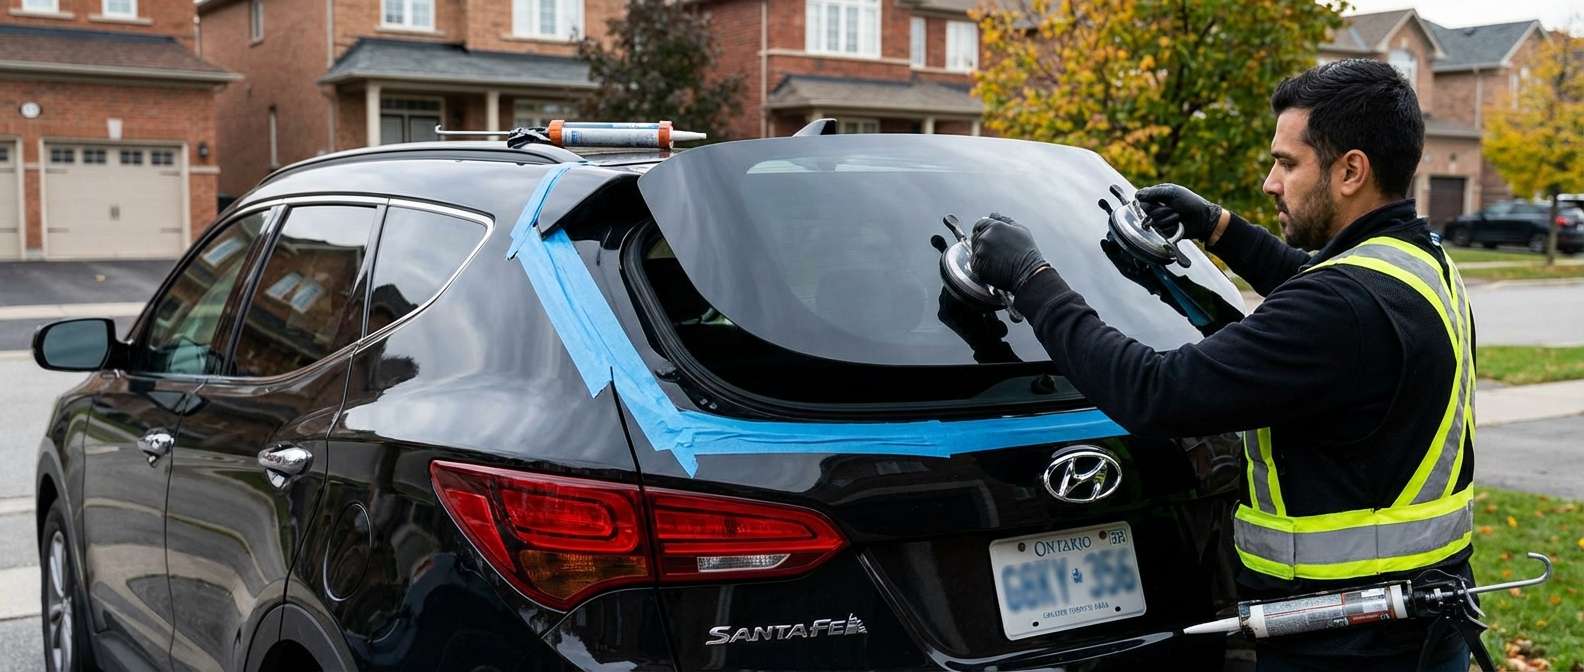
Expert Back Glass Replacement for Hyundai Santa Fe 2013-2018
The third-generation Hyundai Santa Fe (2013-2018), encompassing both the agile Sport and the spacious three-row XL models, redefined the midsize SUV segment with its sweeping "Fluidic Sculpture" design. A vital component of this aggressive yet refined aesthetic—and a critical pillar of your everyday driving safety—is the expansive, heated rear back glass. When an errant rock, a sudden extreme temperature shift, or a rear-end collision shatters this essential part, it does not merely crack. Because it is made of tempered safety glass, it shatters into thousands of tiny, cubic pieces, leaving your SUV's cargo area fully exposed to the harsh elements of the Greater Toronto Area (GTA). As a Master Technician at AlexWindshield, I can assure you that replacing the back window on this specific Santa Fe generation is a highly intricate procedure. It requires an advanced understanding of the vehicle's liftgate mechanics, meticulous shard extraction, and precise structural bonding to restore your vehicle to factory-level safety.
The Anatomy of the 2013-2018 Hyundai Santa Fe Back Glass
Before diving into the replacement process, it is important to understand what makes the rear glass of your Hyundai Santa Fe uniquely complex. Unlike a standard windshield, the rear glass serves multiple functional and electronic purposes:
- Integrated Defroster Grid: Essential for surviving Canadian winters, this internal wiring grid quickly melts ice and clears condensation to ensure maximum rear visibility.
- Privacy Tint Matching: The 2013-2018 models utilize specific factory privacy tints (commonly known as solar or privacy glass) designed to keep the cabin cool and protect your cargo from prying eyes.
- Rear Wiper and Washer Assembly: The glass features a precision-drilled structural mounting point for the rear wiper motor, which must be seamlessly integrated and sealed during installation.
- Tempered Safety Composition: Designed to break into dull, granular chunks rather than dangerous, jagged shards, protecting passengers during an impact but requiring intensive cleanup when compromised.
Comprehensive Step-by-Step Back Glass Replacement Process
At AlexWindshield, we do not cut corners. Our back glass replacement methodology strictly adheres to OEM (Original Equipment Manufacturer) safety standards. Here is the detailed, step-by-step technical process our master technicians execute for your 2013-2018 Hyundai Santa Fe.
Step 1: Vehicle Preparation and Interior Protection
The moment our technician arrives, the primary focus is protecting your SUV. We begin by applying high-tack automotive masking tape to the painted areas surrounding the liftgate to prevent any accidental scratching during the glass removal process. Heavy-duty drop cloths and protective blankets are draped over the rear bumper, cargo floor, and the folded rear passenger seats. Protecting the interior from urethane stains and sharp debris is our top priority.
Step 2: Intensive Glass Shard Vacuuming and Debris Removal
Because back glass is tempered, a blowout results in glass shards infiltrating every crevice of your vehicle. We utilize high-powered, industrial-grade shop vacuums to meticulously extract all broken glass shards from the vehicle's interior. We pay special attention to the cargo tracks, the spare tire compartment, and the rear seat folds. Crucially, we also vacuum inside the internal cavities of the liftgate itself, ensuring no hidden glass pieces are left behind to cause irritating rattling noises while driving.
Step 3: Liftgate Door Panel and Trim Disassembly
To properly install the new glass and clear out internal debris, the interior liftgate trim must be removed. Using specialized non-marring interior pry tools, we carefully detach the plastic door panels and rear pillar trims, ensuring the fragile factory retaining clips are not damaged. Once the internal structure is exposed, we carefully disconnect the wiring harnesses for the rear defroster, the third brake light, and the rear wiper motor. The wiper arm and external motor assembly are then unbolted and safely set aside.
Step 4: Pinch Weld Preparation and Old Urethane Removal
With the trim removed, we focus on the vehicle's structural frame, known as the pinch weld. Using precision cold knives and advanced wire cutting systems, we slice through the original, hardened polyurethane adhesive bed. We skillfully trim the old urethane down to a thin, uniform base layer of approximately 1 to 2 millimeters. This precise trimming provides the perfect bonding foundation for the new adhesive while ensuring we do not gouge the underlying factory paint.
Step 5: High-Performance Primer Application
Surface preparation is the secret to a leak-proof installation. We thoroughly clean the pinch weld area with a specialized, alcohol-based auto glass cleaner to remove any dirt, grease, or lingering glass dust. If any bare metal was exposed during the trimming process, we immediately treat it with an anti-corrosion pinch weld primer to completely prevent future rust formation. We also apply a specialized glass prep and primer to the black ceramic band (the frit) on the perimeter of the new OEM-quality replacement glass, optimizing it for maximum chemical adhesion.
Step 6: Premium Urethane Adhesive Extrusion
Using a battery-operated caulking gun for absolute consistency, we apply a fresh bead of premium, fast-curing polyurethane auto glass adhesive. Our master technicians utilize a highly technical "V-bead" extrusion method. This specific triangular shape guarantees that when the glass is compressed into the frame, the adhesive spreads perfectly and evenly, eliminating the risk of air pockets, wind noise, or water leaks.
Step 7: Precision Installation of the New Hyundai Santa Fe Back Glass
Timing and accuracy are critical once the adhesive is applied. Using heavy-duty vacuum suction cups, two technicians (or one highly skilled technician utilizing a precise lifting technique) carefully hoist the new back glass into place. The glass is gently lowered into the fresh urethane bed, perfectly aligned with the liftgate's structural contours. We lightly press the perimeter to ensure a permanent, watertight seal, applying specialized retention tape to hold the glass firmly in its exact position while the advanced urethane cures.
Step 8: Final Reassembly and Quality Assurance Testing
Once the glass is set, we immediately begin the reassembly process. The rear wiper motor is re-installed, and the wiper arm is precisely calibrated to ensure it sweeps the new glass efficiently without overextending. We reconnect the heating elements for the defroster grid and test the electrical current to guarantee flawless operation. Finally, the interior liftgate panels are securely snapped back into place, a secondary vacuuming of the cargo area is performed, and the new glass is polished to a brilliant, streak-free shine using ammonia-free cleaners.
Mobile Auto Glass Services Across the Greater Toronto Area (GTA)
Driving with a shattered rear window is not only uncomfortable but deeply hazardous. Wind turbulence, exhaust fumes, and the risk of weather damage make immediate replacement an absolute necessity. At AlexWindshield, we completely eliminate the hassle of towing or driving a compromised vehicle to a repair shop by bringing our state-of-the-art mobile service directly to your doorstep anywhere in the Greater Toronto Area (GTA).
We are proud to offer rapid, same-day or next-day mobile dispatch to key suburban hubs. Whether you are parked in a residential driveway in Vaughan, at a busy corporate office complex in Richmond Hill, or running errands at a shopping center in Markham, our fully-equipped mobile units arrive with everything required to perform a factory-quality installation on-site. We navigate the traffic so you can stay safe and comfortable at home or work.
Why Choose AlexWindshield for Your Hyundai Santa Fe Auto Glass?
When you trust AlexWindshield with your 2013-2018 Hyundai Santa Fe, you are partnering with the industry's finest. We refuse to compromise on material quality, utilizing only superior OEM-equivalent glass that perfectly matches your vehicle's factory privacy tint and defroster specifications. Furthermore, our premium, fast-cure urethanes allow for incredibly short safe-drive-away times, getting you back on the road securely and swiftly.
We stand confidently behind our craftsmanship. Every single back glass replacement we perform is backed by our comprehensive Lifetime Warranty. This ironclad guarantee covers you against any post-installation water leaks, wind whistling, or manufacturer defects in the glass itself for as long as you own your Hyundai Santa Fe. Your peace of mind is our ultimate priority.
Book Your Hyundai Santa Fe Back Glass Replacement Today
Do not let a shattered rear window compromise the security, climate control, and aesthetic appeal of your midsize SUV. For the most reliable, precise, and convenient auto glass repair in Vaughan, Richmond Hill, Markham, and the wider GTA, look no further than the proven expertise of our master technicians. Reclaim your safety and visibility by contacting AlexWindshield today to schedule your mobile Hyundai Santa Fe back glass replacement!


