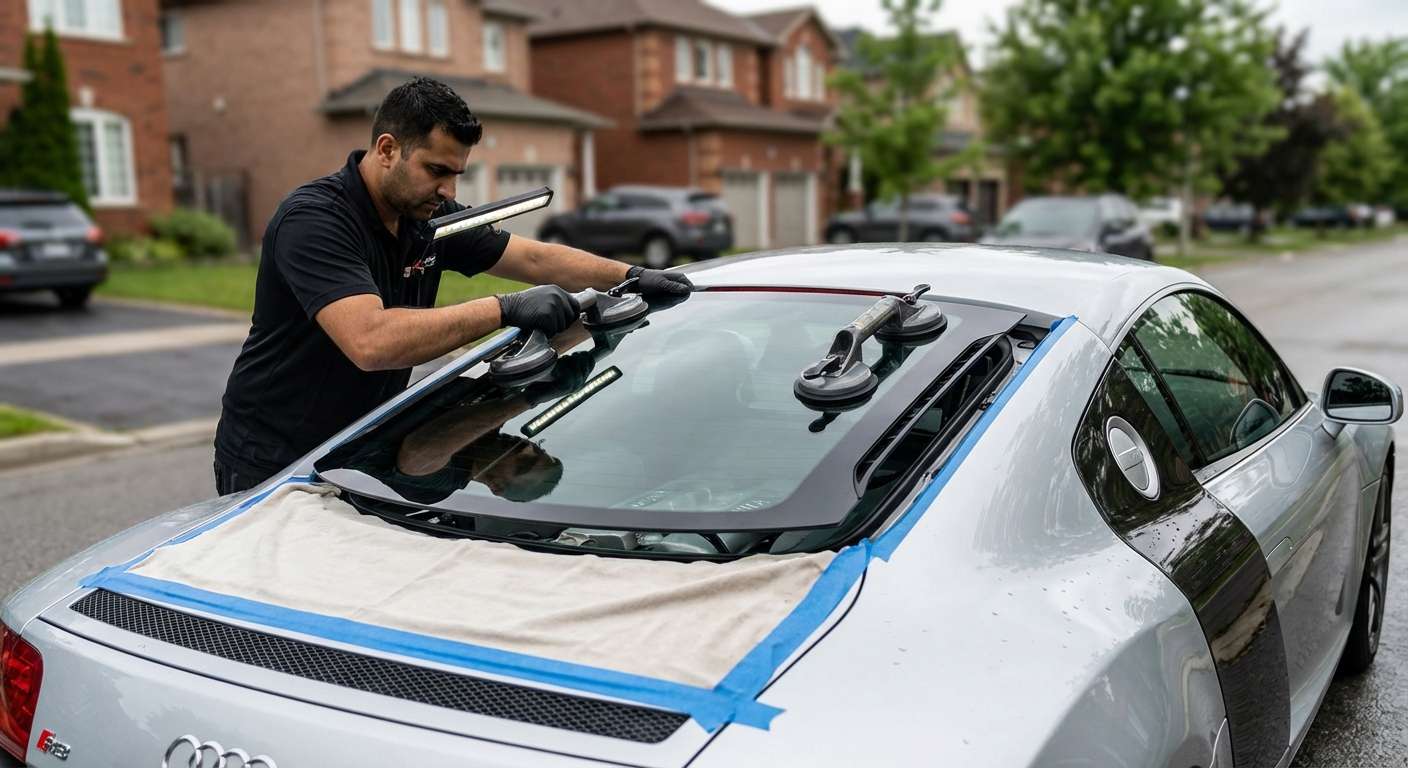
The Art of Engineering: Back Glass Replacement for the Audi R8 (2008-2015)
The first-generation Audi R8 (Type 42), produced between 2008 and 2015, is not merely a car; it is a mid-engine masterpiece that redefined the everyday supercar. With its stunning "side blades," aluminum space frame, and the roaring V8 or V10 engine sitting just inches behind the driver's head, this vehicle demands respect. The back glass on an Audi R8 serves a dual purpose: it separates the cabin from the elements, but more importantly, it acts as a viewing window into the mechanical soul of the vehicle. When this glass is compromised, whether due to impact, thermal stress, or vandalism, it requires more than a standard repair job—it requires surgical precision.
At AlexWindshield, we understand that replacing the back glass on a high-performance vehicle like the Audi R8 is a complex procedure involving tight tolerances, high-heat environments, and exotic materials. A standard sedan repair differs vastly from working around a carbon-fiber engine bay and premium Nappa leather interiors. Below, we detail our specialized, master-technician-certified process for restoring your R8 to showroom condition.
Why the Audi R8 Back Glass Requires Specialized Care
The 2008-2015 Audi R8 back glass is a structural component designed to withstand significant aerodynamic pressure and engine heat. Unlike a front windshield which is laminated, the back glass is typically tempered safety glass. When this glass breaks, it doesn't crack linearly; it shatters into thousands of tiny, pebble-like shards. This creates a unique hazard for the R8, as these shards can migrate into the engine compartment, air intakes, and the intricate crevices of the interior cabin.
Furthermore, this glass usually contains an integrated defroster circuit (heating element) and potentially an embedded antenna system. Incorrect installation can result in electrical faults, water leaks into the engine bay or cabin, and annoying wind noise that ruins the acoustic experience of the engine note. Our team at AlexWindshield utilizes OEM-quality glass and industry-leading adhesives to ensure the structural rigidity of your aluminum space frame is maintained.
Service Availability: Mobile Auto Glass in the GTA
We recognize that Audi R8 owners value convenience and discretion. You should not have to drive a vehicle with shattered glass to a shop. AlexWindshield brings the workshop to you. We provide fully equipped mobile service across the Greater Toronto Area (GTA). Our specialized units are frequently deployed in:
- Vaughan: From the chaotic 400 series highways to private residential estates.
- Richmond Hill: Servicing luxury vehicles in driveways and corporate parking lots.
- Markham: Providing rapid response to tech hubs and residential sectors.
Whether your R8 is parked in a climate-controlled garage in Vaughan or an office lot in Markham, our technicians arrive with every tool necessary to perform a factory-spec installation on-site.
Comprehensive Step-by-Step Replacement Process
As Master Technicians, we follow a rigorous protocol. The following is a detailed, A-to-Z breakdown of how we handle a Back Glass Replacement for an Audi R8. We do not skip steps.
Phase 1: Pre-Installation Inspection and Protection
Before a single tool touches your vehicle, we perform a "pre-scan" of the situation. Working on an Audi R8 requires protecting the surrounding areas, which often feature expensive carbon fiber or aluminum bodywork.
- Vehicle Assessment: We inspect the extent of the damage. If the glass has shattered completely, we assess the spread of the debris. We also check the operation of the rear defroster switch and surrounding trim for any pre-existing issues.
- Interior Protection: The R8 interior is often clad in Alcantara and premium leather. We apply heavy-duty protective covers to the seats, center console, and dashboard. We mask off the interior door panels to prevent accidental scratches during the vacuuming process.
- Exterior Masking: Using automotive-grade painter's tape and protective plastic sheeting, we mask the roofline, the engine cover (deck lid), and the rear fenders. This ensures that no glass shards scratch the paint during removal and that no urethane drips onto the bodywork.
Phase 2: Debris Removal and Cleanup (Critical Step)
Because the back glass is tempered, a break results in thousands of shards. In a mid-engine car, this is critical because debris can fall into the engine bay vents.
- Bulk Glass Removal: We carefully remove the larger remaining chunks of glass by hand, wearing cut-resistant gloves to ensure safety.
- Industrial Vacuuming: We use high-powered, HEPA-filter industrial vacuums to extract glass from the cabin. We pay special attention to the rear bulkhead carpet, the seat rails, and the parcel shelf.
- Door Panel & Trim Removal (If Necessary): While the back glass is fixed, shards often migrate. If debris has fallen behind the rear interior trim panels, we carefully pop the clips and remove the panels to vacuum behind them. This prevents the annoying "rattling" sound of loose glass that can plague lesser repairs.
- Engine Bay Inspection: We meticulously check the engine cover and surrounding vents to ensure no glass has lodged near the engine belts or intakes.
Phase 3: Removing the Old Adhesive
Once the glass is gone and the area is clean, we must prepare the frame for the new glass.
- Trimming the Urethane: The old glass was bonded to the car's frame (pinchweld) with urethane adhesive. We use a specialized "cold knife" or an oscillating tool to slice the old urethane down.
- The 1-2mm Rule: We do not remove all the old adhesive. We leave a thin, level layer (approximately 1mm to 2mm thick) of the original factory bond. This serves as the best possible base for the new adhesive to bond to.
- Corrosion Check: We inspect the metal pinchweld for any scratches or rust. If we find any bare metal scratched during the glass breakage, we treat it immediately with a rust-inhibiting primer to prevent future corrosion.
Phase 4: Chemical Preparation and Priming
Adhesion is chemistry. If the surfaces aren't chemically prepped, the glass will leak or detach in an accident.
- Cleaning the Pinchweld: We clean the frame with a specialized contaminate-free cleaner to remove road grime, dirt, and silicone residues.
- Glass Preparation: The new Audi R8 back glass is cleaned with a glass activator. This opens the pores of the glass ceramic band (the black border) to accept the primer.
- Primer Application: We apply a high-quality "black primer" to both the glass frit (the black edge) and any exposed areas of the vehicle frame. This primer acts as a UV shield, protecting the adhesive from sun degradation, and as a bonding agent.
Phase 5: Adhesive Application and Installation
This is the moment of truth where precision is paramount.
- High-Modulus Urethane: For a high-performance vehicle like the R8, we use High-Modulus, Non-Conductive Urethane. High modulus means the adhesive is stiffer, contributing to the vehicle's structural integrity—crucial for a car capable of high speeds and cornering G-forces. Non-conductive properties ensure the adhesive does not interfere with the radio antenna or sensitive electronics.
- The "V" Bead: We apply the urethane in a high-profile "V" shape bead. This shape ensures that when the glass is pressed down, the glue spreads evenly without trapping air bubbles, guaranteeing a watertight seal.
- Setting the Glass: Using specialized suction cups (known as "vacuum lifters"), two technicians (or one using a mechanical setting tool, depending on access) carefully maneuver the glass through the tight confines of the R8's cabin area. The glass is lowered onto the fresh adhesive with millimeter precision.
- Decking the Glass: We gently press the glass to ensure it sits flush with the body panels, replicating the factory wind-noise tolerances.
Phase 6: Reassembly and Electrical Connection
- Defroster Connection: We reconnect the heating element tabs to the vehicle's wiring harness. We test the continuity to ensure the defroster will function correctly in the Canadian winter.
- Trim Reinstallation: All interior trim panels, pillar covers, and engine bay shrouds removed during the process are snapped back into place. We check all clips to ensure a tight, rattle-free fit.
- Final Clean: We perform a final polish of the glass inside and out, ensuring no fingerprints or smudges remain. We do a final vacuum pass to catch any stray dust.
Safe Drive-Away Time (SDAT)
Safety is not negotiable. The urethane adhesive requires time to cure (harden) to a point where it can safely retain the glass in the event of a crash. For the adhesives we use at AlexWindshield, the typical Safe Drive-Away Time is approximately 60 minutes after installation, depending on humidity and temperature. Our technicians will inform you of the exact time your Audi R8 is safe to be driven again.
Why Choose AlexWindshield for your Audi R8?
The Audi R8 is a marvel of German engineering, and it deserves a technician who respects that lineage. Choosing a discount glass shop for a supercar often leads to scratched leather, damaged carbon fiber, leaks, and wind noise. At AlexWindshield, we offer:
- Specialized Expertise: We have extensive experience working on luxury and exotic vehicles, including the Audi R8, Lamborghini Gallardo, and Porsche 911.
- Lifetime Warranty: We stand behind our craftsmanship. Our installations come with a lifetime warranty against leaks, air noise, and manufacturer defects for as long as you own the vehicle.
- OEM Quality Materials: We prioritize the use of OEM (Original Equipment Manufacturer) or OEE (Original Equipment Equivalent) glass to ensure perfect optical clarity and fitment.
- Local GTA Focus: We know the roads of Vaughan, Richmond Hill, and Markham. We know the climate conditions our repairs need to withstand.
Ready to Restore Your View?
Do not compromise on the safety or aesthetics of your Audi R8. If you require a Back Glass Replacement in the Greater Toronto Area, trust the Master Technicians who treat your car with the reverence it deserves.
Contact AlexWindshield today to schedule your mobile service. Let us get your R8 back on the road, looking pristine and structurally sound.


