The 2012-2015 MINI Roadster (R59) is a rare automotive gem—a dedicated two-seater soft-top that perfectly distills the brand's legendary go-kart handling into an exhilarating open-air thrill ride. Its raked windshield, low stance, and manually operated or semi-automatic soft top make it a uniquely engineered vehicle. However, when the heated back glass embedded in that complex convertible top shatters, the thrill of the drive abruptly turns into a logistical nightmare. Convertible back glass replacements require an extraordinary level of precision, a deep understanding of canvas tension, and master-level automotive glass skills. At AlexWindshield, we bring decades of specialized expertise to ensure your R59 is restored to its factory-perfect condition.
Expert Back Glass Replacement for Your 2012-2015 MINI Roadster (R59)
Replacing the rear window on a MINI Roadster is not a standard auto glass job. Unlike traditional hardtop vehicles where the glass sits against a rigid metal pinchweld, the MINI Roadster (R59) back glass is bonded directly to the flexible material and internal frame of the convertible soft top. This requires highly specialized techniques to ensure that the new glass is perfectly aligned, flawlessly sealed against weather intrusion, and fully capable of withstanding the dynamic folding and unfolding processes of the convertible roof.
As a Master Technician, I have seen firsthand the damage caused by inexperienced technicians attempting to service convertible tops. A single slip of a cut-out tool can slice through the expensive canvas, while improper urethane application can lead to catastrophic water leaks that ruin the vehicle's electrical systems. At AlexWindshield, we utilize advanced tools and premium materials specifically tailored for high-tension convertible applications.
Local Mobile Auto Glass Services Across the Greater Toronto Area (GTA)
A shattered back glass leaves your vehicle's interior entirely exposed to the elements, theft, and environmental damage. Driving a vehicle in this condition is not only uncomfortable but highly dangerous due to the risk of flying glass shards. That is why AlexWindshield brings our state-of-the-art auto glass shop directly to you.
We are proud to offer comprehensive, mobile auto glass replacement services across the Greater Toronto Area (GTA). Whether your MINI Roadster is safely parked in your driveway in Vaughan, situated at a commercial office complex in Markham, or stranded at a shopping center in Richmond Hill, our fully equipped mobile service vans will arrive at your location. We provide the same flawless, factory-grade installation on the go as you would receive in a traditional brick-and-mortar facility, saving you the hassle and danger of driving a compromised vehicle.
The Complete A to Z Master Technician Replacement Process
Because the rear window of the MINI Roadster is made of tempered safety glass, it is designed to shatter into thousands of small, blunt cubes upon impact. While this prevents dangerous, jagged shards from injuring passengers, it creates an enormous mess that permeates every inch of the tight two-seater cabin. Here is our meticulous, step-by-step master technician process for completing your MINI R59 back glass replacement.
Step 1: Thorough Preparation and Interior Protection
The very first step is securing the vehicle and protecting the interior. We begin by laying down heavy-duty protective blankets over the R59's sporty leather seats, the center console, and the exterior painted surfaces surrounding the rear decklid. We apply specialized, low-tack protective tape directly to the exterior canvas of the soft top bordering the glass. This tape acts as a shield, ensuring that no old adhesive, new urethane, or chemical primers come into contact with the delicate convertible fabric.
Step 2: Removal of Interior Rear Panels and Extensive Glass Vacuuming
When the back glass of an R59 shatters, the thousands of tempered glass cubes fall directly into the rear parcel shelf, the convertible top storage compartment, and behind the interior trim. To execute a professional replacement, we must carefully remove the rear interior trim panels and retaining clips. This allows us full access to the lower bonding edge of the glass and exposes the hidden crevices where broken glass collects.
Using a high-powered industrial shop vacuum with specialized micro-crevice attachments, we meticulously vacuum all broken glass shards from the vehicle's interior. We vacuum the seats, the floor mats, the hidden soft-top storage basin, and the internal tracking mechanisms. Leaving even a single shard of glass behind can cause tearing in the convertible top when it is folded down, or create annoying rattles while driving. We guarantee a completely glass-free interior before proceeding.
Step 3: Disconnecting Electronics and Removing the Shattered Glass
The MINI Roadster features an integrated rear defroster grid. Before extracting the remaining glass structure, we carefully disconnect the electrical hardwires and wiring harnesses that power the heating element, ensuring the delicate factory connectors are not stressed or snapped. Once the electronics are safely isolated, we address the remaining glass ring.
To safely separate the broken glass and the original adhesive from the soft top frame, we utilize an advanced fiber-line cutting system. Unlike traditional cold knives that can easily slip and slice the convertible canvas, a high-tensile braided wire is carefully threaded through the existing urethane bead. By systematically pulling this wire around the perimeter, we slice through the factory adhesive with surgical precision, allowing us to safely lift away the remaining glass structure without putting any sheer stress on the soft top fabric.
Step 4: Surface Cleaning and Pinchweld Preparation
With the old glass removed, we must prepare the bonding surface. The old polyurethane adhesive bead is carefully trimmed down to a thin, uniform base of approximately 1-2 millimeters. This "close-cut" provides the perfect foundational layer for the new adhesive to bond to. We then rigorously clean the entire perimeter of the convertible frame and the mounting surface using an alcohol-based, lint-free chemical cleaner. Any dust, glass dust, dirt, or moisture left on this surface will severely compromise the integrity of the new seal.
Step 5: Chemical Primer Application
One of the most critical steps in any professional auto glass replacement is the application of the glass and pinchweld primer. We apply a premium, fast-drying black automotive glass primer to any exposed areas of the vehicle frame and to the black ceramic frit band (the black painted border) of the brand-new replacement glass. This primer serves two vital functions: it acts as a chemical bonding agent that allows the urethane to permanently fuse to the glass, and it provides an impenetrable UV shield that prevents sunlight from degrading the adhesive over time.
Step 6: High-Quality Urethane Adhesive Application
For a convertible top like the MINI Roadster R59, standard adhesives are insufficient. We utilize a specialized, High-Modulus, Non-Conductive (HMNC) polyurethane adhesive. This specific high-quality adhesive is designed to cure rapidly and withstand the extreme torsional flexing, stretching, and vibrations that a soft top experiences at high speeds.
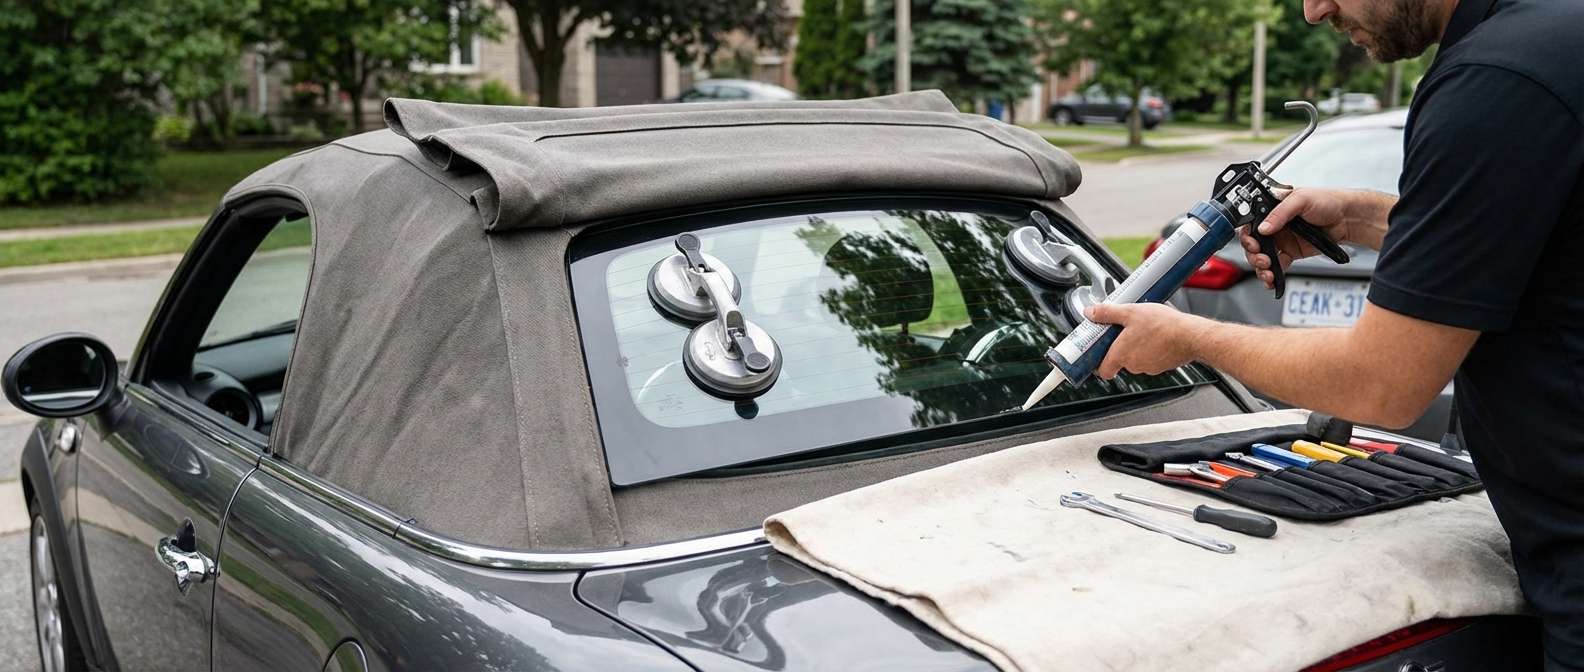
Using an electric caulking gun, the Master Technician extrudes a perfectly uniform, V-shaped bead of urethane around the entire perimeter of the new back glass. The V-shape is crucial, as it ensures that when the glass is pressed into place, the adhesive collapses evenly, eliminating the possibility of air pockets or water leaks.
Step 7: Precision Installation and Alignment
Setting the glass into a convertible top requires absolute perfection. Because the canvas is flexible, there is no margin for error. Using specialized suction cups, two technicians carefully lower the new back glass into the exact factory position. We use precise alignment markings to ensure the glass is perfectly centered. Gentle, even pressure is applied around the edges to compress the urethane bead, creating a watertight, airtight, and structurally sound seal between the glass and the convertible frame.
Step 8: Reconnection, Reassembly, and Quality Assurance
Once the glass is set, we reconnect the rear defroster wiring harnesses and test the electrical continuity to ensure your rear window heater functions flawlessly for the harsh Canadian winters. We then reinstall all the interior rear trim panels, clips, and parcel shelf components that were removed earlier. A final, comprehensive vacuuming is performed, and all protective tapes and blankets are removed.
We clean the new glass inside and out with streak-free automotive glass cleaner, ensuring pristine visibility. Finally, we conduct a rigorous visual inspection and explain the Safe Drive-Away Time (SDAT) to the customer, ensuring the urethane has cured sufficiently before the vehicle hits the road.
Why AlexWindshield is the Top Choice for Your MINI R59
Replacing the back glass on a specialty convertible like the 2012-2015 MINI Roadster requires far more than basic mechanic skills; it requires an artisanal touch and a deep understanding of automotive structural integrity. By choosing us, you are opting for unparalleled craftsmanship, premium OEM-equivalent materials, and the utmost respect for your beloved vehicle.
- Unmatched Expertise: Specialized knowledge in complex convertible auto glass, ensuring your soft top remains perfectly intact and fully functional.
- Convenient Mobile Service: We bring our premium auto glass shop to you, serving the entire GTA, with rapid dispatch to Vaughan, Richmond Hill, and Markham.
- Impeccable Cleanup: Comprehensive removal of all interior trim panels and meticulous vacuuming to ensure zero dangerous glass shards are left behind.
- Premium Materials: We use only industry-leading HMNC urethane and high-quality replacement glass that meets or exceeds all strict safety standards.
Don't trust the intricate soft top of your beloved two-seater to just anyone. Choose the Master Technicians at AlexWindshield for your MINI Roadster R59 back glass replacement. We stand proudly behind our craftsmanship, offering a comprehensive Lifetime Warranty on our workmanship and against any water or air leaks. Contact AlexWindshield today to schedule your mobile appointment and get back to enjoying the open road with complete peace of mind.