Breathing New Life into Your Hatchback: The Ultimate Mazda Mazda2 Back Glass Replacement
The 2011-2014 Mazda Mazda2 is celebrated for its agile handling, sporty subcompact design, and undeniable city-driving charm. As a nimble hatchback, it navigates tight urban streets with ease, but the exact design that makes this vehicle so incredibly practical also leaves its rear window highly exposed. Whether it is due to flying road debris on the highway, a sudden plunge in Canadian winter temperatures, or an unfortunate break-in, a shattered back glass on your Mazda2 brings your daily routine to a screeching halt. Unlike front windshields that simply crack, the rear window is made of tempered safety glass. When compromised, it literally explodes into thousands of tiny, granular pieces, leaving the rear of your cabin completely exposed to the elements.
As a Senior SEO Specialist and Master Technician at AlexWindshield, I have spent years perfecting the art of automotive glass restoration. Replacing the back glass on a 2011-2014 Mazda2 is not just a matter of slapping a new piece of glass into a frame. It requires a meticulous, highly technical approach that involves safely managing shattered glass, dealing with integrated defroster grids, and ensuring a factory-level seal to prevent water leaks and wind noise.
Mobile Auto Glass Expertise Across the Greater Toronto Area (GTA)
Driving a vehicle with a blown-out rear window is not only uncomfortable—it is incredibly dangerous and often illegal due to obstructed visibility. Recognizing this, AlexWindshield offers premium, fully mobile auto glass replacement services directly to your driveway, workplace, or preferred location. You do not need to risk driving your compromised Mazda2 to a shop.
Our fleet of fully equipped mobile service vans spans the entire Greater Toronto Area (GTA). We specifically offer rapid-response Mazda Mazda2 back glass replacement to drivers in Vaughan, Richmond Hill, and Markham. Whether you are parked near a busy commercial plaza in Vaughan, a quiet residential street in Richmond Hill, or an office complex in Markham, our Master Technicians arrive with the exact OEM-quality glass, premium adhesives, and heavy-duty vacuums required to restore your vehicle to its original factory condition.
The Master Technician's Process: Step-by-Step Back Glass Replacement
At AlexWindshield, we pride ourselves on transparency and technical excellence. Replacing a back glass involves a stringent set of procedures. Here is the comprehensive, A-to-Z process our certified technicians follow to guarantee a flawless installation on your 2011-2014 Mazda Mazda2.
Step 1: Thorough Pre-Inspection and Interior Protection
Before any tools are lifted, we conduct a comprehensive pre-installation inspection. We assess the structural integrity of the rear liftgate, checking for any denting or frame damage that could affect the glass seating. Because tempered glass shatters explosively, the first active step is protecting the vehicle's interior. We lay down heavy-duty protective drop cloths over the Mazda2's rear seats, cargo area, and exterior bumper to prevent any scratches to the paint or damage to the upholstery during the repair process.
Step 2: Safe Disassembly and Component Removal
The back glass of a hatchback is a complex assembly. To execute a professional replacement, we must carefully strip down the affected components. Our technicians meticulously remove the rear wiper arm and the exterior wiper motor nut. We then transition to the interior of the liftgate, using specialized trim-removal tools to carefully pop off the interior plastic hatch panels. Removing these door panels is an absolutely mandatory step, as thousands of glass shards inevitably fall down inside the internal cavity of the hatchback door when the rear window shatters. We also carefully disconnect the electrical wiring harnesses connected to the rear defroster grid and the high-mount third brake light.
Step 3: Extensive Glass Shard Extraction and Vacuuming
One of the most critical differences between a windshield and a back glass replacement is the clean-up. Tempered glass granules get everywhere. At AlexWindshield, we do not cut corners. We deploy high-powered industrial shop vacuums to extract every single piece of broken glass. We vacuum the trunk carpet, the folds of the rear seats, the floor mats, and most importantly, the exposed internal cavity of the rear hatch door. Leaving glass inside the door panel results in highly irritating rattling noises every time you drive or close the trunk. We vacuum, agitate the area, and vacuum again until the vehicle is completely free of hazardous glass shards.
Step 4: Old Urethane Removal and Pinch Weld Preparation
Once the glass is cleaned up, we address the vehicle's frame. Using razor-sharp cold knives and specialized auto glass cut-out tools, we trim down the old, hardened urethane adhesive from the rear pinch weld (the metal frame where the glass sits). We trim this old bead down to a precise 1-2 millimeter thickness. This thin layer of original urethane provides an excellent bonding base for the new adhesive. We thoroughly brush away any remaining dirt, dust, and microscopic glass dust from the bonding area using a specialized lint-free prep cloth and an alcohol-based glass cleaner.
Step 5: Precision Primer Application
To guarantee a permanent, waterproof seal, the structural frame must be chemically primed. If any bare metal was exposed on the pinch weld during the cut-out phase, we apply a high-quality, corrosion-resistant black body primer. This prevents future rust formation, which is a major cause of future glass leaks. We also apply a specialized glass primer to the ceramic frit band (the black painted border) of the brand-new Mazda2 rear glass. This chemical primer activates the surface, ensuring the urethane adhesive creates an unbreakable molecular bond with the glass.
Step 6: High-Quality Urethane Adhesive Application
The lifeblood of a safe auto glass installation is the adhesive. We exclusively utilize premium, high-quality urethane adhesive that meets or exceeds original factory safety standards. Using an electric caulking gun equipped with a specialized V-notch nozzle, the technician extrudes a perfectly uniform, continuous bead of urethane around the entire perimeter of the hatch frame. The V-notch shape is critical; as the glass is pressed into place, the peak of the V collapses evenly, eliminating any air pockets that could lead to water leaks or whistling wind noises.
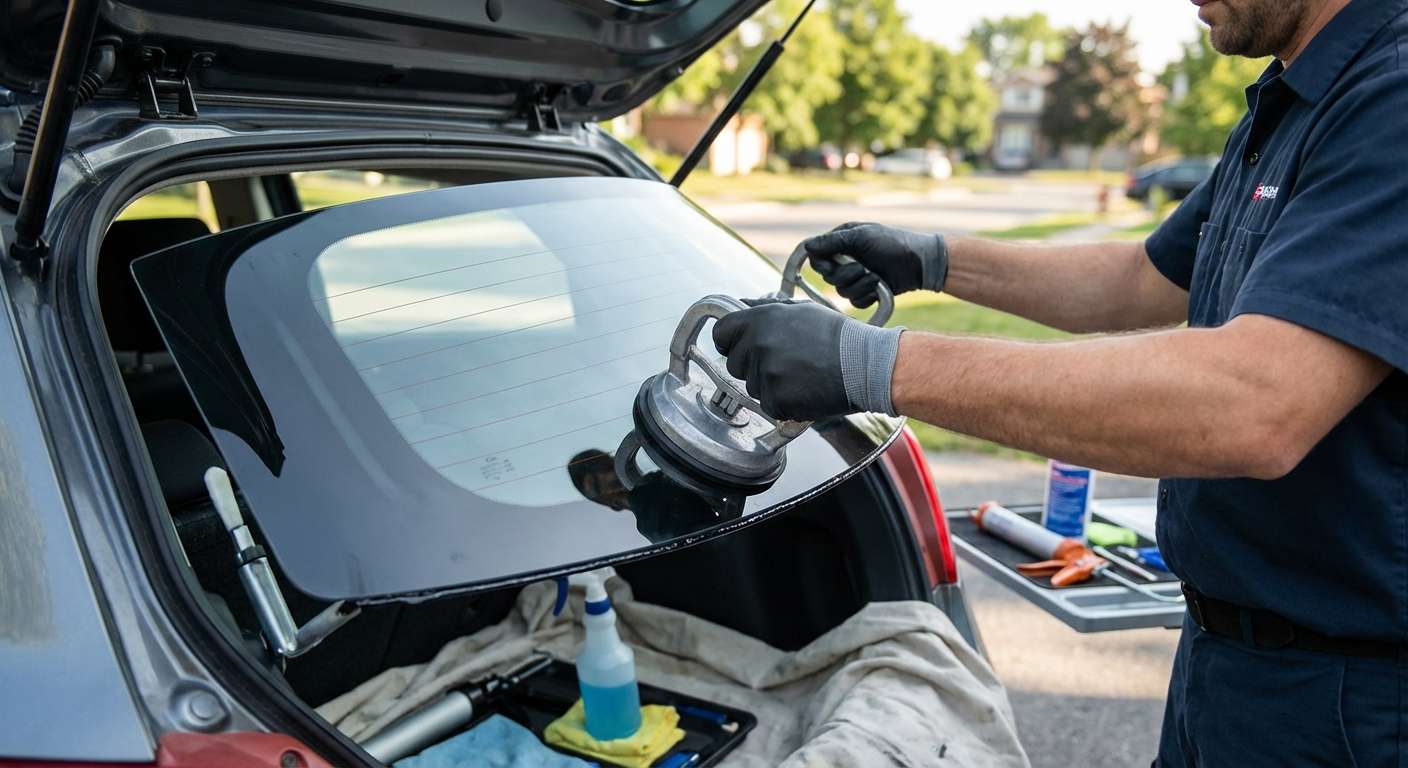
Step 7: Precision Installation of the New Back Glass
With the adhesive laid down, the window of time to install the glass is short due to the fast-curing nature of our premium urethane. Utilizing heavy-duty suction cup grips, the technician carefully lifts the new OEM-quality rear glass. Aligning the glass perfectly with the Mazda2's specific roofline and hatch contours, the glass is gently "decked" (placed) onto the urethane bed. Gentle, even pressure is applied around the perimeter to compress the urethane, ensuring the glass sits at the exact factory depth. Specialized retention tape is applied to the roofline to hold the glass firmly in place while the adhesive begins its initial cure.
Step 8: Reassembly, Reconnection, and Final Testing
Once the glass is securely set, the reassembly process begins. The technician re-installs the interior hatch door panels securely, ensuring all trim clips snap tightly into place. We reconnect the electrical harnesses for the rear defroster grid, ensuring the heating elements have proper continuity to melt away ice and condensation. The rear wiper motor, wiper arm, and blade are reinstalled and calibrated to their correct resting positions. Finally, we conduct a final cleaning of the new glass with ammonia-free cleaner and do a complete walkthrough of the vehicle to ensure the interior is pristine.
Why the Right Glass and Adhesives Matter
For your 2011-2014 Mazda Mazda2, utilizing the right materials is non-negotiable. The hatchback experiences intense vibrations and structural flexing during normal driving. Inferior glues or cheap aftermarket glass can lead to seal failures, meaning water will leak directly into your trunk area, potentially ruining your vehicle's electronics and interior upholstery. By trusting our Master Technicians, you are guaranteed glass that perfectly matches the curvature of your Mazda2, complete with perfectly functioning defroster lines and proper wiper hole alignments.
Post-Installation Care for Your Mazda2
After we complete the installation, our technicians will provide you with specific Safe Drive-Away Time (SDAT) instructions. Thanks to our advanced fast-curing urethane, this wait time is generally very short. However, we advise all our customers in the GTA to observe the following rules for the first 24 to 48 hours:
- Leave the retention tape in place: Do not remove the tape holding the glass for at least 24 hours.
- Avoid high-pressure car washes: Hand wash only, or avoid washing the car entirely for 48 hours to allow the urethane to fully off-gas and cure.
- Keep a window cracked: When closing the doors of your Mazda2, leave a front window rolled down about an inch to prevent air pressure spikes from pushing against the newly installed back glass.
- Avoid slamming doors: Gently close the doors and the rear liftgate to prevent jarring the fresh adhesive seal.
Trust AlexWindshield for Unmatched Quality and Convenience
Dealing with a shattered rear window is stressful, but the repair process doesn't have to be. As the leading local experts in auto glass, AlexWindshield is dedicated to providing superior, stress-free mobile service to drivers throughout the Greater Toronto Area. Whether you are at home in Vaughan, at the office in Richmond Hill, or out shopping in Markham, we bring our cutting-edge auto glass shop directly to you.
We stand firmly behind the craftsmanship of our Master Technicians. That is why every single back glass replacement we perform comes backed by our comprehensive Lifetime Warranty. This warranty protects you against any manufacturing defects, air leaks, or water leaks for as long as you own your Mazda2. Do not let a broken window ruin your week. Contact AlexWindshield today for industry-leading service, OEM-quality auto glass, and the peace of mind that comes from working with true automotive glass professionals.